
Mr. Naraku
Unexpert Bosun
Reconnaissance means discovering as much as we can about a potential target. Merchant vessels tend to travel slower after dark, due to lower visibility. The cabin boy will be given the responsibility of spending the next few nights in the crow’s nest, at the top of the main mast. Hopefully, he won’t fall asleep this time.
Here's the contents:
Domain names and Whois
The WHOIS protocol is documented in RFC 3912. RFC 3912 says that: “WHOIS is a TCP-based transaction-oriented query/response protocol that is widely used to provide information services to Internet users. While originally used to provide "white pages" services and information about registered domain names, current deployments cover a much broader range of information services”.
Whois runs on TCP port 43 and allows you to query distributed databases containing records that hold the association between domain names and their owners. So when we use Whois to search for a domain X, what we are doing is looking for the answer to the question “who is responsible for domain X?”.
Without getting into the details of how DNS works, (perhaps we’ll discuss that in another post), we know each Top Level Domain is managed by a registry/administrator. For example, Verisign is administrator for .com. So registries maintain the authoritative database that contains information about all registered domain names within their TLD. We call “registrant” someone who purchases a domain. To purchase the domain, the registrant has to go through a “registrar” (e.g., GoDaddy), which is just an organization accredited by the Internet Corporation for Assigned Names and Numbers (ICANN) to sell domains to people. The registrar will have an agreement in place with the registry to send in domain updates and abide by their policies. In the interaction between registrant and registrar, the latter will collect contact details for the owner and technical operator of the site. Registrars are then generally required by ICANN to make that information available via Whois service. Such data includes the name, address, email address, and phone number of the domain registrant, administrative contact, and technical contact.
Ok cool but, what do we look for in the Whois output? Our goal is to find about:
- the people associated with these domains,
- the related domains,
- the Domain Name Servers used to resolve target domain names,
- the target's IP addresses.

Illustration of a crow's nest
So let us begin. If you are using a UNIX shell, then you can simply write:
whois -h [WHOIS_SERVER] [DOMAIN_NAME]
The -h option tells the whois client to use a specific whois server to fetch information. If no details are provided about which server to use, the whois client will use a default server, which depends on the specific whois client implementation. For instance, if your Linux distro is using jwhois program, then you’ll find the default server configuration in /etc/jwhois.conf. Such configuration file tells the client which whois server (name) to consider for the query, depending on the TLD of the searched domain.
As a general rule, when we are not sure about what whois server to query for the specific domain name, we start by querying the whois server of the TLD associated to it. Now two things can happen:
- Some TLDs use a so called “thick” data model, meaning the server will store all the records and does not rely on registrars’ databases. (e.g., the .org TLD)
- Other TLDs use a “thin” data model, meaning they may only include a reference to the whois server of the appropriate registrar. (e.g., the .com TLD)
In practice this doesn’t concern us much. But for the sake of clarifying what the hell “thick” and “thin” data models are, let’s see an example. I know the Whois server for .com TLD is whois.verisign-grs.com. So let’s say I want to search for Whois data of the “lofigirl.com” domain. I would do as follows:
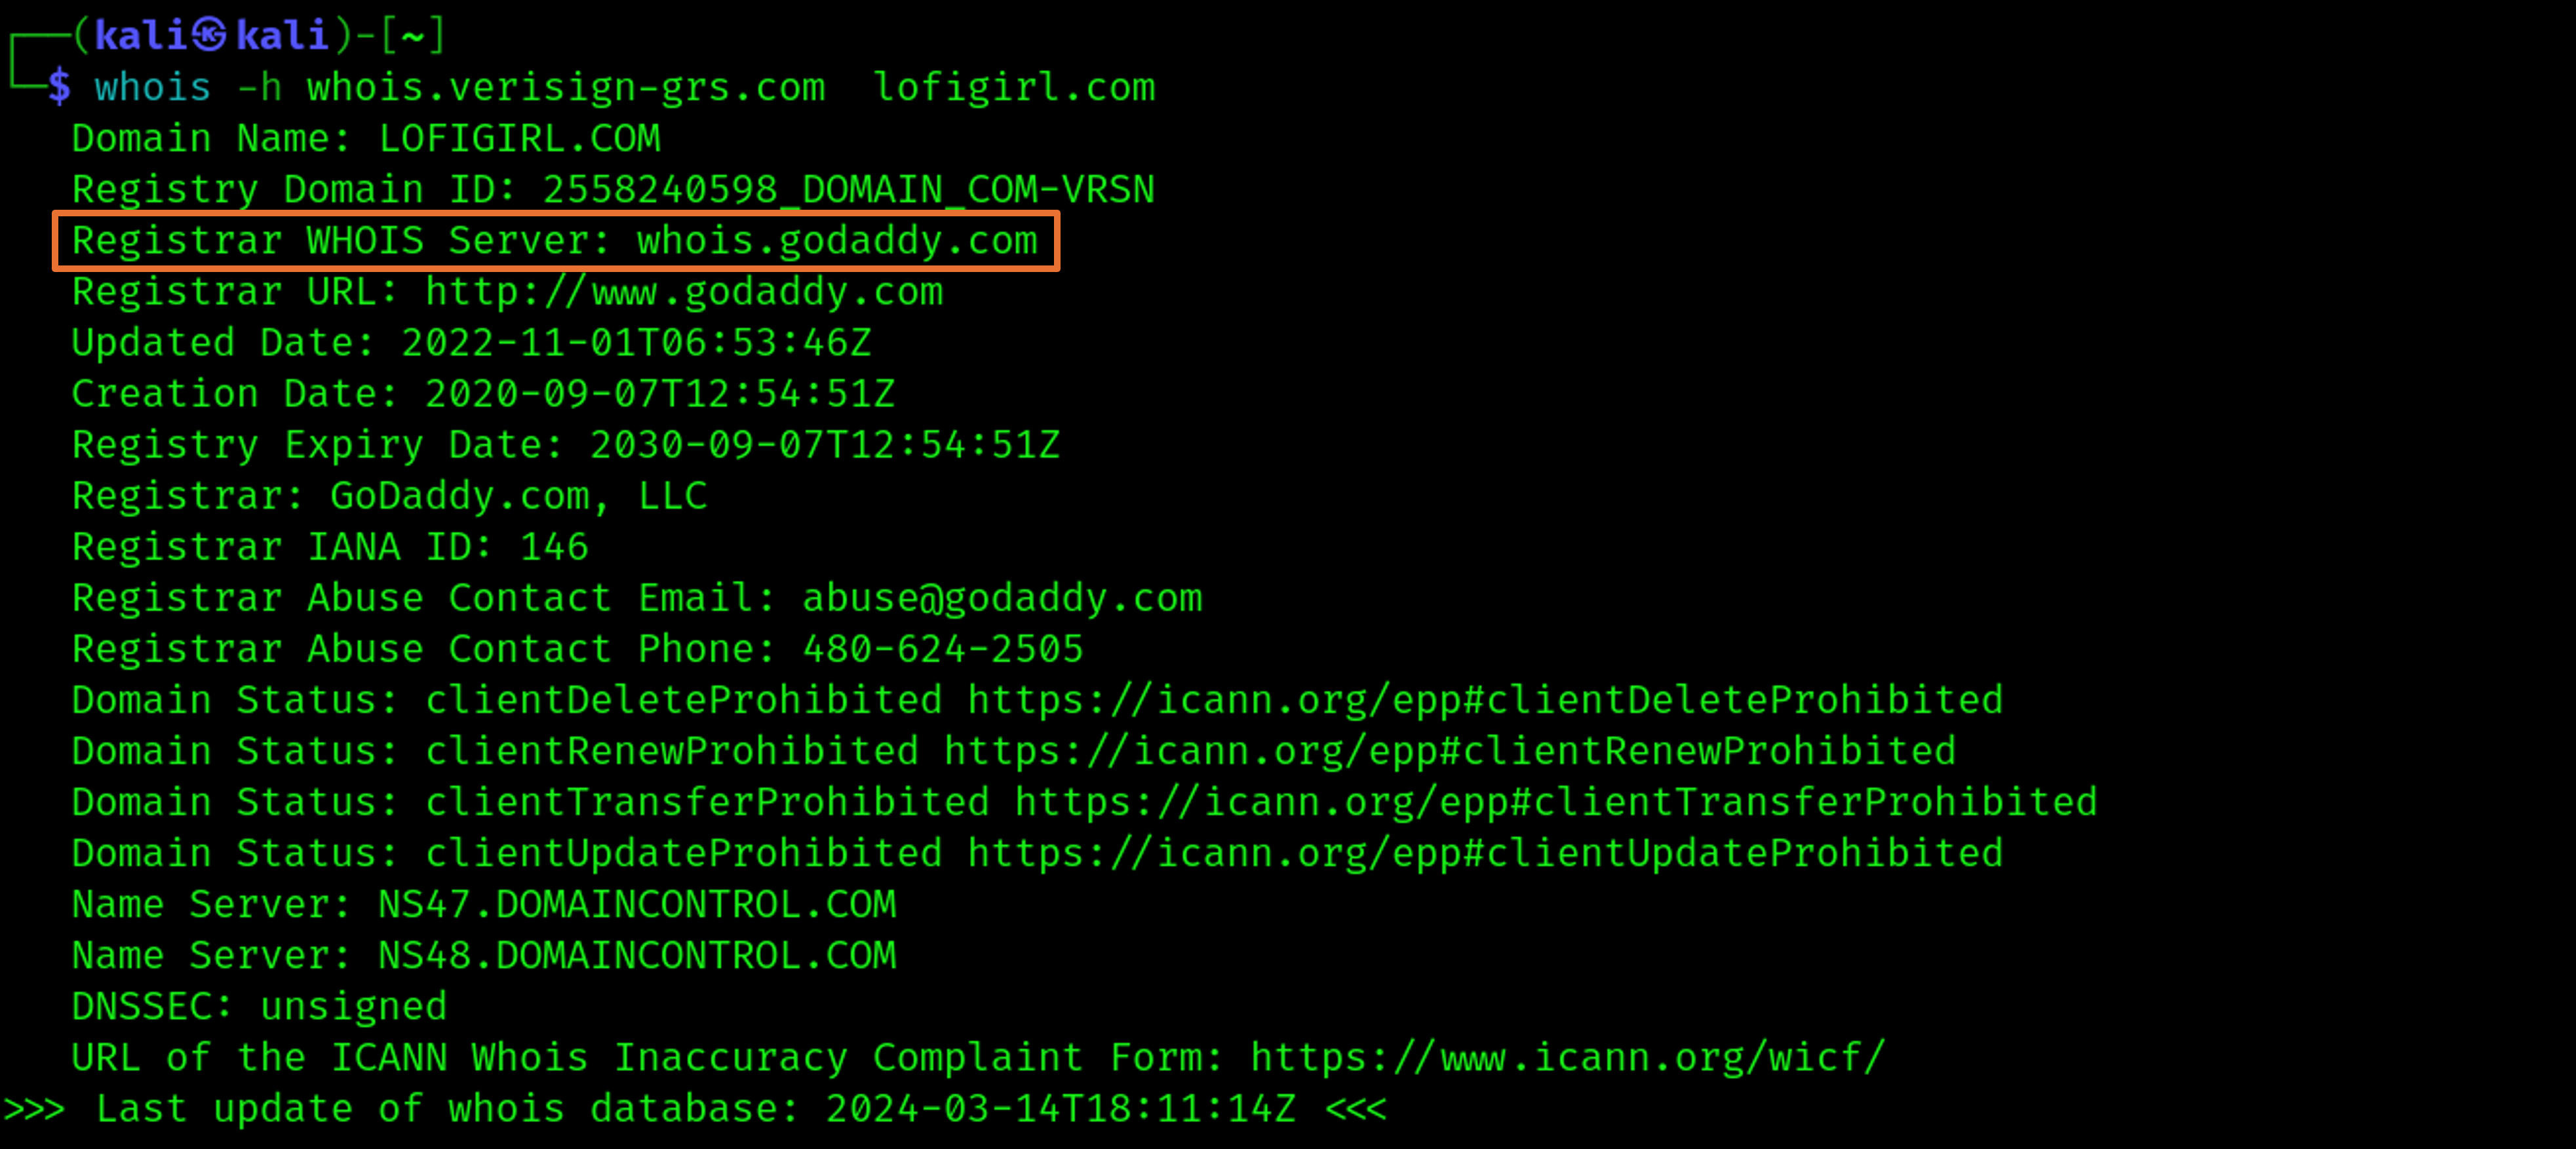
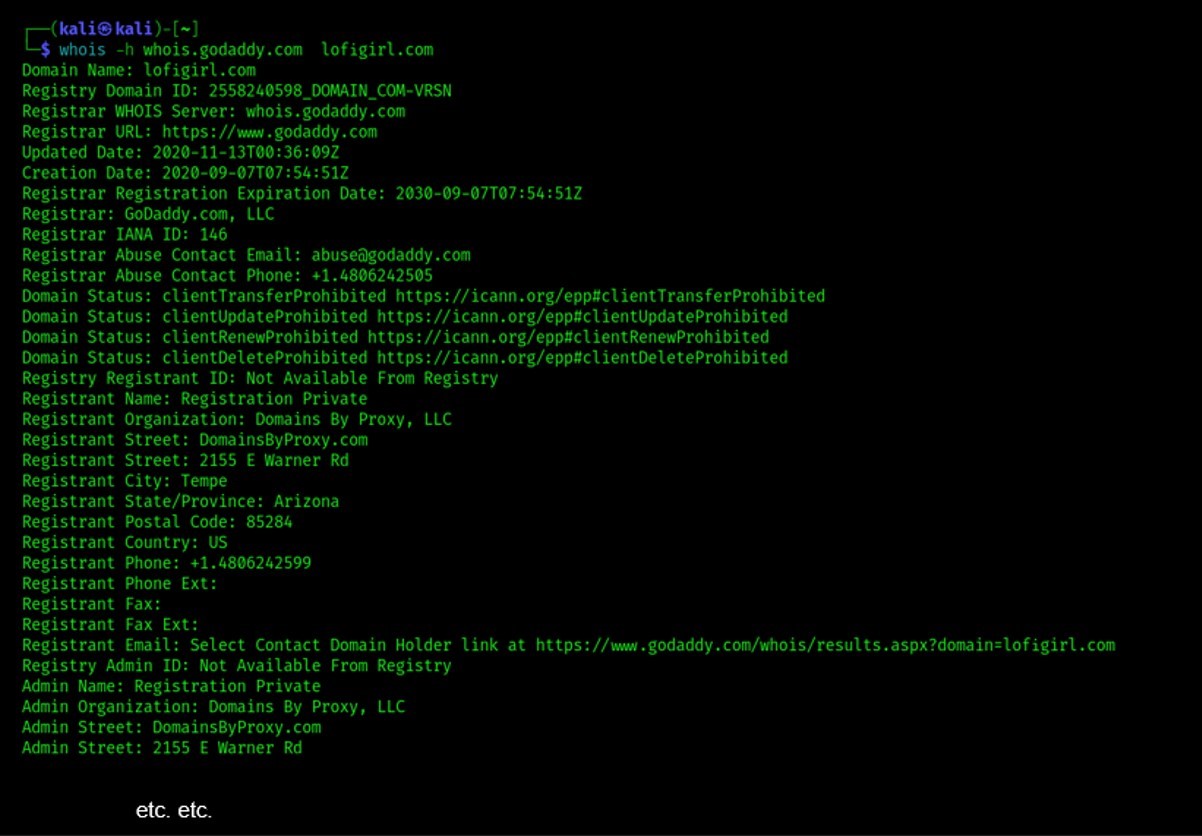
As you can see, being .com a thin data model, we only obtain information that is referred to the registrar of lofigirl.com (godaddy), and not to lofigirl.com directly. Which means that, if we want to obtain the whois query results for lofigirl.com, we now have to run the whois command again using the Whois server of the registrar. Like so:
whois -h whois.godaddy.com lofigirl.com
Now we obtain much more information. If we did the same with some .org domain (i.e., with a thick data model), then we would have found the right information directly in the output of the first query, without need to run whois again on the registrar Whois server.
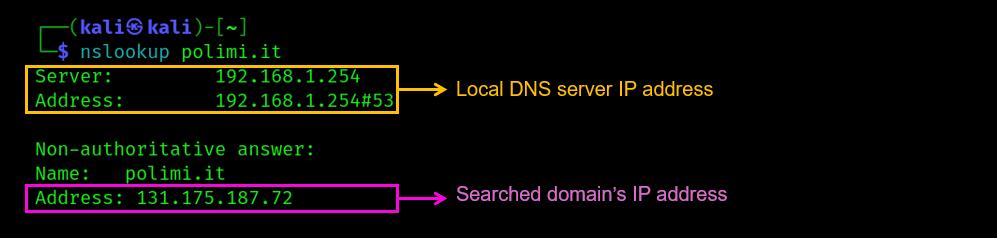
Let’s start looking at a simple example: we run whois for the domain polimi.it.
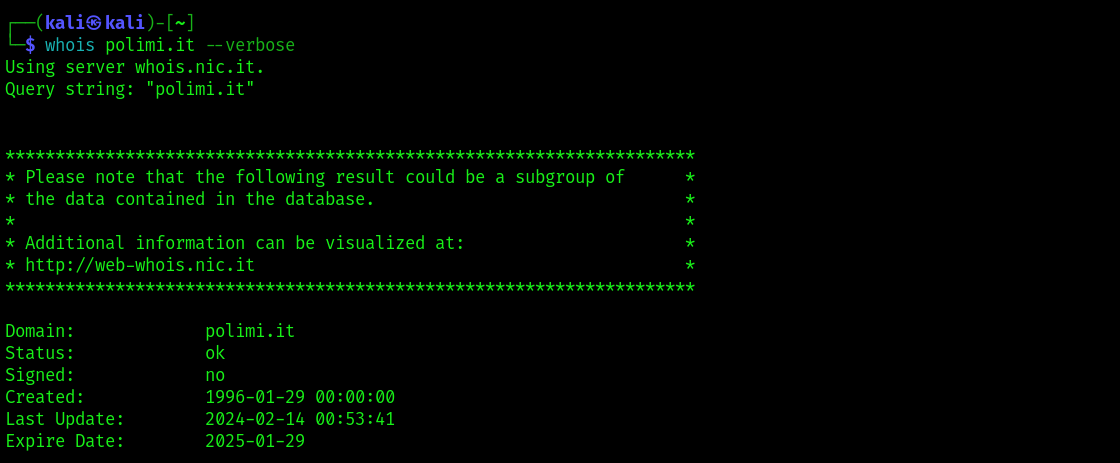
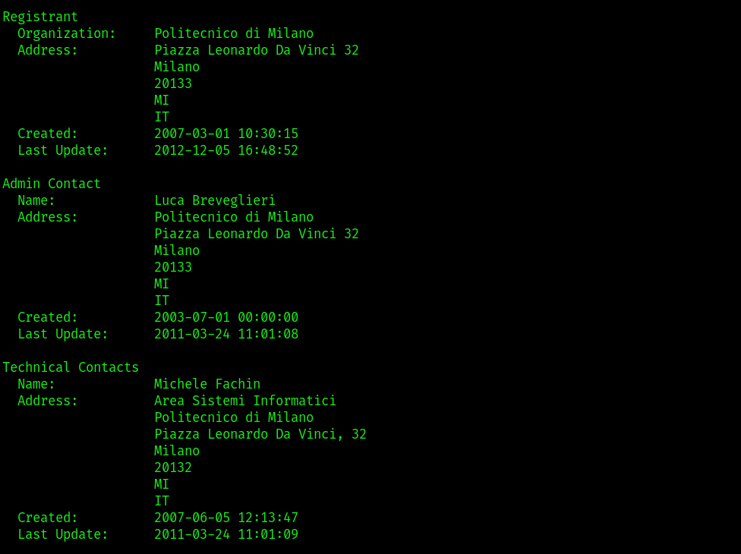
By running the query with the -- verbose option we get to know the specific whois server name. In the first section of the output we have some information about the domain, nothing particularly interesting for us. Next, we have data about the registrant (i.e., the entity owning the domain name) and some data related to the administrator as well as to the individual responsible for the technical aspects of the domain infrastructure. Normally we’d expect to have some contact data, but – depending on the privacy policies applied by the registrar or registry – that might not be the case. Here, we don’t have that info.
Finally, the last part of the output is:
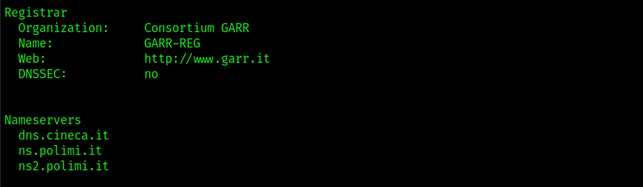
What we care about here is the nameservers for the searched domain. These are the DNS authoritative servers responsible for answering DNS queries about the domain, and they will come to our use later on. For example, when you surf to www.polimi.it, your browser (or a recursive local DNS server on its behalf) is going to query these nameservers to resolve the IP address of the organization webserver for fetching the webpage.
Note that if you don’t want to use the whois command, there are several web-based tools that allow you to query whois databases, such as:
- www.internic.net (Internet Network Information Center, “interNIC”)
- www.who.is (this one works for IP address searches too)
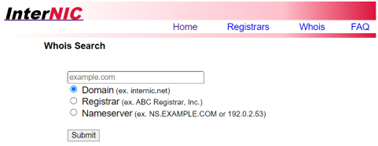
interNIC
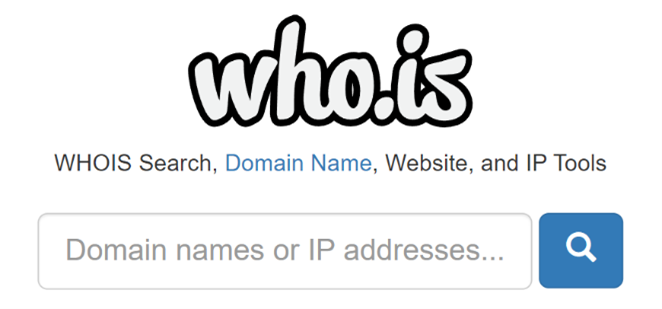
Who.is
Regional Internet Registries
Something else we want to do during recon is to determine the IP address blocks that are assigned to the target organization. For that, we can try to surf to the websites of Regional Internet Registries (RIRs). Cutting it short, the internet is divided into big chunks called Autonomous Systems (AS), each being a collection of IP networks and routers under the control of one or more network operators that have a common routing policy. AS communicate with each other through interconnection points (big routers) exchanging routing data through BGP (Border Gateway Protocol). AS are assigned unique identifiers known as Autonomous System Numbers (ASNs) by regional internet registries (RIRs) . If we imagine AS to be cities (with their addresses, roads, roundabouts, etc.), RIRs are like larger regional authorities that oversee the allocation of land and construction of infrastructures for their respective cities.
Through the RIR website, a user can provide a company name or domain name and retrieve official address assignments, including IPv4 and IPv6 addresses. Most records also include the CIDR (Classless Inter-Domain Routing) block, telling us the size of the target network. Consider though that not all organizations have an IP address block assigned to them. Some get IP addresses from their ISP. So there’s a discrete possibility our RIR searches are not going to be that useful.
Anyways, the main RIRs are:
- The American Registry for Internet Numbers (ARIN) for North America.
- The Reseaux IP Europeans Network Coordination Centre (RIPE NCC) for Europe, the Middle East, and parts of Central Asia.
- The Asia Pacific Network Information Centre (APNIC) for the Asia Pacific region.
- The Latin American and Caribbean Internet Address Registry (LACNIC) for Latin America.
- The AfriNIC for Africa.
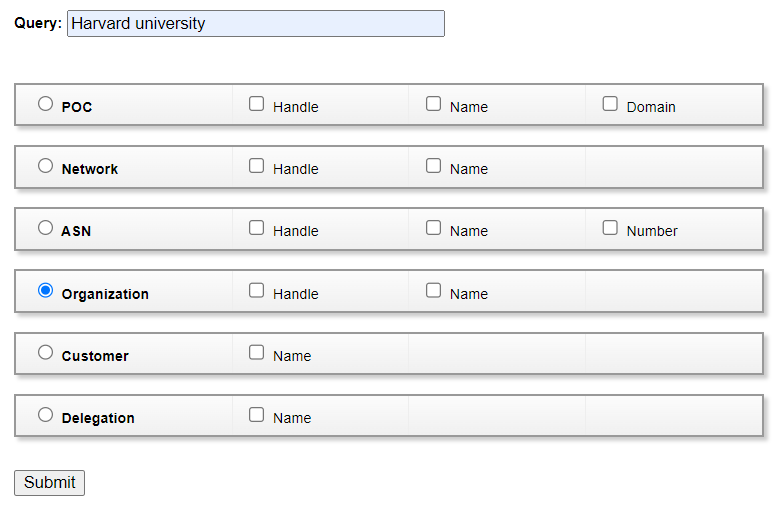
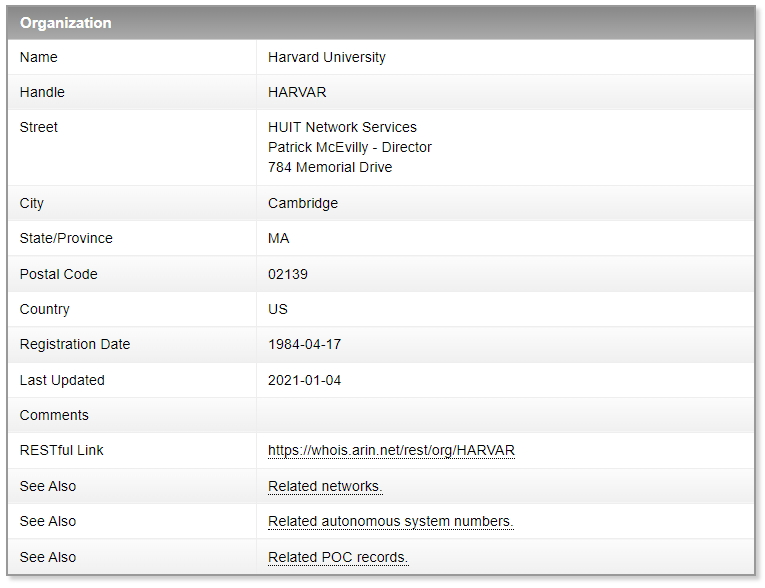
For example, we can go to ARIN and in the advanced Whois search we query for organization names, like this:
This is what we obtain after selecting the organization:
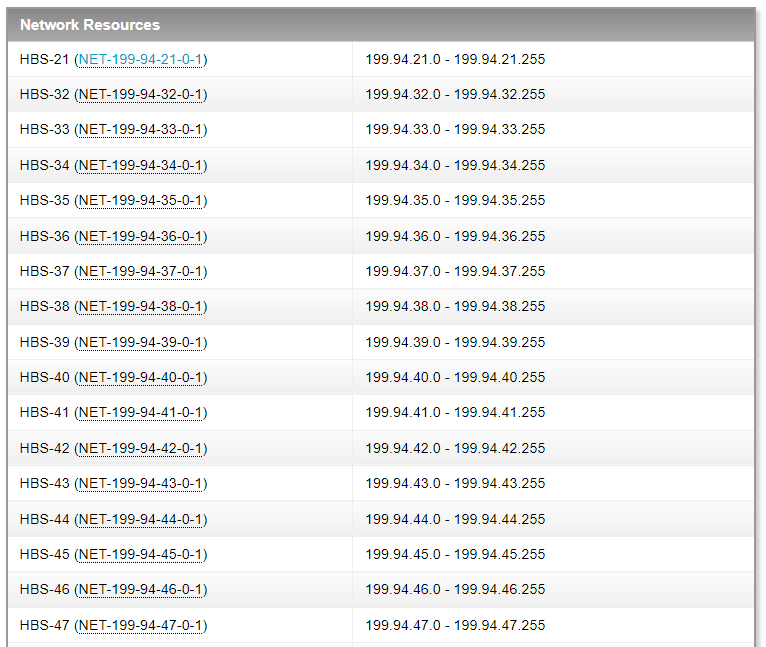
Then we could go for “Related networks” and obtain a list of all the networks’ addresses associated to the organization:
Or we could explore the POC (points of contact) for the organization’s NOC and find…

Pretty informative hm? This way one can get names and surnames and mobile/office phone numbers, as well as email addresses. Cool beans!

Creed Bratton
DNS and nslookup
Previously we retrieved a list of DNS servers (primary, secondary, and tertiary, if it exists) associated with the target from our Whois lookups. Now we want to query those servers to gain a list of potential target machines associated with the given target domain(s). So let us try to harvest records from those name servers. Records will provide the association between domain names and IP addresses together with some more useful information (e.g., which machine is a mail server for the domain).
To query DNS servers, we use the nslookup command (available in Windows and Linux). Nslookup can be used in two ways. First, we could simply type nslookup followed by the domain name that we are interested in.
nslookup [DOMAIN_NAME]
The nslookup command sends a query to the local DNS server specified in your system's configuration (for example, the one whose IP address you have received from the DHCP server). This query asks for information related to the domain name you provided. The local DNS server – being recursive – turns around and starts asking the various authoritative ones, hence resolving the IP address associated to the searched domain name.
Alternatively, we could use nslookup in interactive mode, by running “nslookup” by itself. At this point, we can instruct nslookup to use a different DNS server, by using this syntax:
                        nslookup

                        >

                        > server [CHOSEN_DNS]
The [CHOSEN_DNS] here can be the IP address or the name of the server we choose. This allows you to temporarily override the default DNS server configured on your system and use a different DNS server for your queries. Notice that, after closing the nslookup session, the OS goes back to the initial default local DNS server.
At this point, we could try to request a zone transfer (i.e., obtain all the records for a certain target domain) from the chosen server, using the following (“ls” = list, “d” = domain):
>ls -d [TARGET_DOMAIN]
Sadly, this is most certainly not going to work. In fact, for security reasons, most DNS servers restrict zone transfers to authorized servers only, in order to prevent unauthorized access to DNS data. This is simply achieved through firewall rules.
Another trick we could try to do with nslookup is “cache-snooping”, which means trying to check what FQDN are saved in the current cache of a target recursive DNS server. The idea is simple. By default, nslookup will send DNS messages with the Recursion Bit (RD) set to 1 in the header, and as RFC 1035 states,“If RD is set, it directs the name server to pursue the query recursively”. So to say it in more simpler terms, nslookup will by default ask for recursion from the name servers it queries. If we want to set the RD bit to 0 and prevent the DNS server to act recursively, we use > set norecurse. No recursion means that the recursive DNS server we are querying might answer us in one of two ways:
- It gives us the DNS resource records, hence telling us that those records are cached and the corresponding FQDN were resolved in the past cache lifetime (usually the past 24 hours).
- It tells us no records are found, leading us to the opposite conclusion.
So… how would one do cache-snooping with nslookup? First we set the DNS server to be the target recursive DNS server. Then we set the RD bit to 0 (i.e., “please, no recursion”). Finally we query the target server for a specific domain X. That’s it.
Unfortunately, once again, I am pretty sure this is mostly unfeasible nowadays due to security configurations of DNS servers. If you test this technique with your own local DNS, it might return SERVFAIL error. Mine does. You can try to do the same with dig, but it’ll give the same error. I don’t know… there’s some room for further investigation here.
dig +norecurse @[TARGET_DNS_SERVER] [DOMAIN_NAME]
An interesting fact here is that, regardless of what utility we use for cache-snooping, the process always involves a “trial and error” dynamic. In other words, we can only interrogate the recursive DNS servers asking them “do you have this in your cache?” and the answer will always be “yes” or “no”. We can’t ask them “give me everything you have in your cache”. To make this process faster, one could come up with an extensive list of FQDN whose presence in a cache we want to check, and then iterate the no-recursive queries. You can find more details about this HERE.
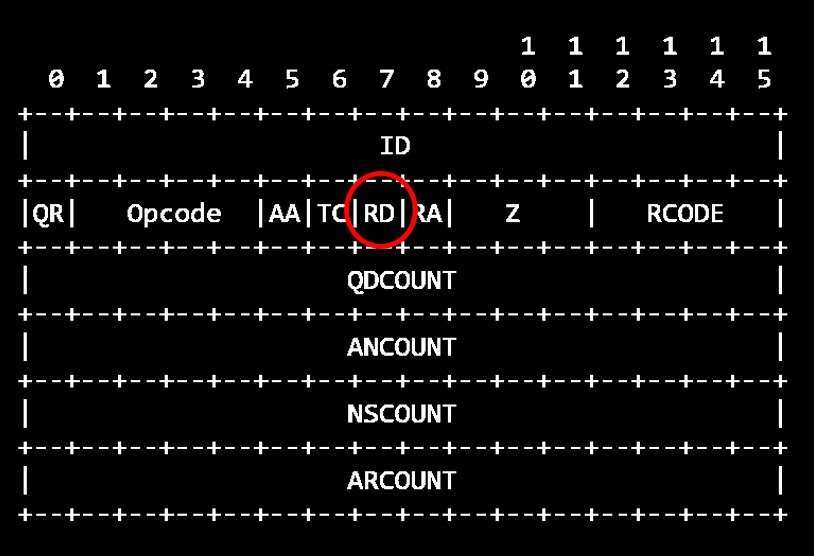
DNS message header
Resource Records digging
As we’ve seen above, we can use the dig utility for various kinds of DNS research, including zone transfers. So now that we used whois to determine the nameserver associated with the target domain X, let’s retrieve all X’s records. Dig uses the following syntax:
dig @[SERVER_TO_QUERY] [DOMAIN_NAME] [TYPE]
For demonstration purposes, we run whois on uni-tuebingen.de and we find the primary DNS server for the domain, then we use dig on that server looking for any record:
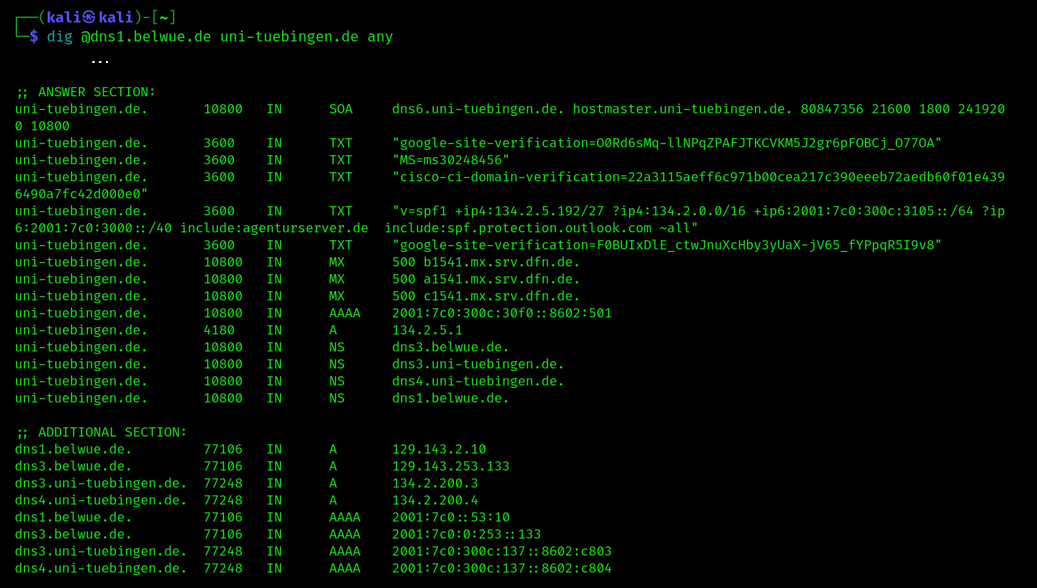
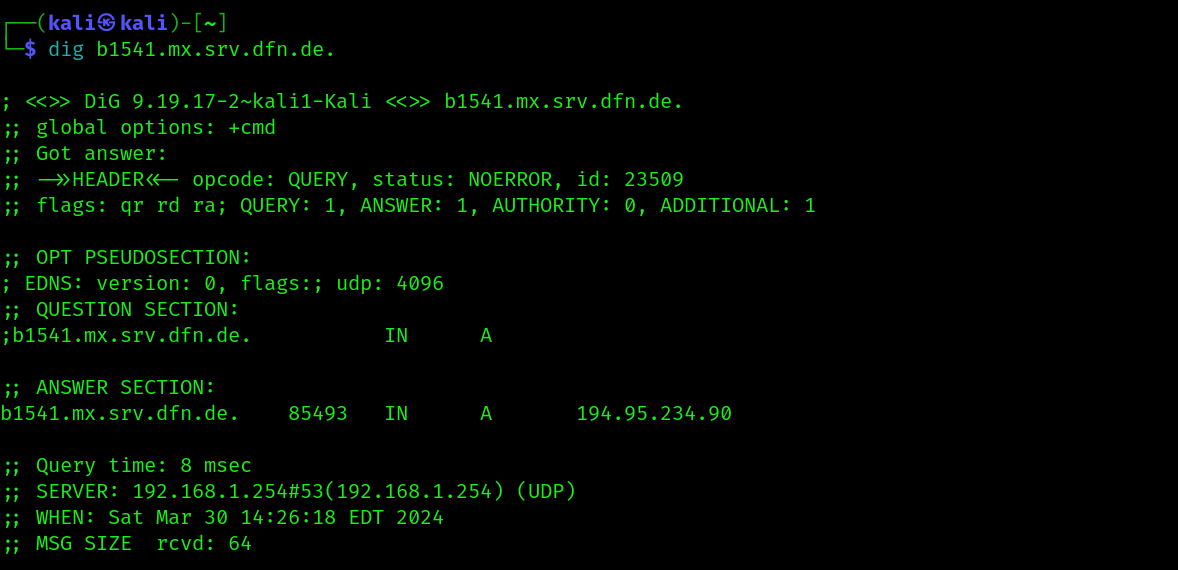
At this point we could utilize the obtained names to find the IP addresses associated to, for instance, the Mail Exchanger (MX) server of the target organization. This can be simply accomplished through another dig search on the name of the MX server.
Note that the Mail Exchanger (MX) record is used to define the hosts where mail for a domain should be sent. Such records can point to any host, inside or outside the domain—as long as that host is set up to receive mail for that domain.
Another useful tidbit obtained from querying any resource record is to be found in the TXT record about SPF (Sender Policy Framework) email authentication protocol. This one:

When an email is sent from the domain implementing SPF (here is uni-tuebingen.de) the recipient mail server will look at the header of the email (in the “From” field) and find that same domain name. Next, it will query that domain’s authoritative DNS server to retrieve the domain’s SPF TXT record. Such record (shown in the picture above) basically contains a list of IP addresses and names indicating the sending email servers to be trusted and the ones not to be trusted. Details about this stuff can be found in here.
Here, we know that the SPF record is telling the recipient server to trust emails from uni-tuebingen.de if they are sent by mail servers in the IPv4 address range 134.2.5.192/27. The “+” means that emails coming from these addresses “pass” the SPF check. Same is true for the IPv6 addresses in the range 2001:7c0:300c:3105::/64. The “?” indicates neutrality, meaning that emails coming from these addresses do not fail nor pass the SPF check (ranges 134.2.0.0/16 and 2001:7c0:3000::/40). The “-“ would indicate the addresses not to trust, causing the emails to fail the SPF check. Here there are none. Then there are some names following the “include” parameter, telling the recipient mail server to reference the SPF TXT records related to them. Finally, there’s the “~all” parameter, indicating a so-called “Softfail” policy. This is the equivalent of telling the recipient mail server “if the emails fails the SPF check, don’t discard right away but flag it instead and handle it with caution”. All this information is publicly available and results very useful to potential attackers. The most obvious thing one could think of is to send spoofed emails from within the IP address ranges allowed by the SPF policies, to increase the likelihood of successful delivery while avoiding spam detection.
DNS reverse lookups
Even if we are used to think of DNS only in the process of “forward lookup”, there can be “reverse lookup” too. In forward lookups we have a FQDN and we want to search the corresponding IP address (and to do this, we search for A and AAAA records, holding this information). In backward lookups we do the opposite. We have an IP address and we want to search for the corresponding FQDN, using the PTR records. Such reverse DNS query is performed with the -x option in dig. Like this:
dig -x [IP_ADDRESS]
<<<<<<< HEAD
For instance, we could focus on the IP addresses shown by the SPF TXT record and run dig -x manually on each. Since this can be a pretty time-consuming task, many tools exist that allow you to automate this process. Among them, there is recon-ng.
=======The idea is quite simple. The previous explorations have allowed us to gather blocks of IP addresses that we know are assigned to the organization. We can iteratively run a reverse lookup searching for hostnames associated to those addresses. This might help us in getting to know more about the target’s architecture.
For instance, we could focus on the IP addresses shown by the SPF TXT record and run dig -x manually on each. Since this can be a pretty time-consuming task, many tools exist that allow you to automate this process. Among them, there is recon-ng.
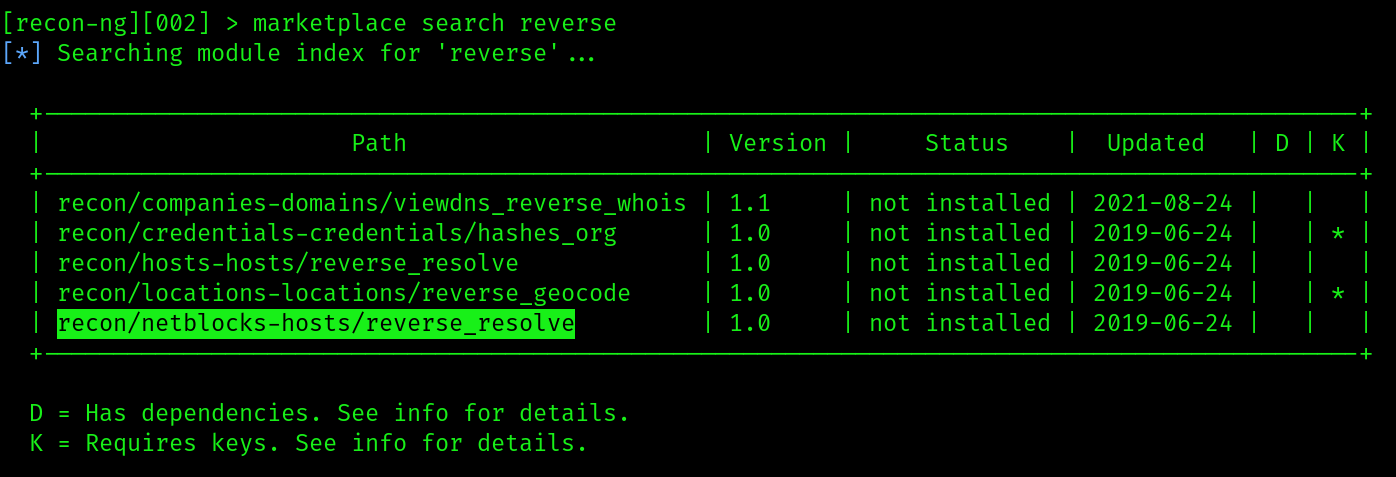
So, first we need to run recon-ng as sudo. Now we search the recon-ng marketplace for “recon/netblocks-hosts/reverse_resolve”, aka the Recon-ng module for the reverse queries..
sudo recon-ng
marketplace search reverse
Then we install the module with marketplace install recon/netblocks-hosts/reverse_resolve and load it with modules load recon/netblocks-hosts/reverse_resolve .
[recon-ng][default] > marketplace install recon/netblocks-hosts/reverse_resolve
[recon-ng][default] > modules load recon/netblocks-hosts/reverse_resolve
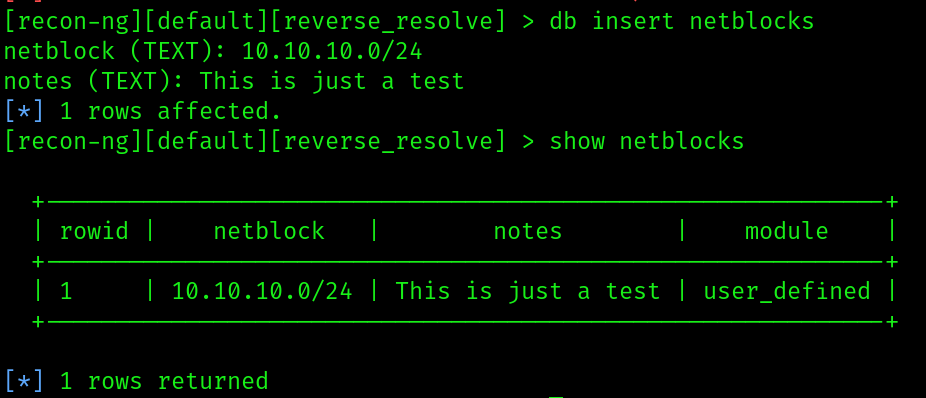
Then we insert a netblock - the set of addresses for which we want to run the reverse lookup - in our recon-ng database, like below... (In the image I added some random netblock just for showing how the process works).
[recon-ng][default][reverse_resolve] > db insert netblocks
If we run “info”, then we obtain some details about the module. Here we are told that if we leave the source as default, recon-ng will reverse resolve the addresses we inserted in the netblocks database.
[recon-ng][default][reverse_resolve] > info

At this point, we just run the module with run and we'll see what the tool finds out.
[recon-ng][default][reverse_resolve] > run
A good question is: what netblocks do we use? I’d say all the ones we know belong to the target organization. In the previous steps we discussed the contents of a SPF TXT record that shows ranges of IP addresses whose sent emails are going to pass the SPF check. Let’s start with those. We have “134.2.5.197/27”, which means the range of addresses going from 134.2.5.192 to 134.2.5.223”. That’ll be our first netblock.
Now I am not going to run recon-ng on the ip addresses of some legitimate organization here, because it doesn’t really make sense. So just to demonstrate what sort of output we could expect, we only try once or twice with dig -x [IP_ADDRESS] and obtain the corresponding PTR records. I gathered the results below.

As you can see, there’s a lot to consider here, especially when trying to map the target infrastructure, its topology and what services are running on it.
Just as a curiosity, PTR records are stored in special zone files called in-addr.arpa zone files. As you may have noticed, the in-addr.arpa zone files are named using the IP block in reverse followed by in-addr.arpa. So 134.2.5.194 is indexed as 194.5.2.134.
Note that if we do all this with the reverse_resolve module, recon-ng will automatically saved all the discovered IP address – name associations into a database called hosts, which we can then view using “show hosts”.
>>>>>>> bd73748db8f21caf2bdcdd6def6b5b0c416b3a3d
👽 Related links 👽
If you wanna know more about this stuff, these may be useful resources to begin with.
Request for Comments: 1035
DOMAIN NAMES - IMPLEMENTATION AND SPECIFICATION
nslookup
Linux Man Pages
dig
Linux Man Pages