
Mr. Naraku
Unexpert Bosun
This post will be a quick one, although it represents the result of long and particularly painful moments spent coursing at GNS3. Our objective is to begin setting up a security lab hosting whatever network appliances we need, along with a Kali Linux machine (i.e., our analysis station) to be used for testing. Let us all try to keep calm and not rock the damn boat.
Here's the contents:
Home lab topology and tools
The following is just an example of configuring and setting up a security home lab in GNS3, using VirtualBox as hypervisor.
Disclaimer 1: The topology we will deploy is simple: a router, a switch, and two virtual machines (Ubuntu Server and Kali Linux). If you were expecting more complexity, this post may not be for you. I am no expert of GNS3. Truth is, I am writing this stuff mostly for myself, as a reference in case of future necessities.
Disclaimer 2: The home lab won't be connected to the internet. This is something that we want. In fact, we want to control the network completely, without having to worry about the security concerns arising from using it. It should be quite obvious that running a virtualized network containing intentionally vulnerable machines on your personal computer will automatically turn the latter into an easy target. And since we are the only ones that want to fuck around with the vulnerabilities, we should use the whole lab while our platform is completely isolated. I know what you are thinking. "Oh but, what if I need to download tools that do not come preinstalled in my Kali machine?". Don't worry. You'll just need to (1) temporarily change the configurations of the hypervisor to allow the Kali VM to connect to the internet, (2) download whatever you need to, (3) reset the hypervisor configurations. I'll show this later.
Anyways, let's cut the rambling. Disconnect your device from the network, open GNS3 and VirtualBox and let's begin.

Picture of Russel Brand from Eric Andre show
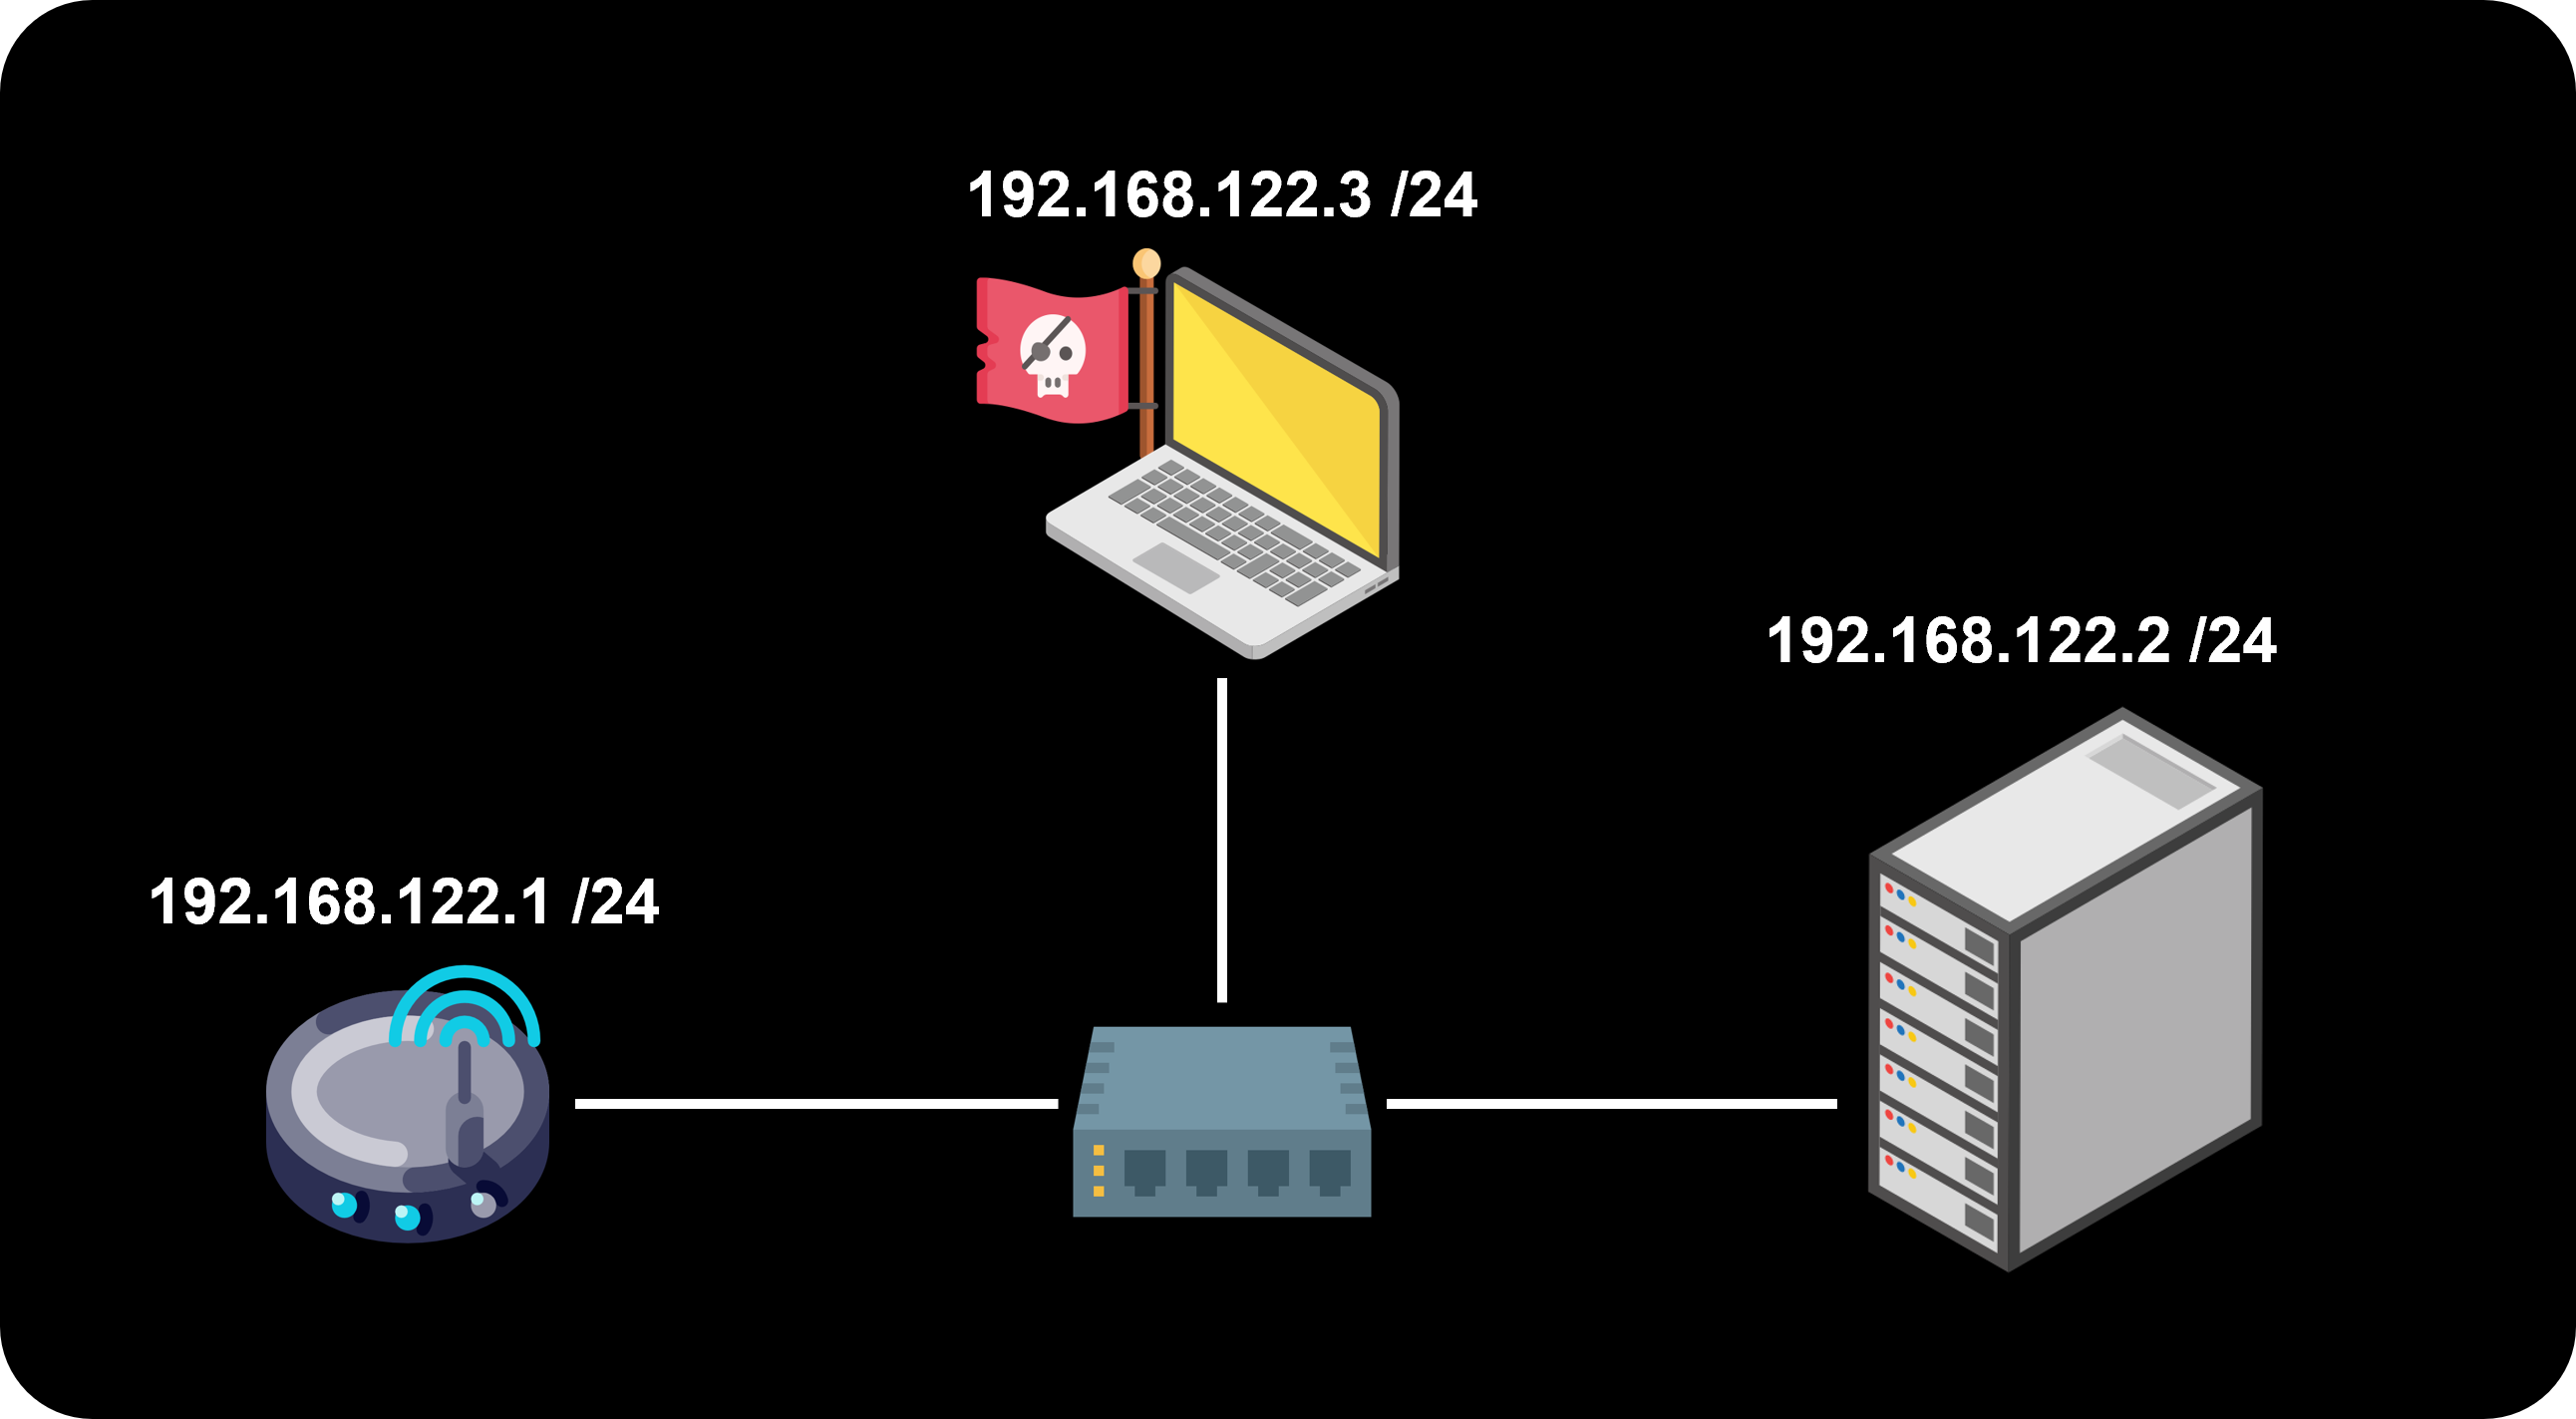
Our network nodes are:
- The router. The router we are going to use is a Cisco 7200. You can download the appliance from the gns3 website, here. I am not going to discuss how to import it into GNS3, you can find various tutorials online dealing with that. The router interface local IP address will be 192.168.122.1/24.
- The switch. The switch is a simple Ethernet switch. The appliance is present in GNS3 by default.
- Kali Linux. Kali Linux OS obtained as pre-built Virtual Machines from kali.org, here. This machine will be our analysis and testing station, and it'll have the address 192.168.122.3/24.
- Ubuntu Server. Ubuntu Server, which you can get from here. The server will have IP address 192.168.122.2/24
The figure below depicts a scheme of the topology we are going to implement.
Router and switch
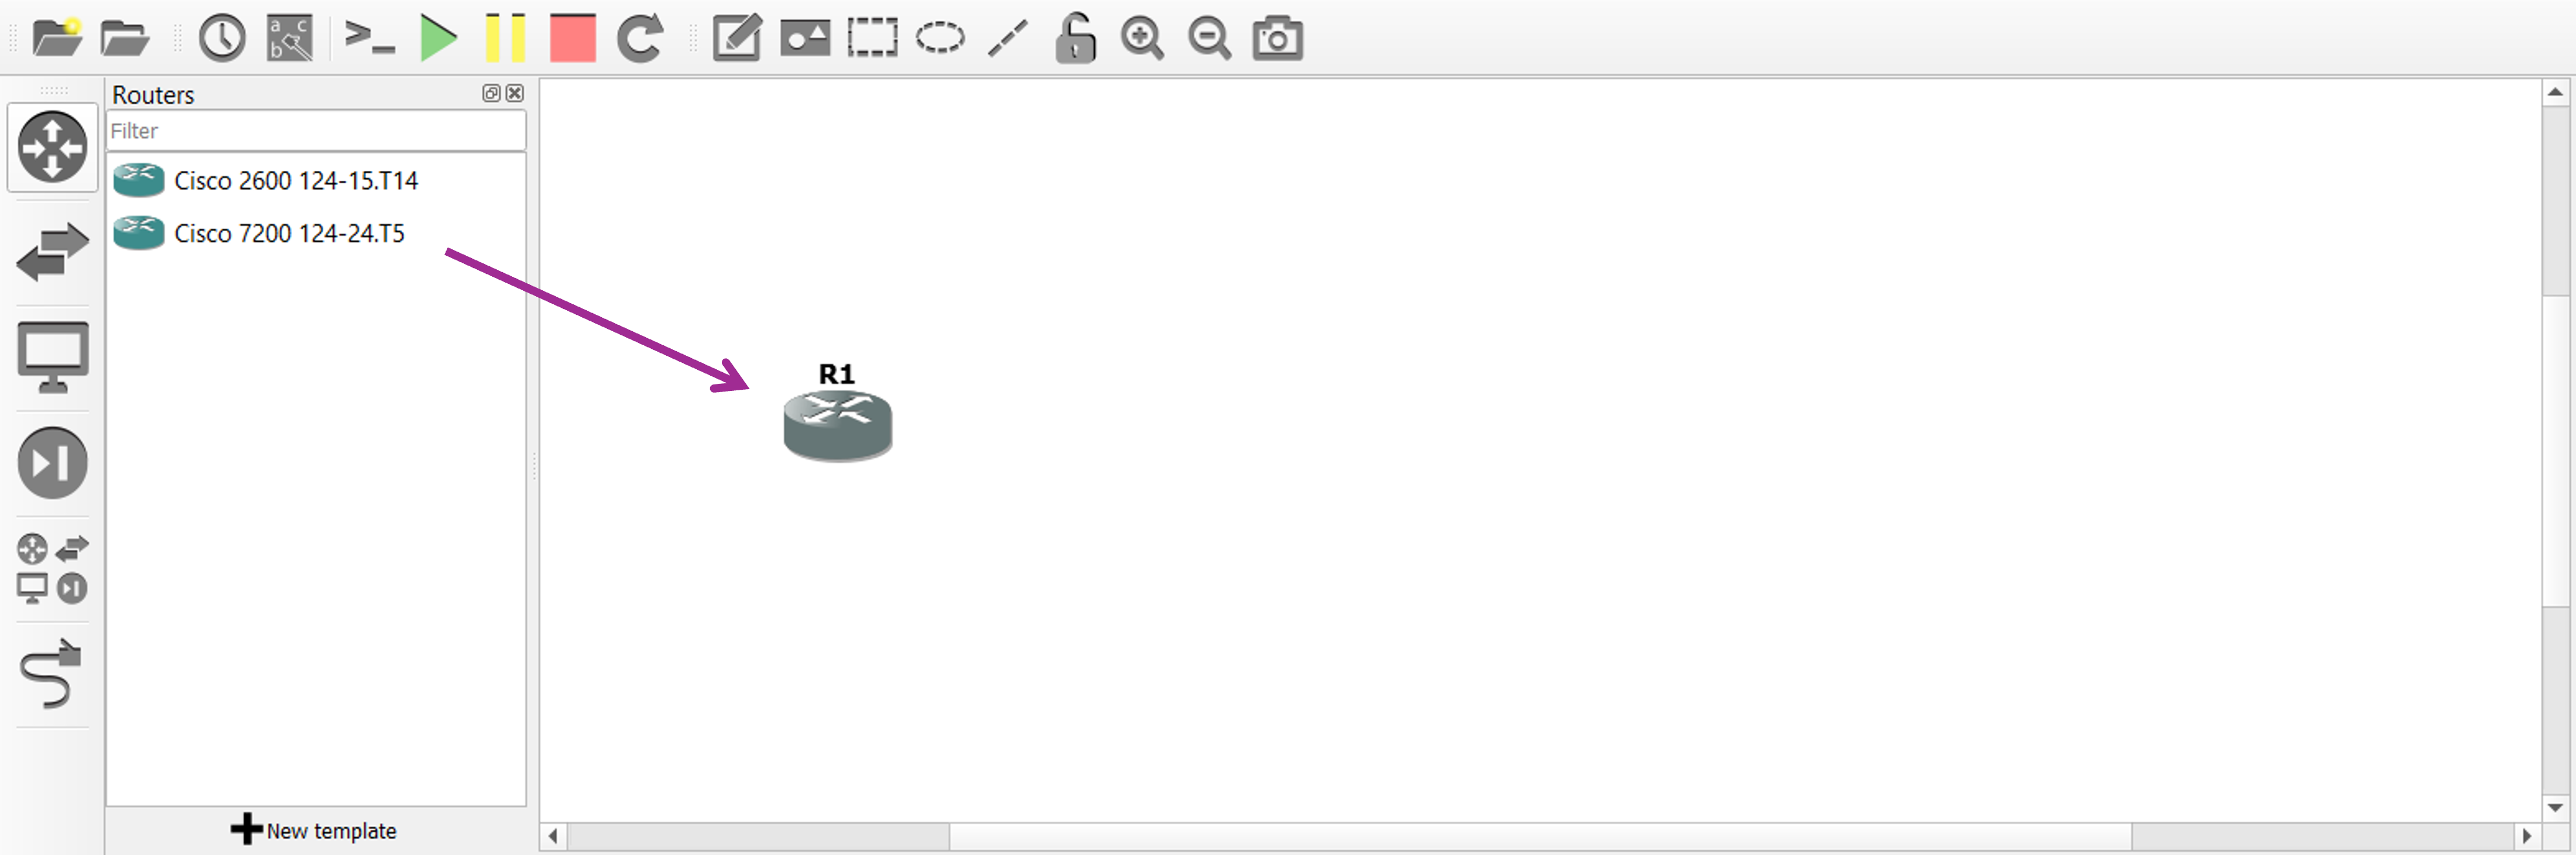
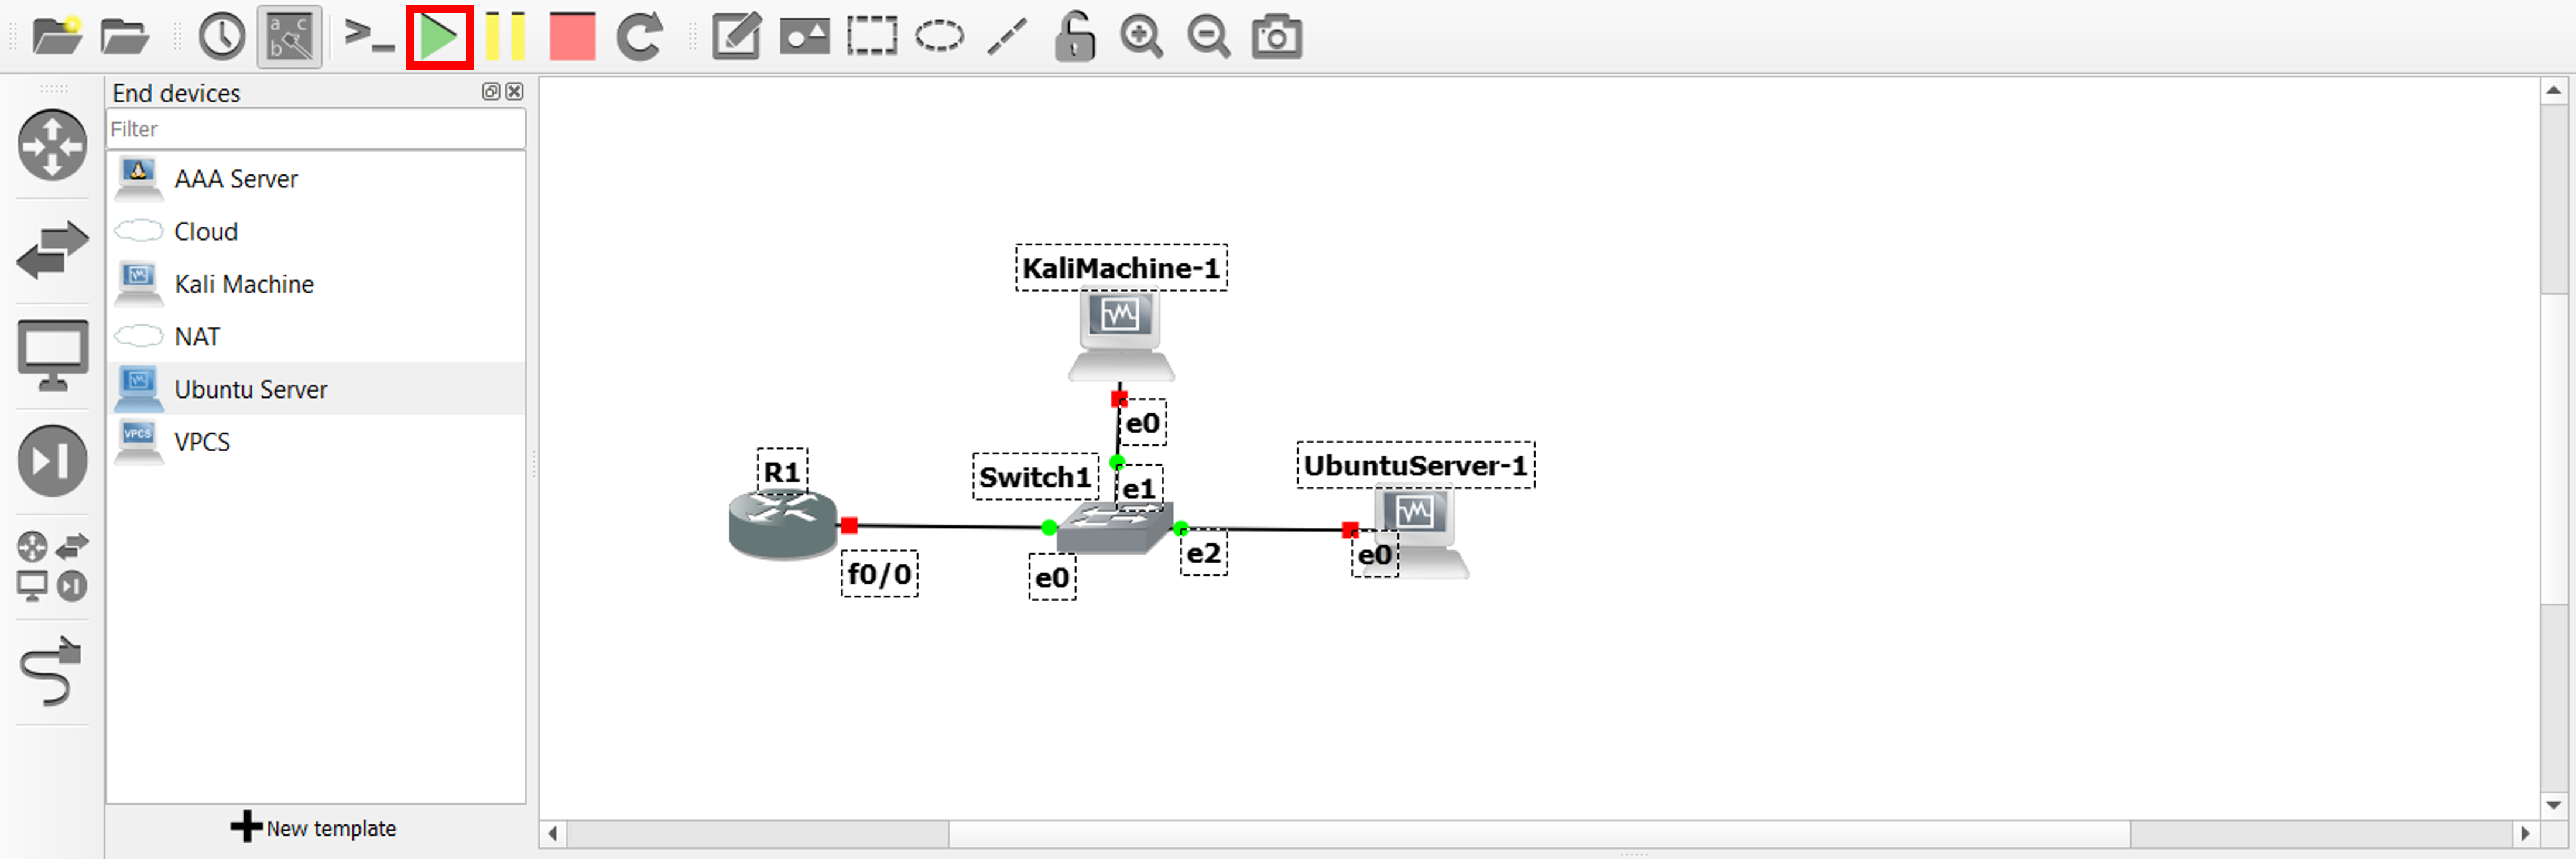
So let’s start by importing the Cisco 7200 router from the appliances list on the left, like shown below.
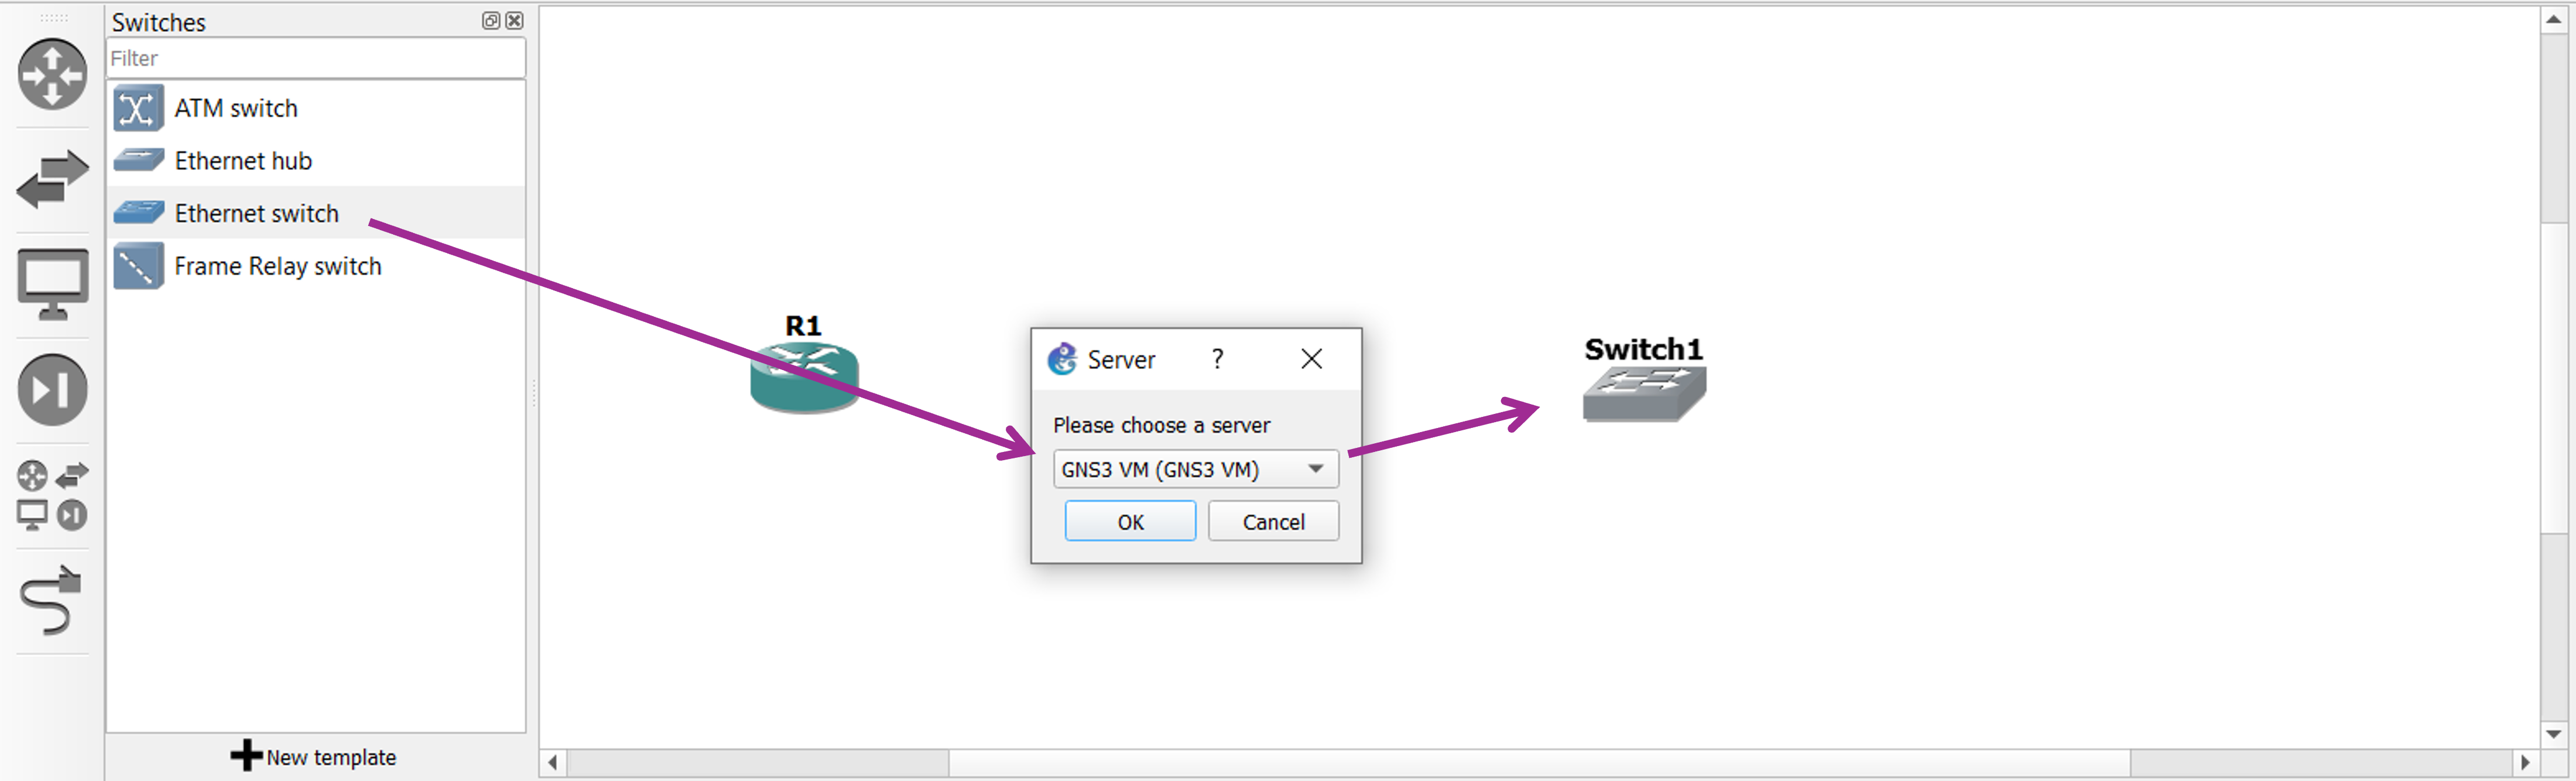
Next, we do the same with the Ethernet switch. First drag the appliance, next select “GNS3 VM” as the chosen server on which the virtualized switch functionality will run.
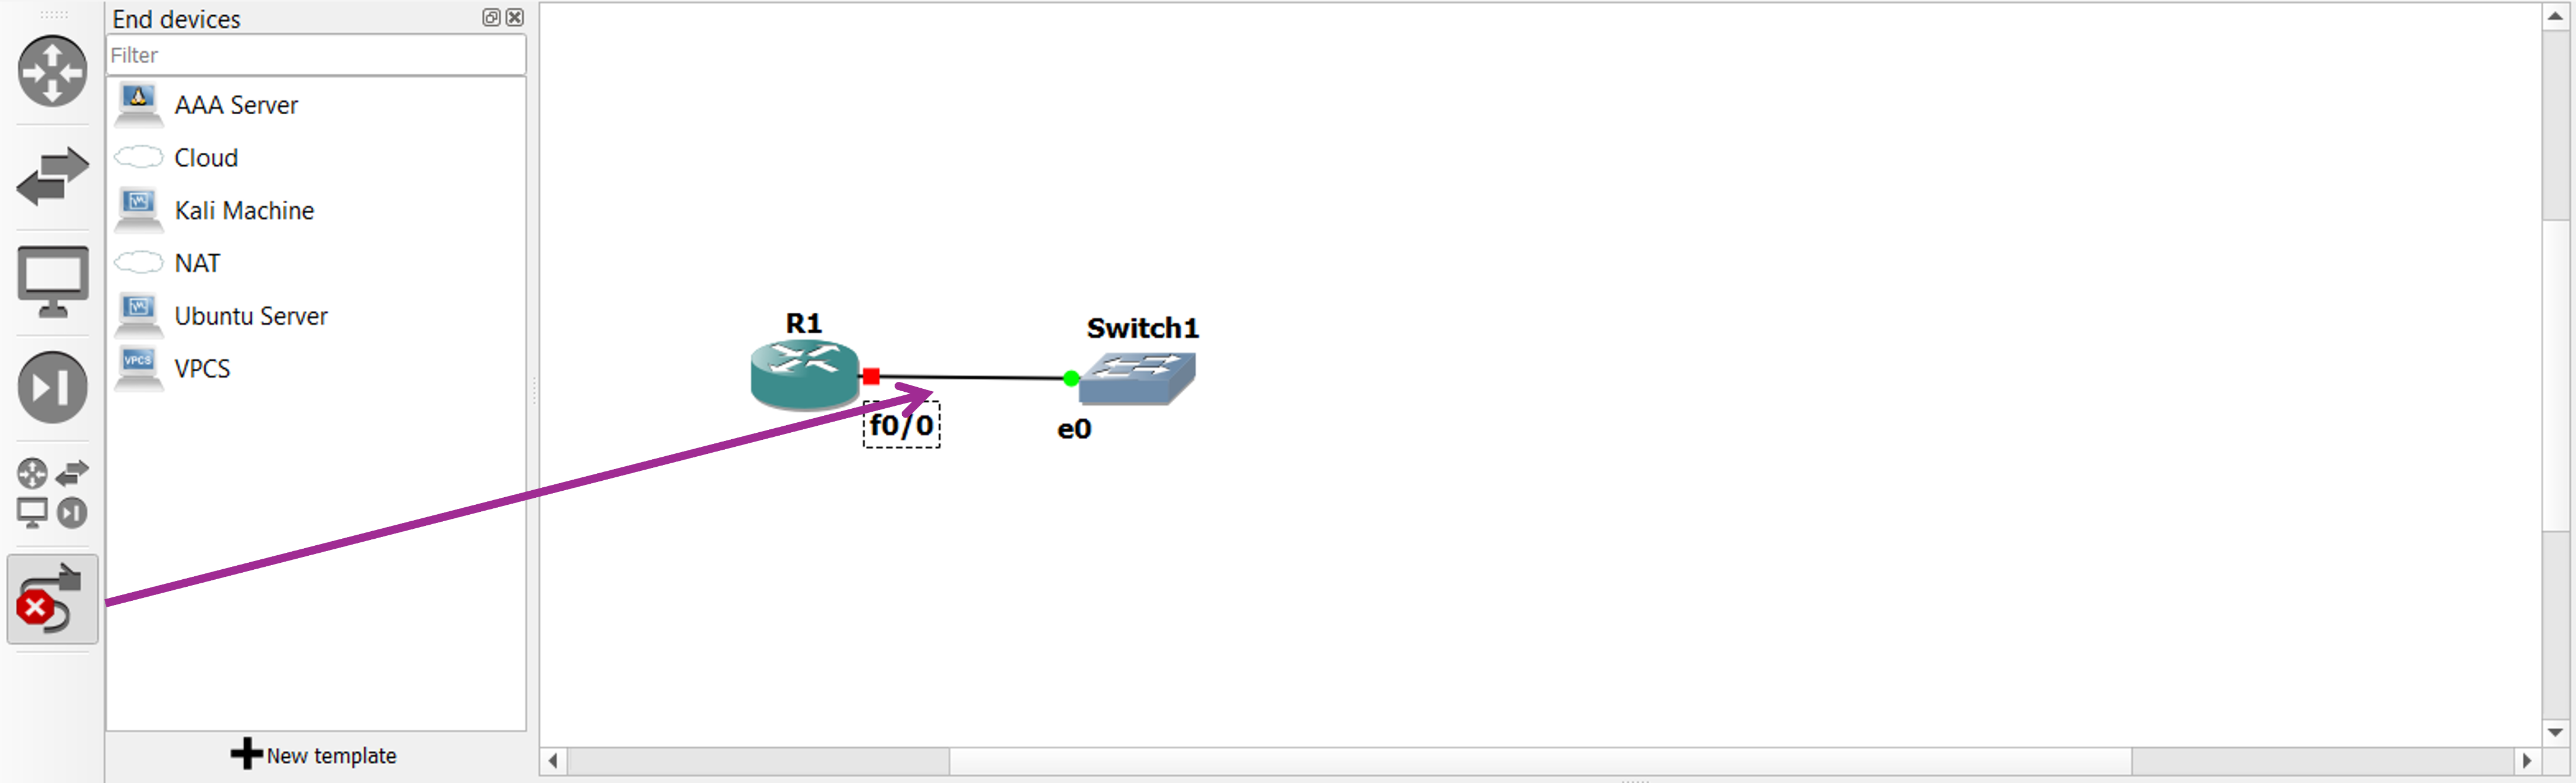
We connect the two devices using the “add a link” button on the left. Also, by going on “View” > “Show/Hide interface labels” we can display the names of the interfaces we are using in the connection.
For now, let’s leave the router and switch as they are and go ahead with deploying the two VMs and configuring the hypervisor.
Hypervisor configurations
Assuming here that VirtualBox and the VMs are installed and ready to be deployed, the steps we need to follow are…
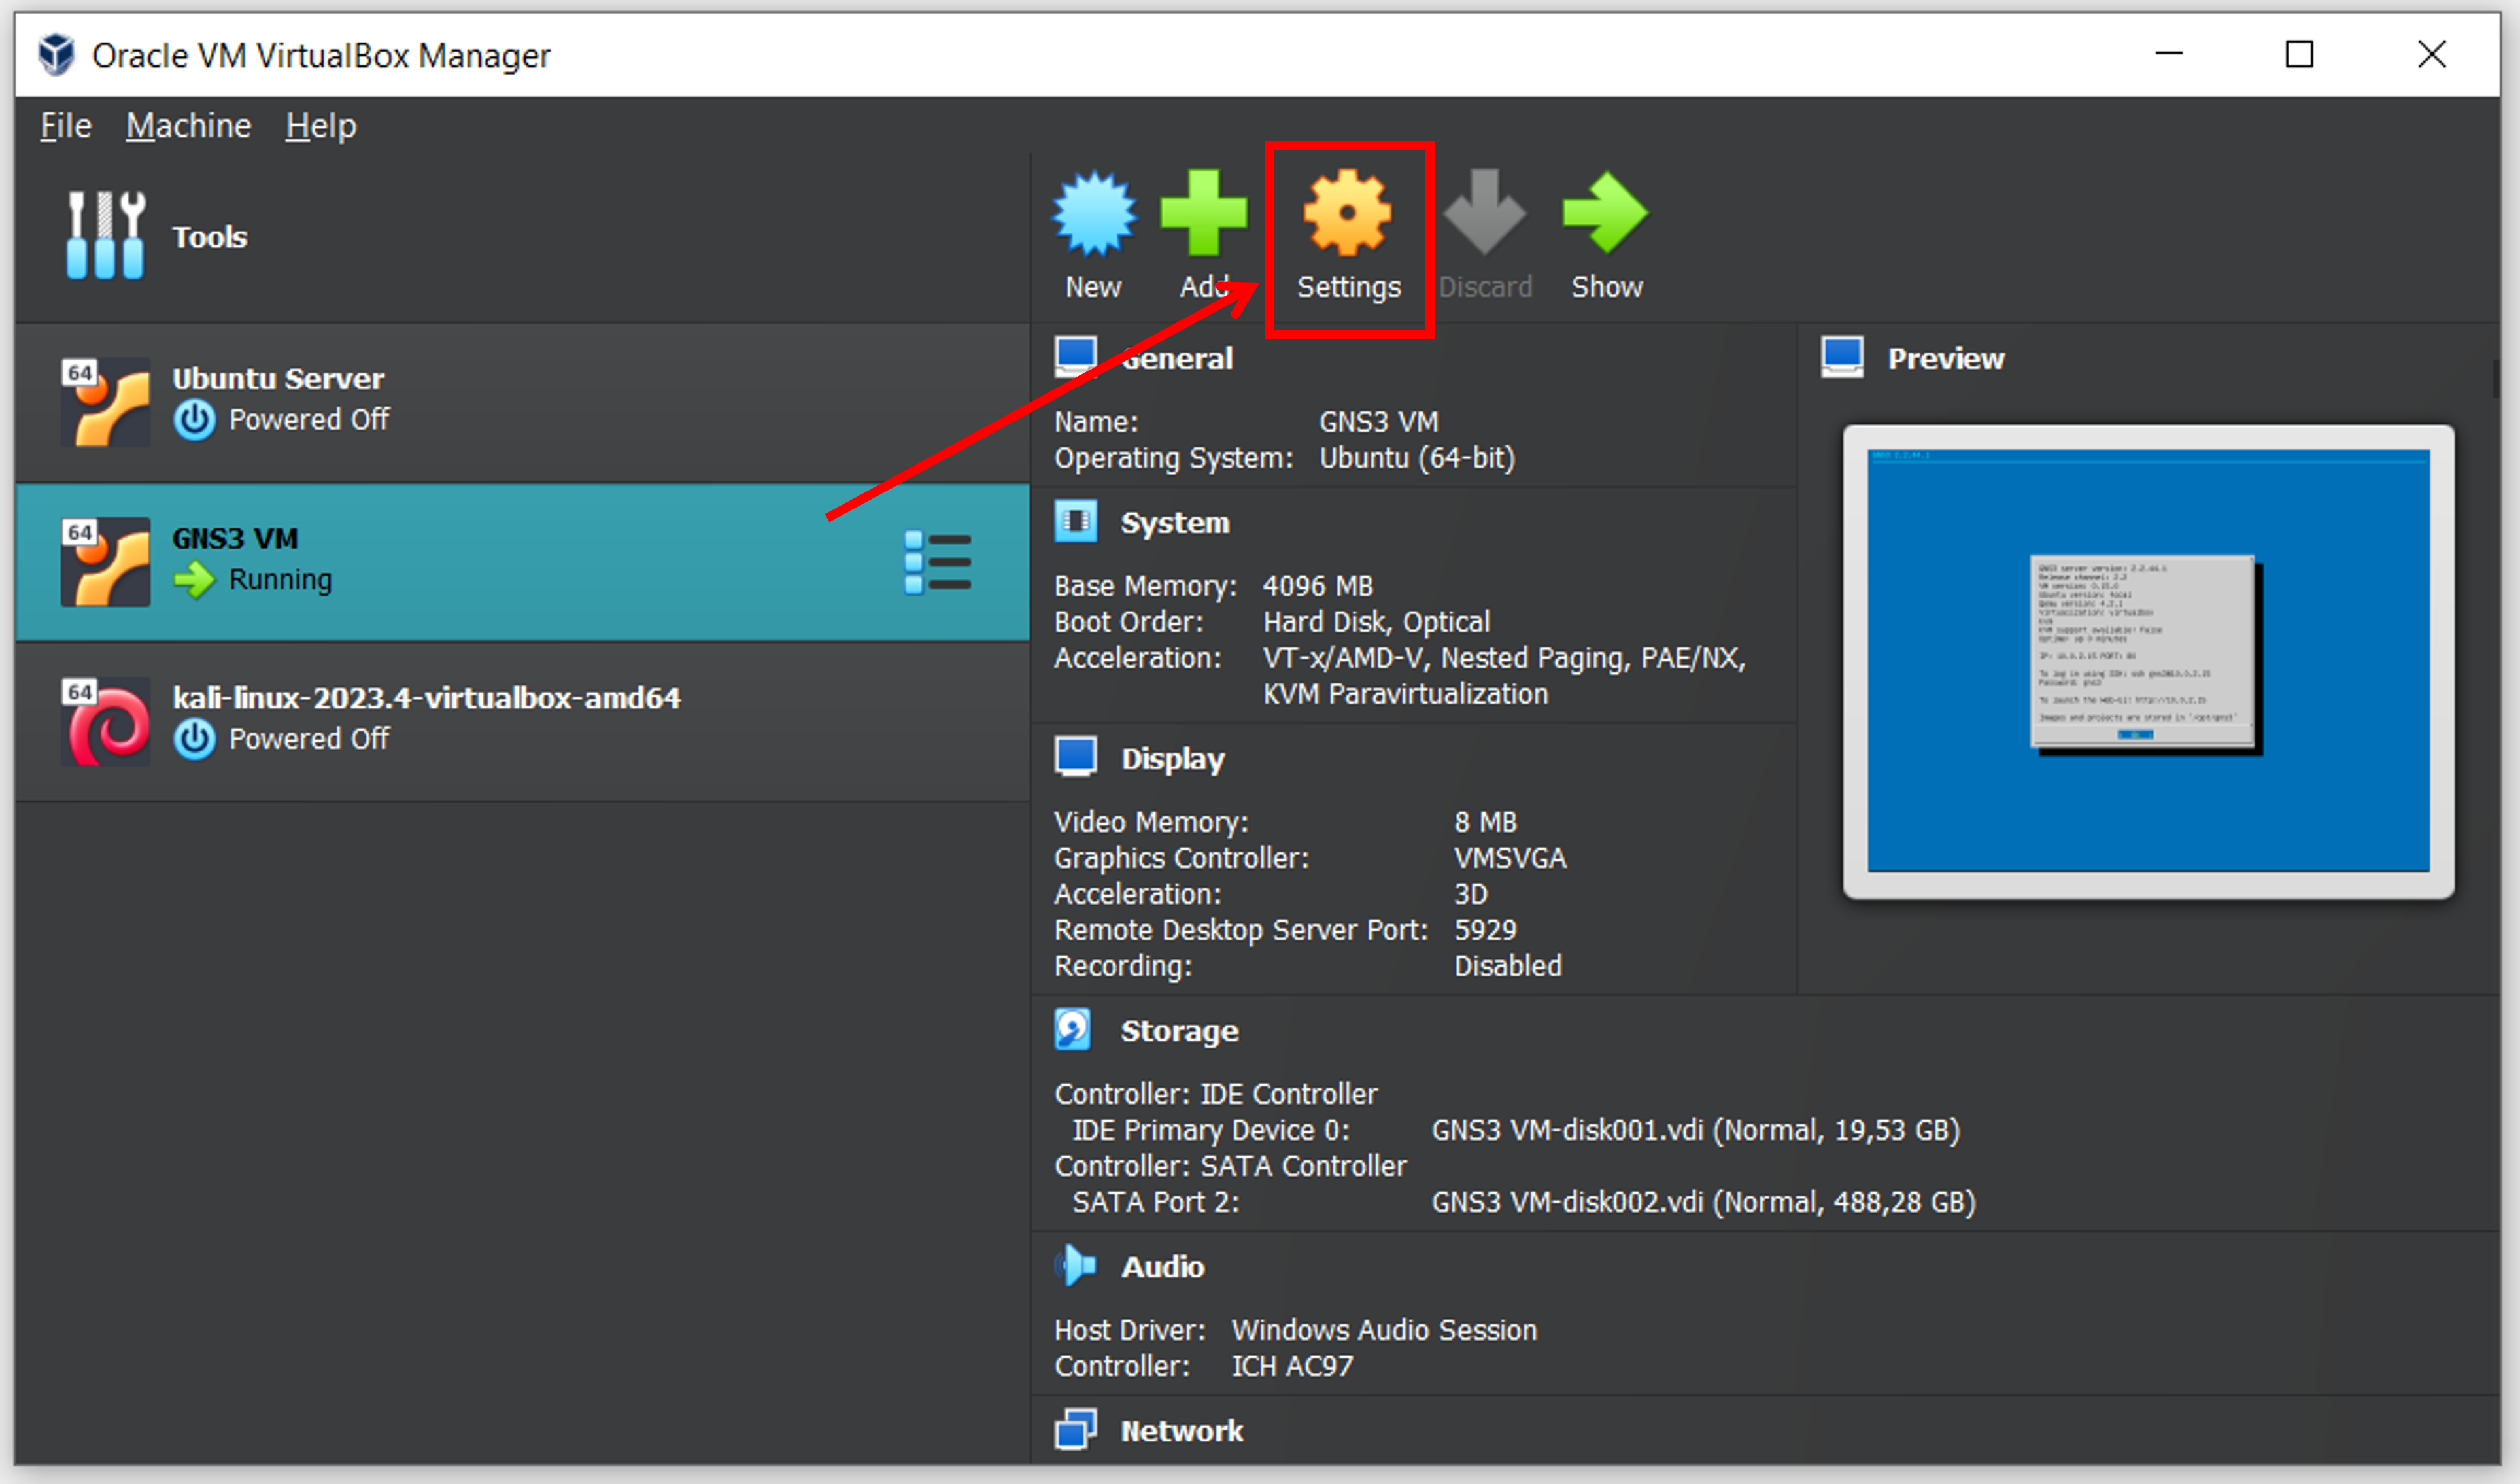
Open VirtualBox, select GNS3 VM and go to Settings.
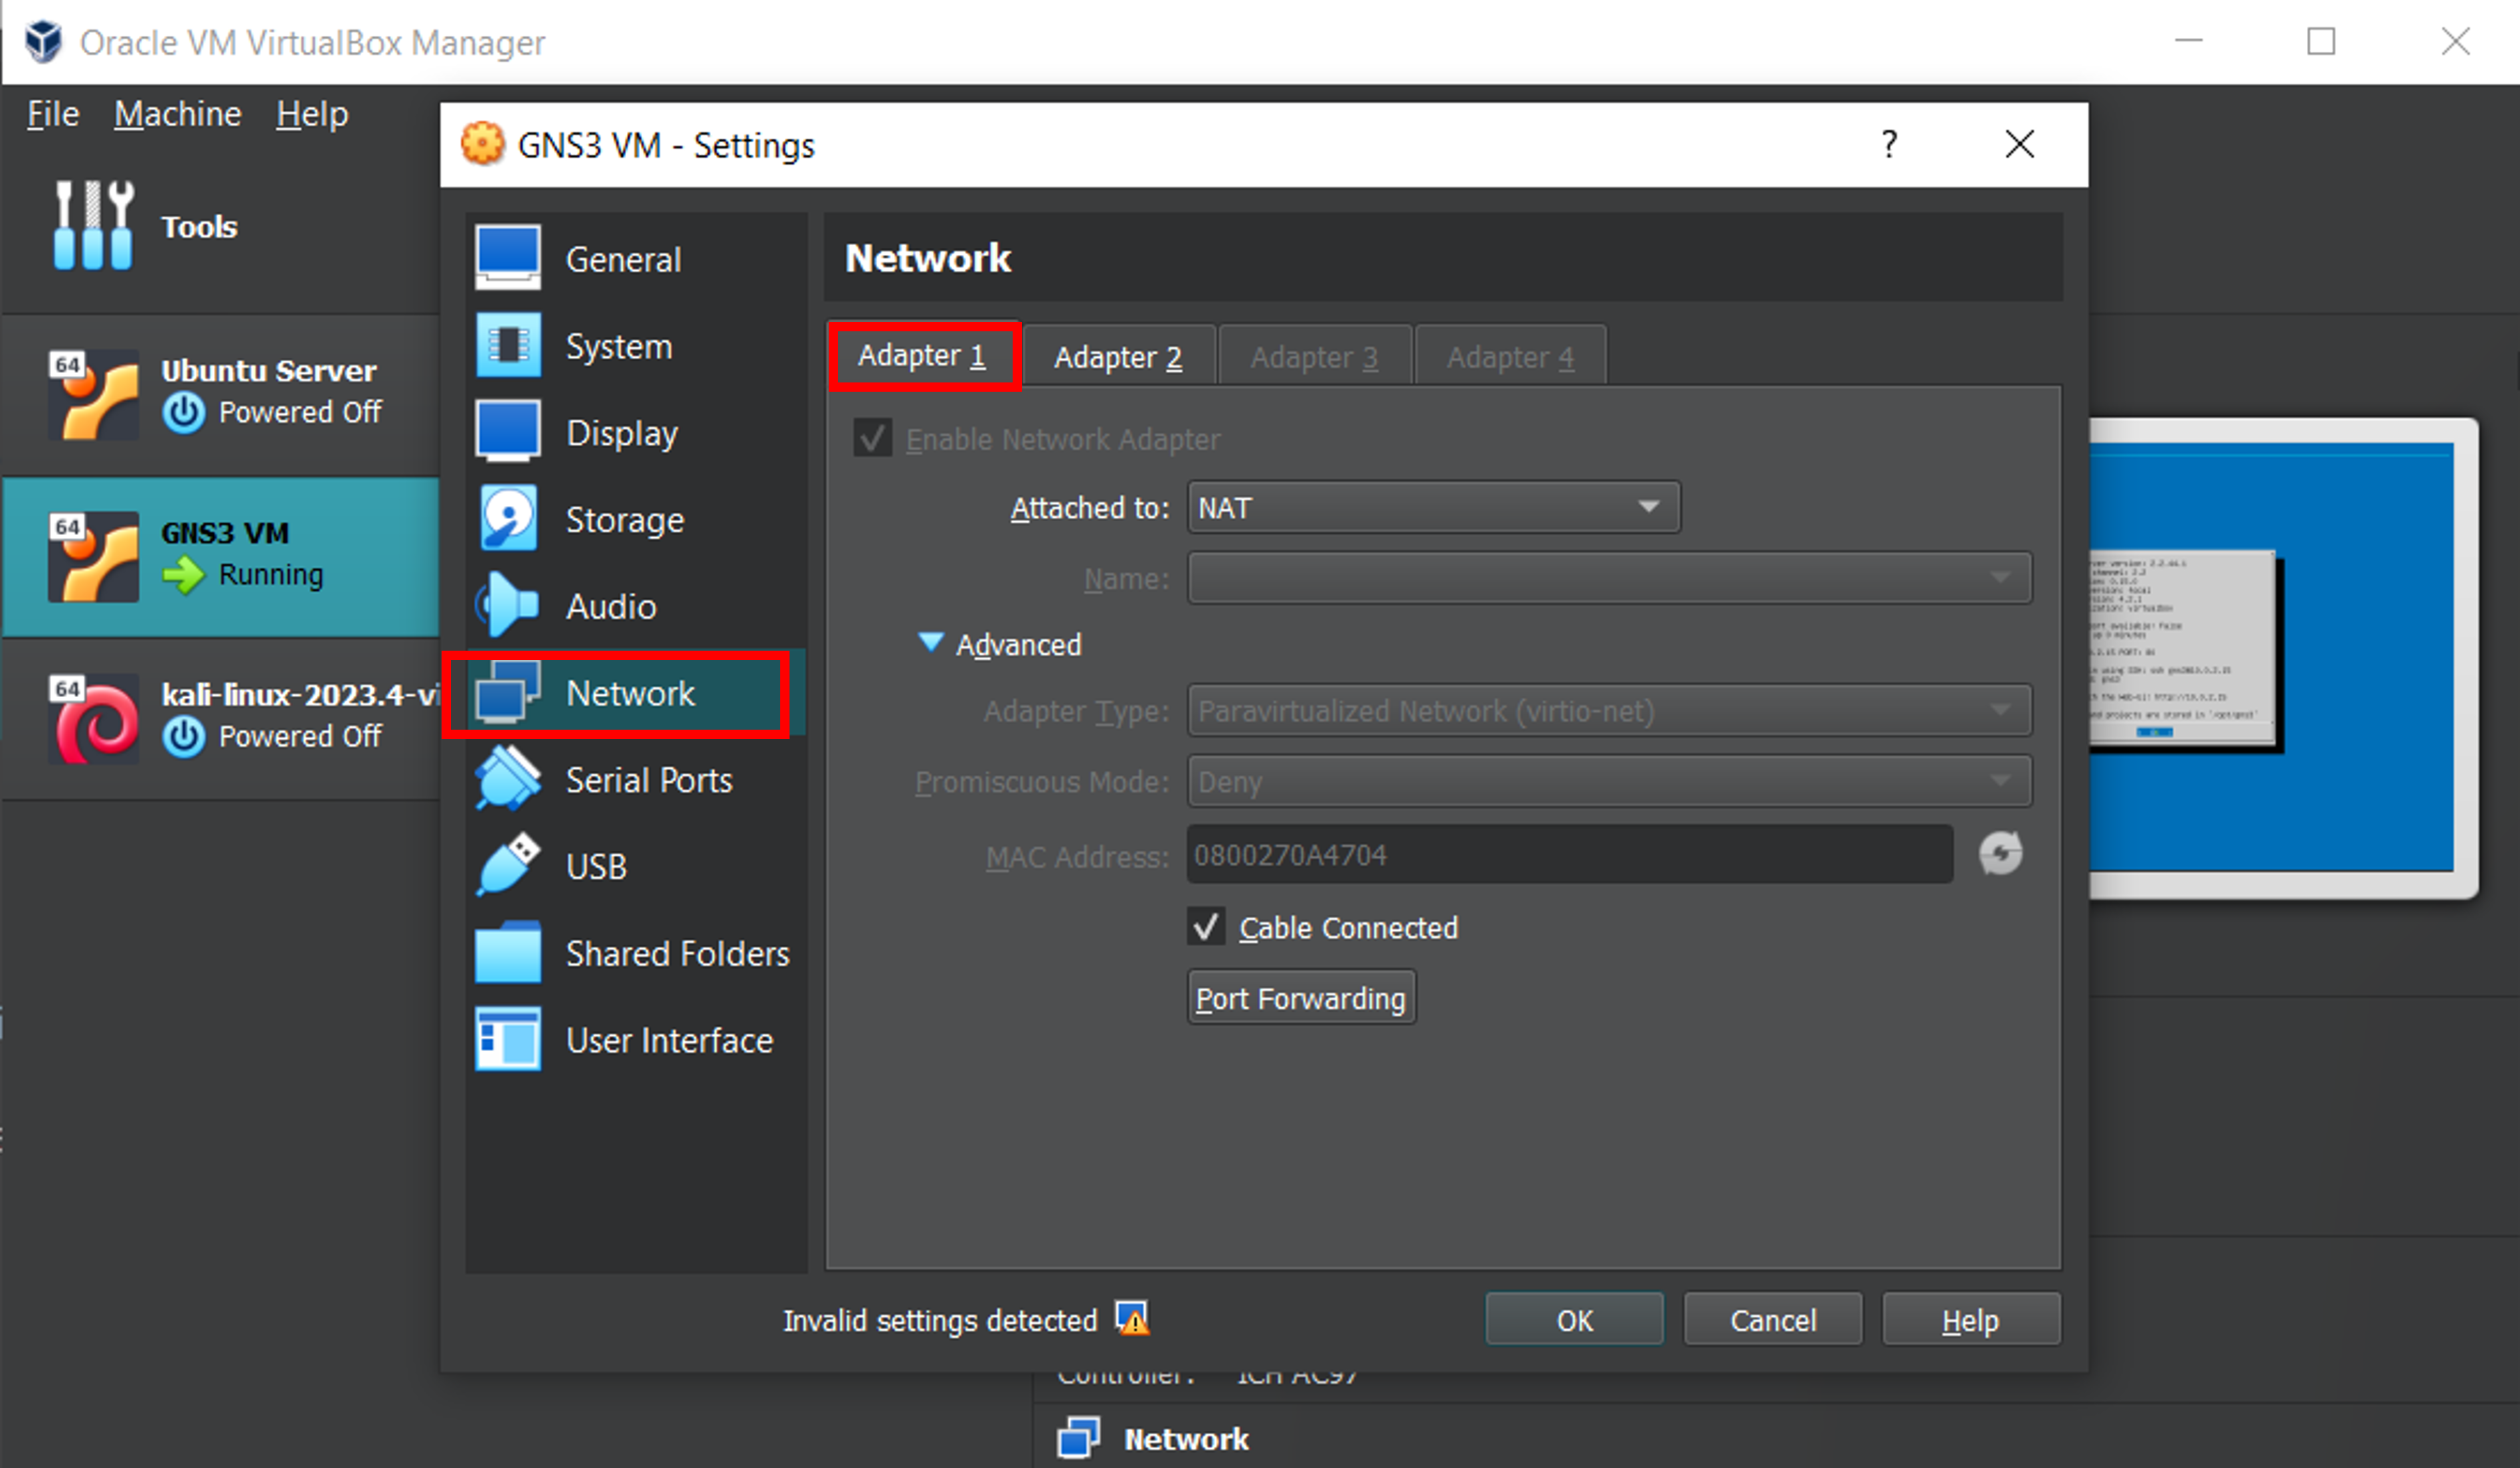
Once within the Settings panel, move to Network and configure Adapter 1 with the parameters shown in the figure below. GNS3 VM needs to have a NAT adapter and Paravirtualized Network (virtio-net) to run properly, as discussed in this post. If we do not set the adapter to use network address translation, we'll encounter an error. I have to admit this confuses me, but hey, our physical device is disconnected anyway so let us not worry about that NAT for now.
And now set the parameters for Adapter 2, like this. Host Only Adapter (VirtualBox Host-Only Ethernet Adapter), meaning we are connecting the VM to a network that only allows it to see the VM host (our device). Within the advanced options, select the Virtual Network Card INTEL PRO/1000 MT Desktop as adapter type.

For both adapters check the Cable Connected option.
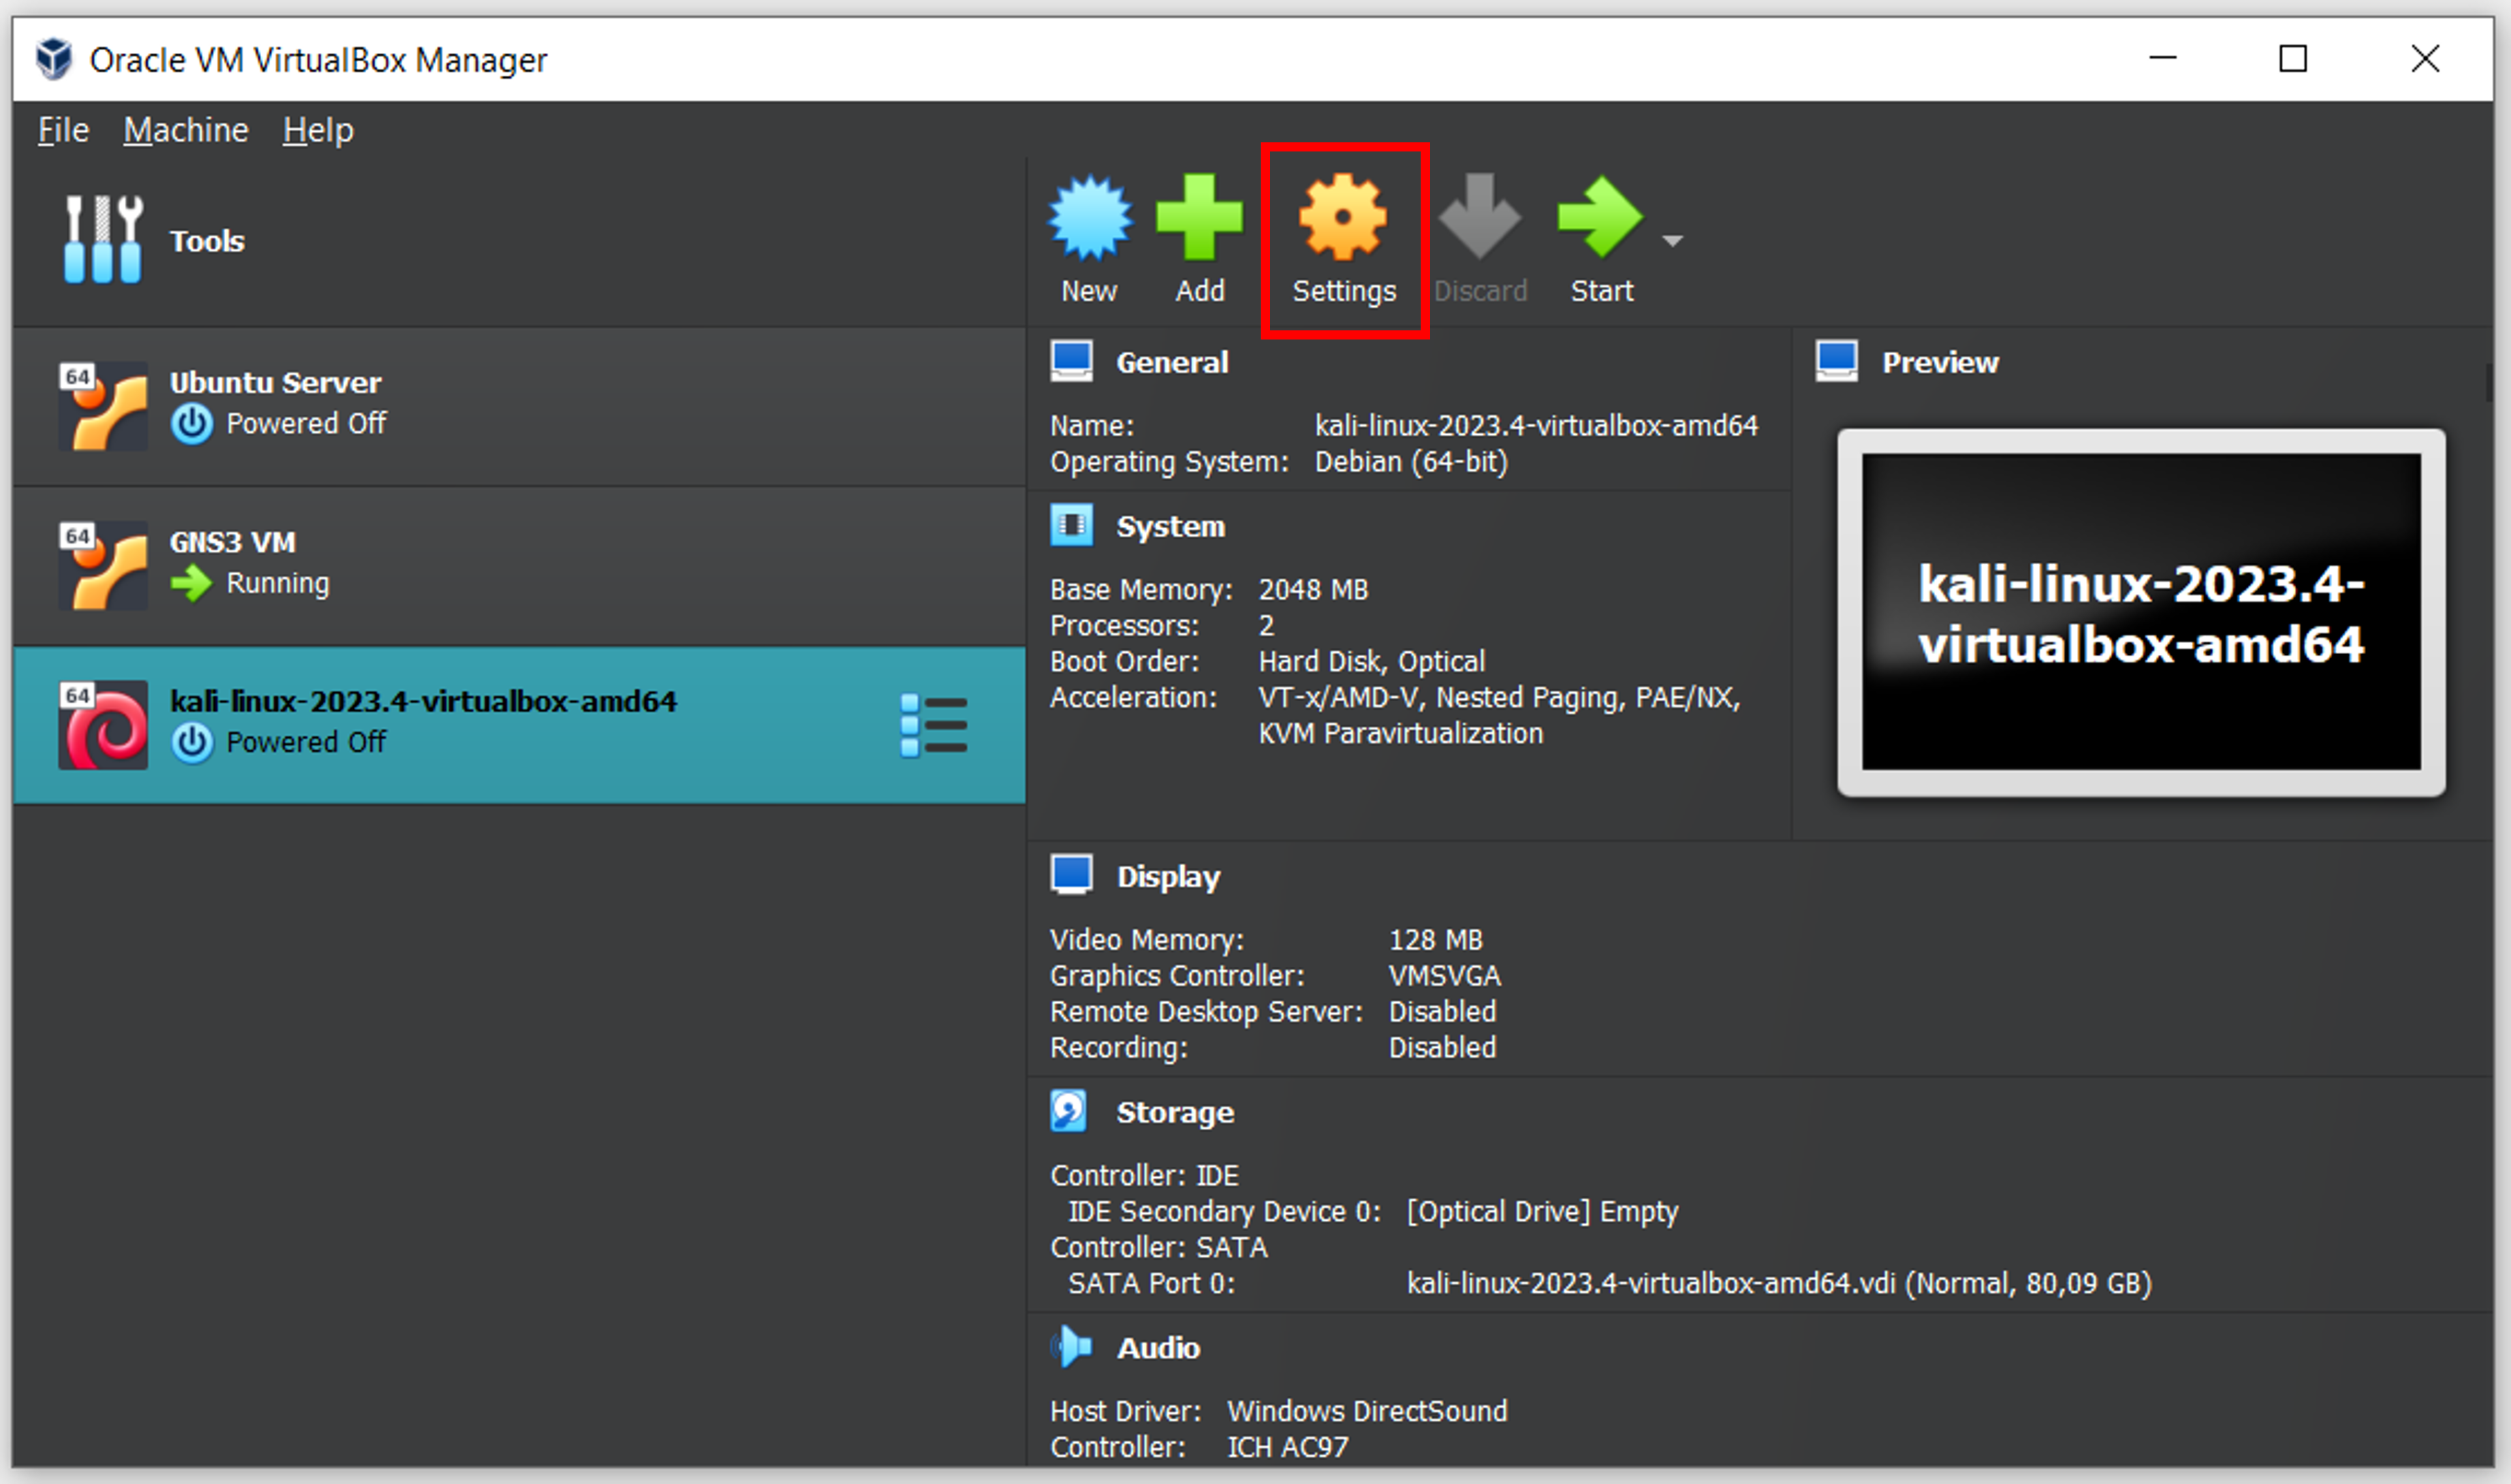
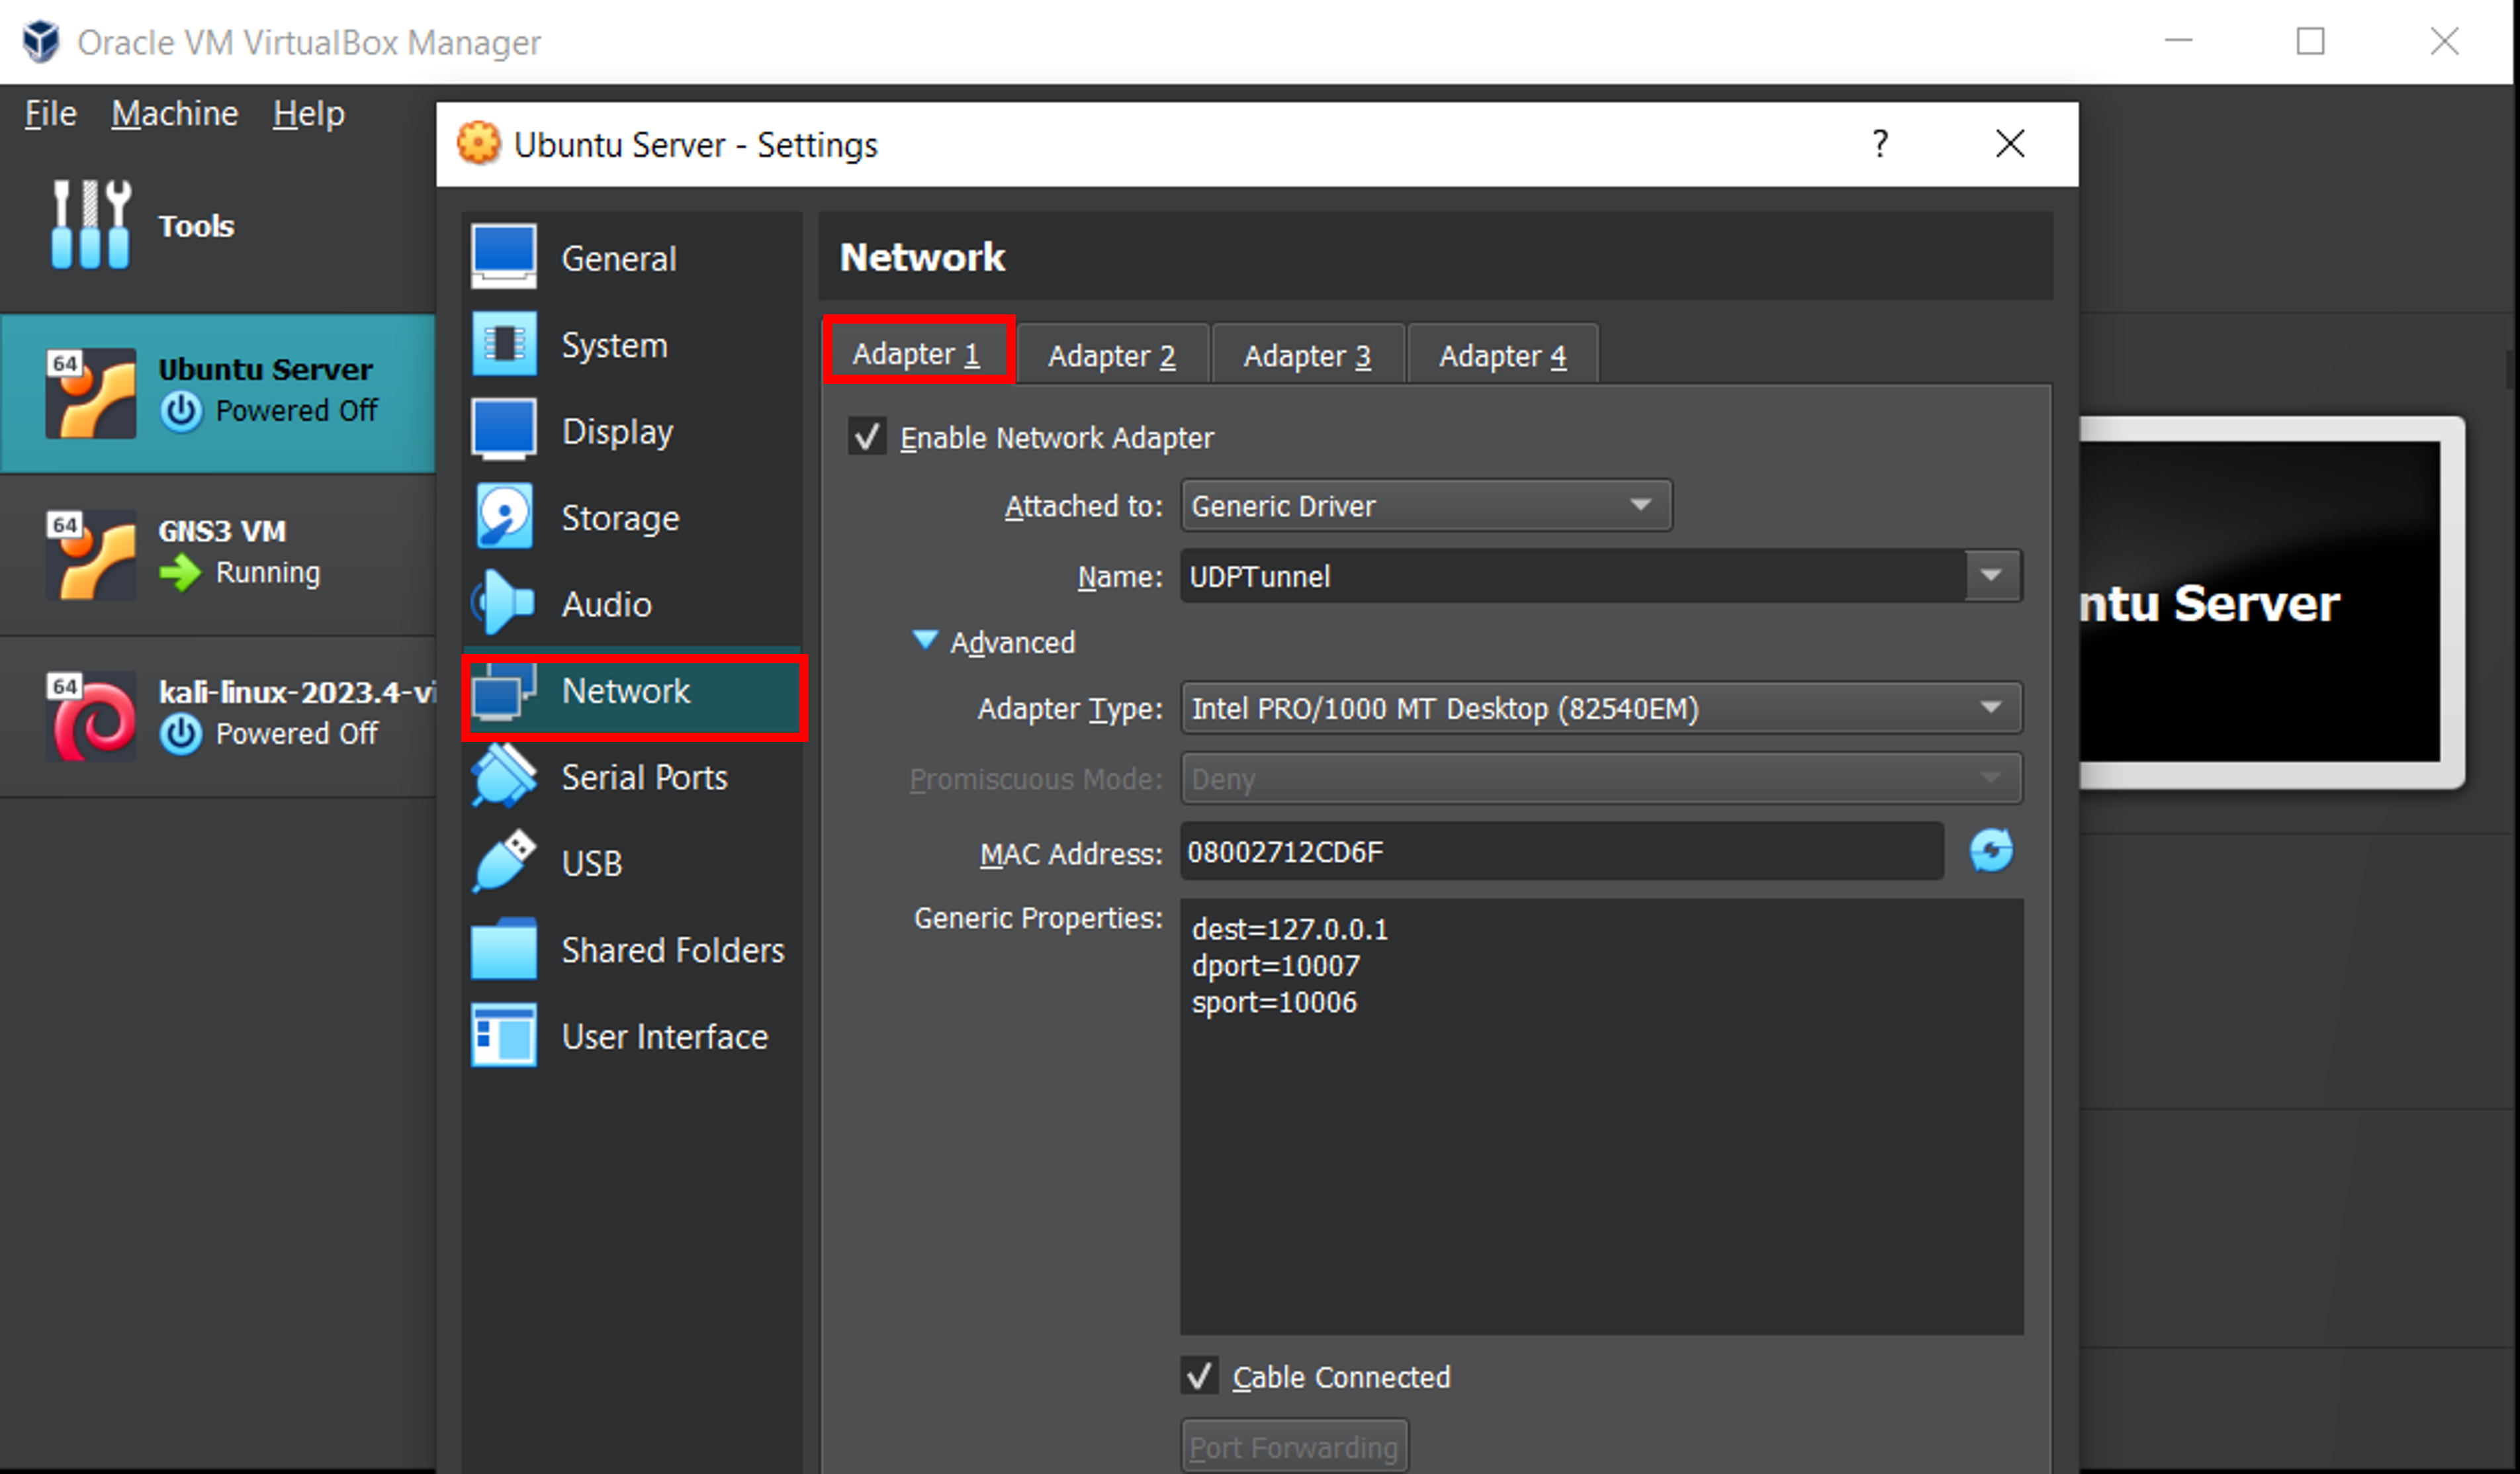
Good. Next let’s configure the adapters of our two VMs. Here I show how we do it with Kali Linux but the same applies to the Ubuntu Server or any other machine we want to add. First, let’s select the VM in VirtualBox and go to Settings > Network > Adapter 1 . We choose Generic Driver with UDPTunnel option. The type is INTEL PRO/1000 MT Desktop like before.

As already mentioned, we do the same for the Ubuntu Server machine.
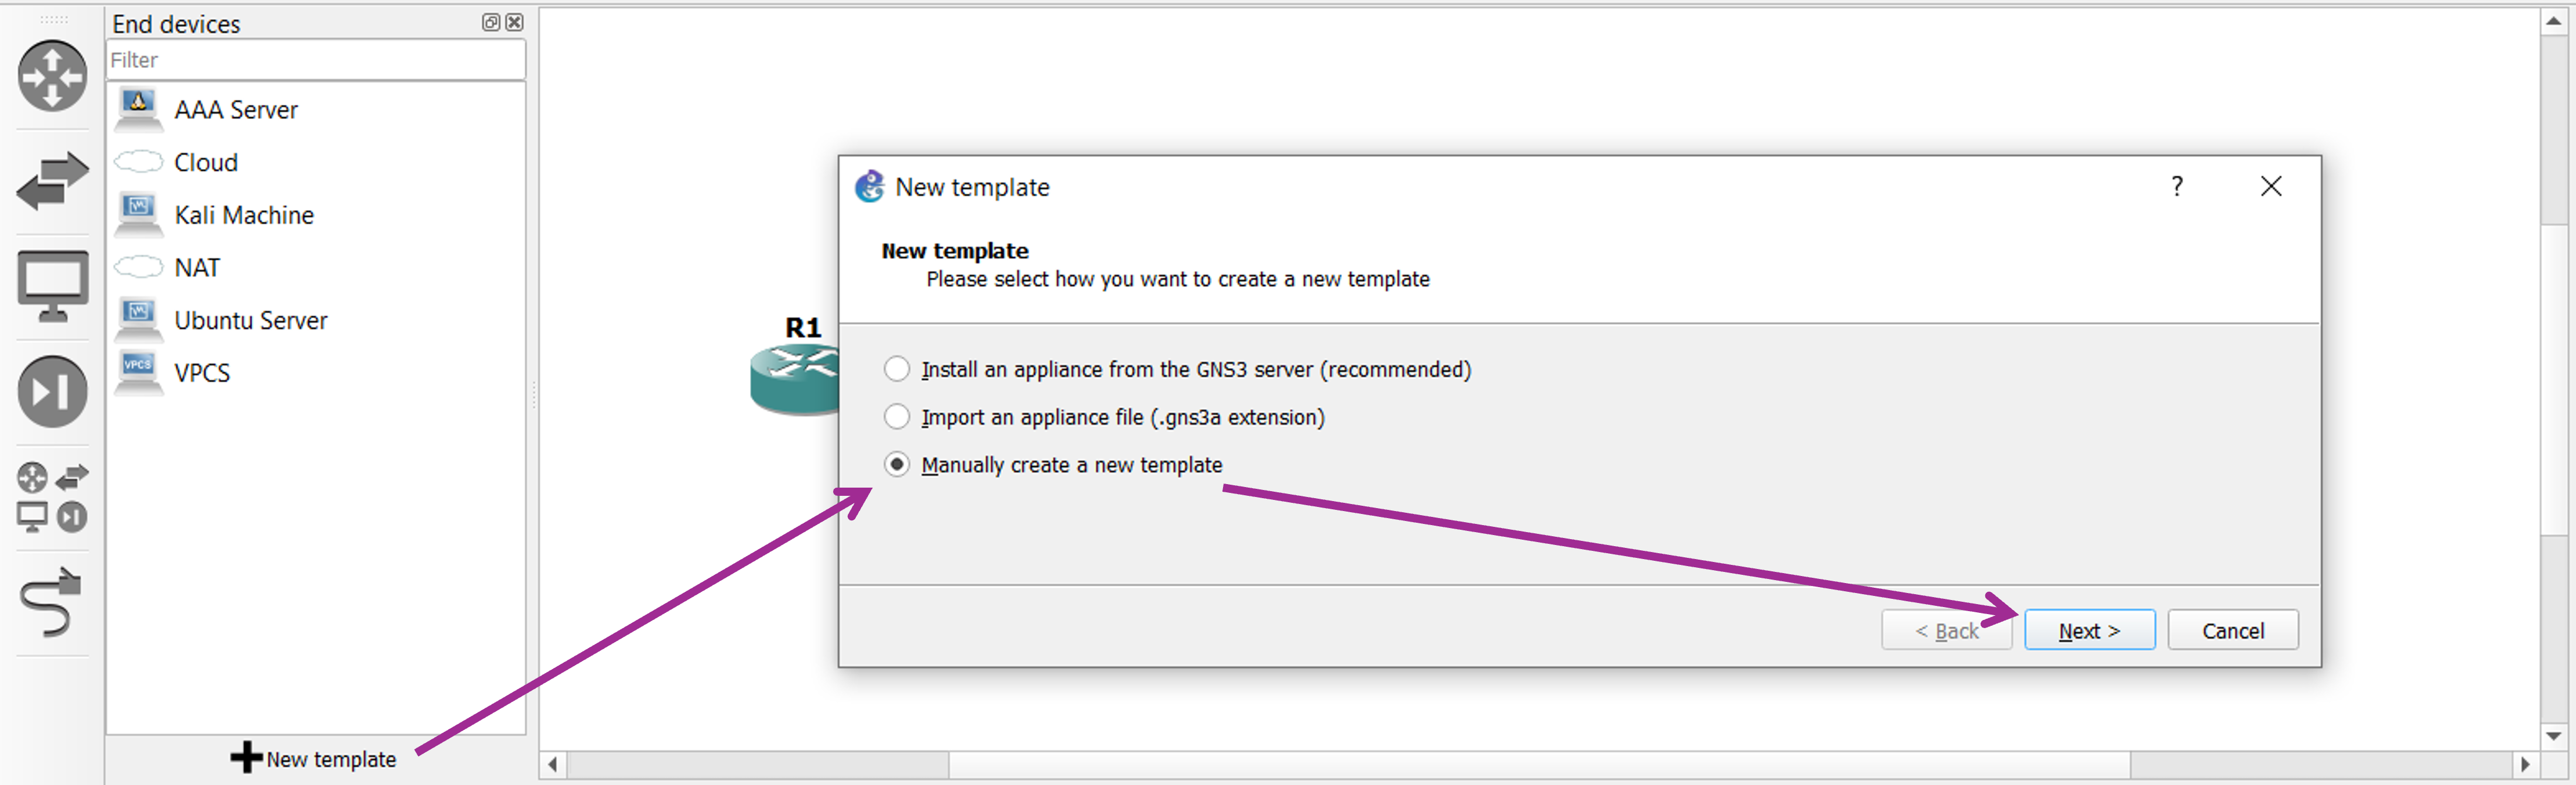
Good. Now that we are good with VirtualBox configurations, we import the machines within our GNS3 lab. To do that, move to the appliance list on the left and click on the “+” button, New Template. Then Manually create a new template.
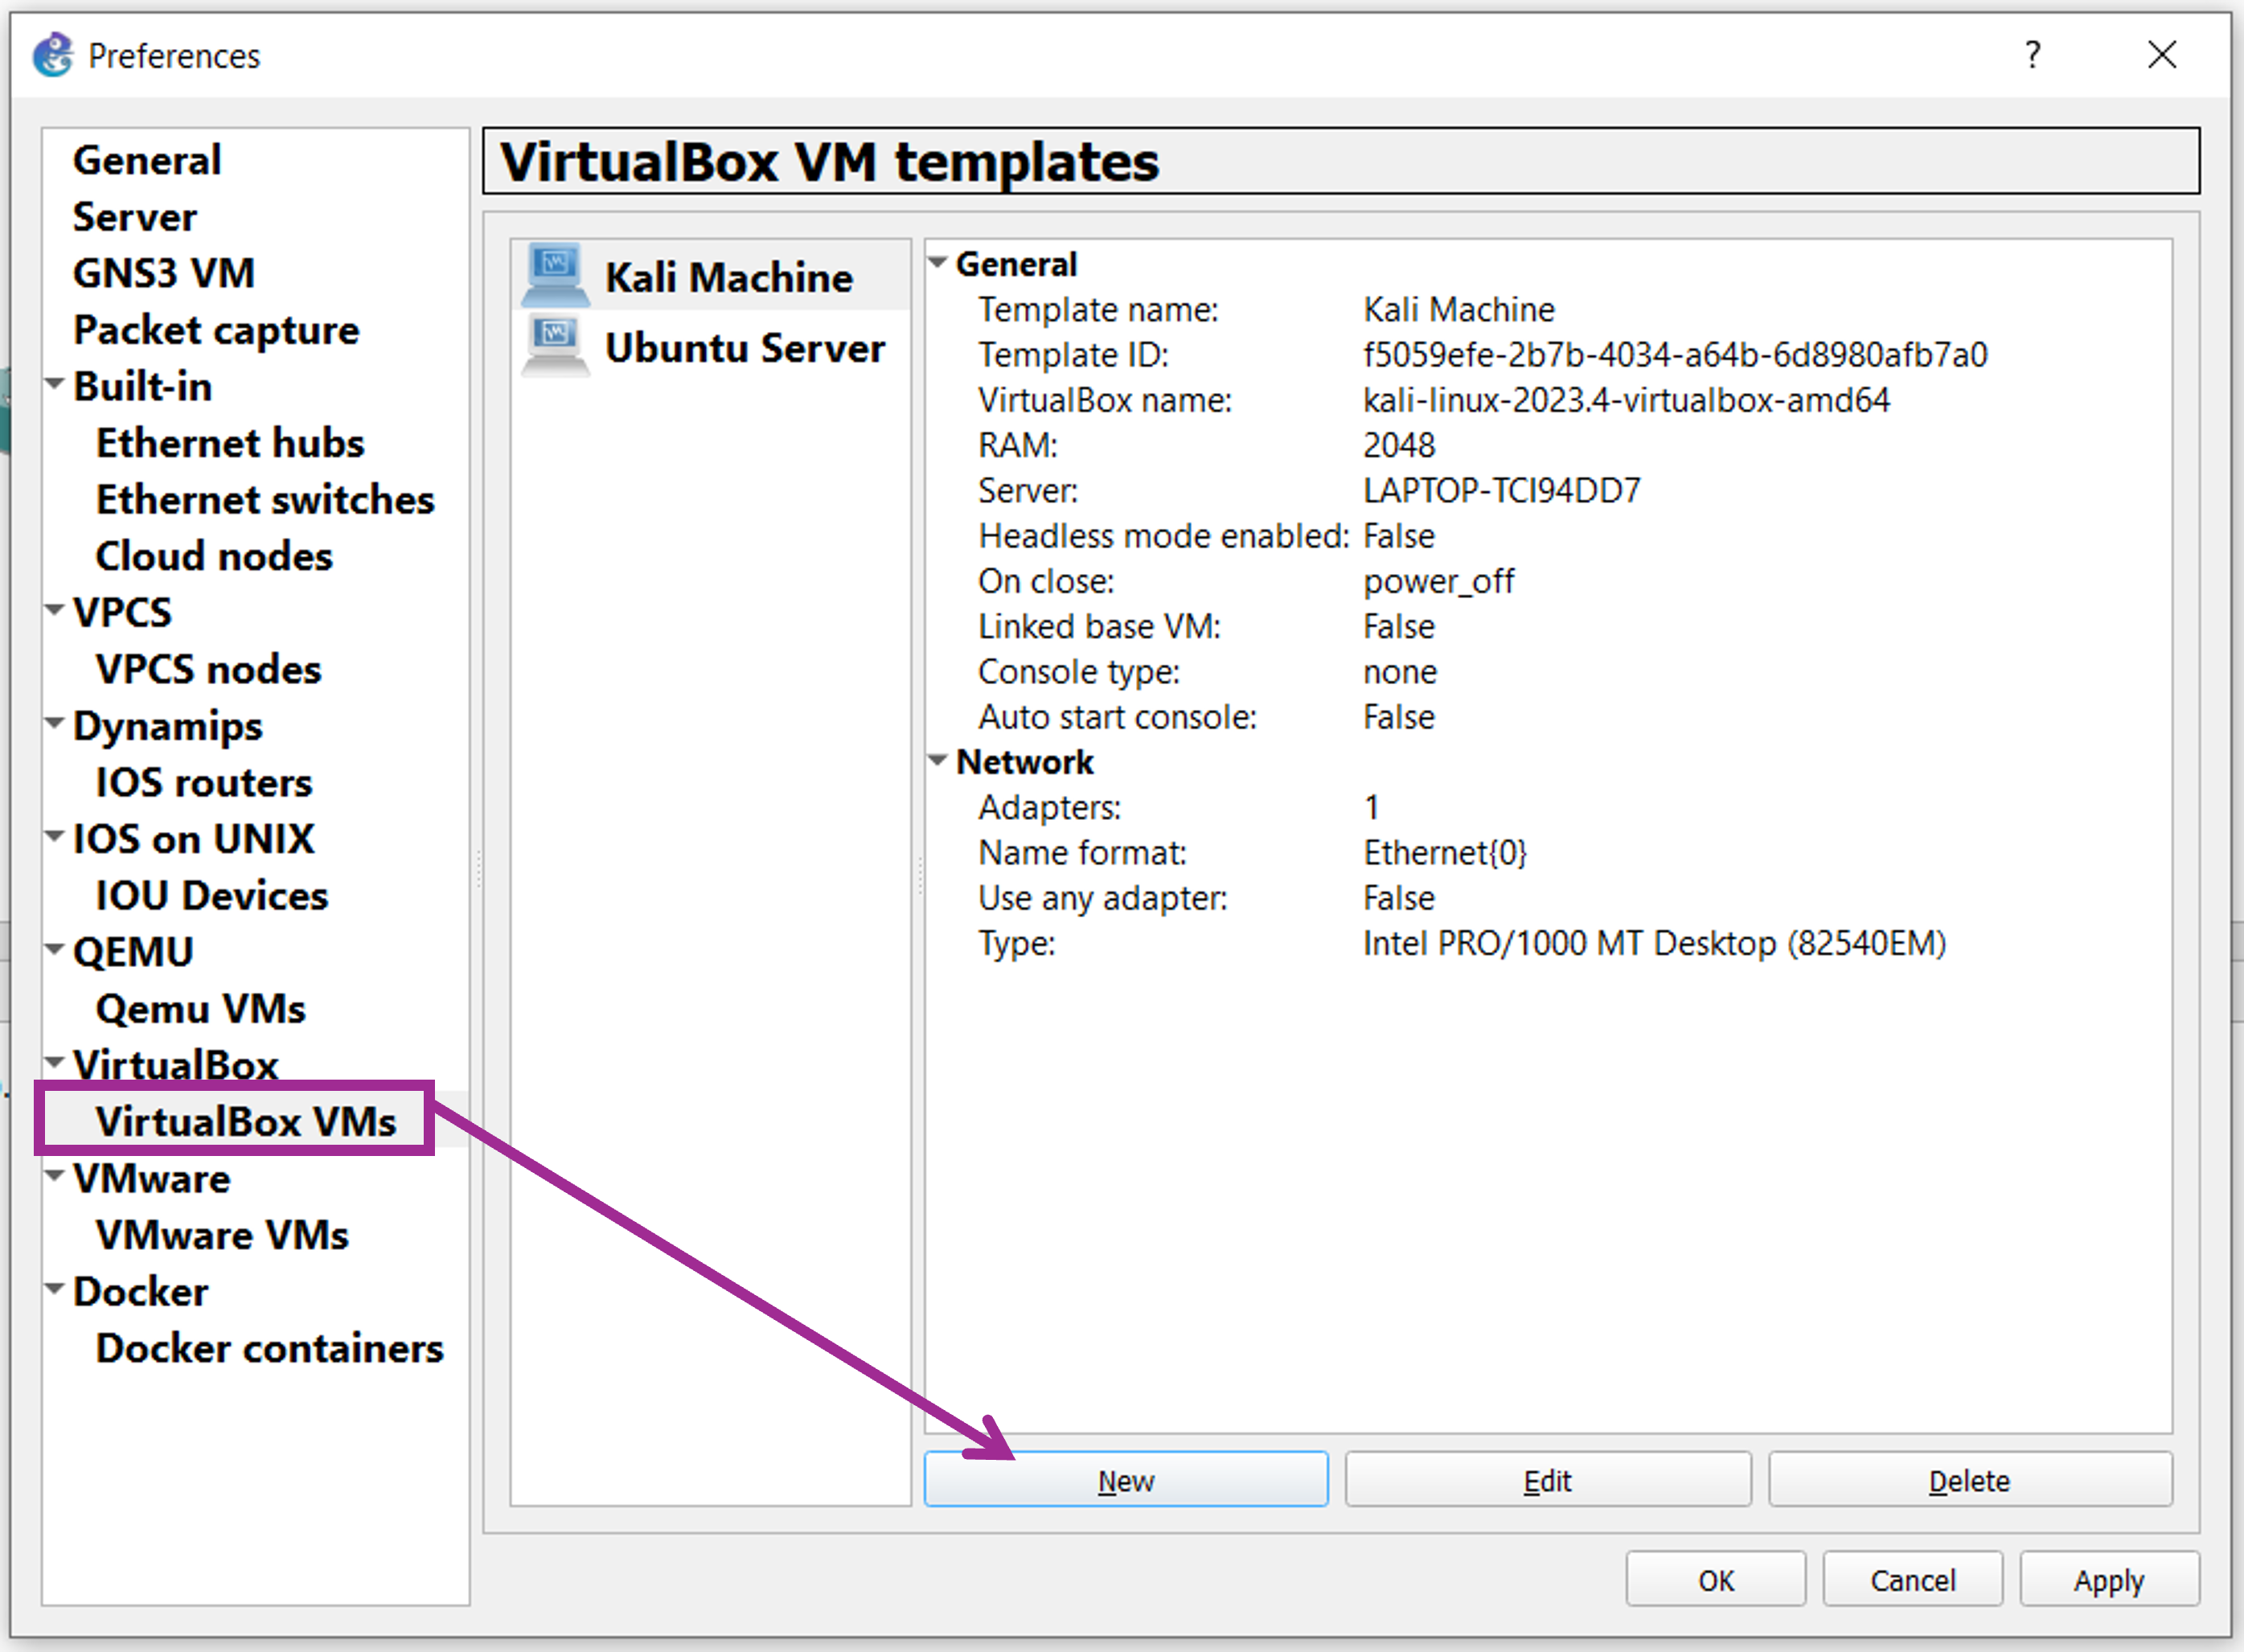
Now in the next window, select VirtualBox VMs on the left. Click on New.
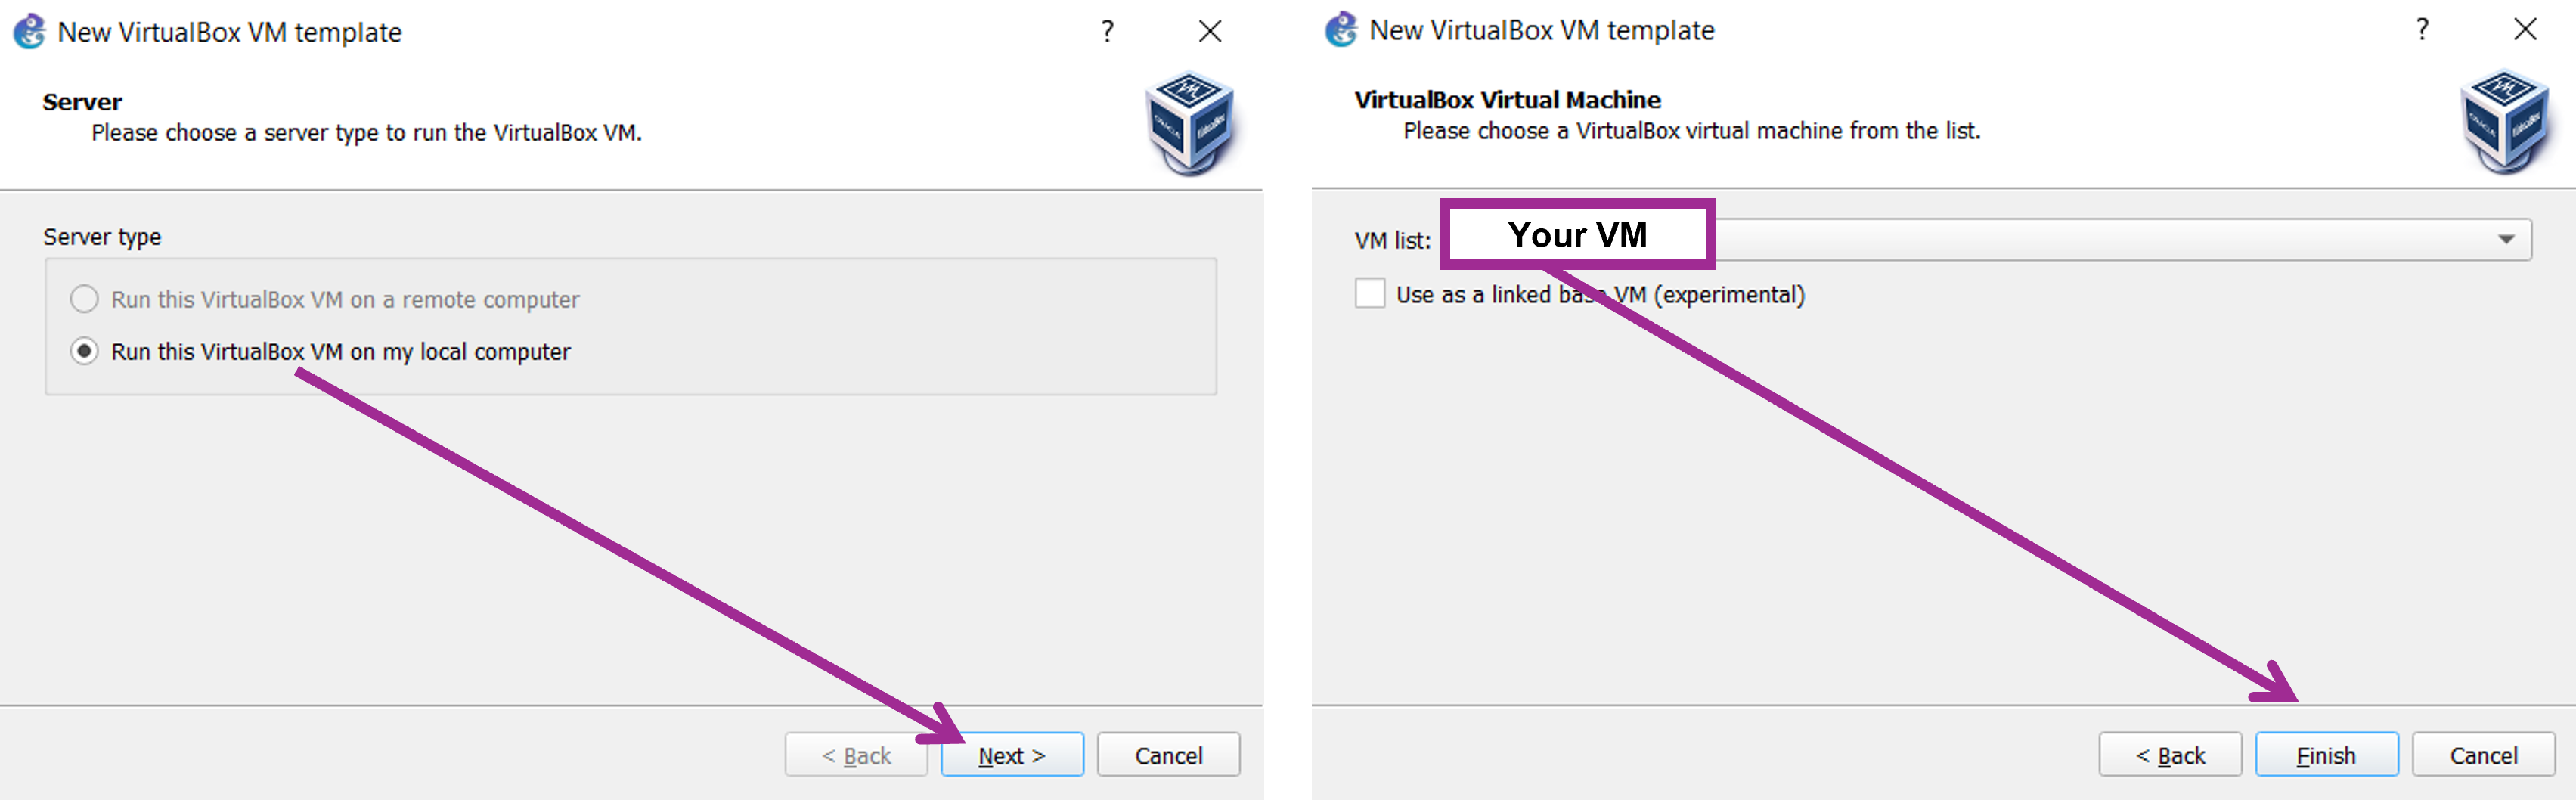
Now go with Run this VirtualBox VM on my local computer and click Next again. From the list displayed, select the VM you want to import (i.e., Kali Linux or Ubuntu Server in our case). Then Finish.
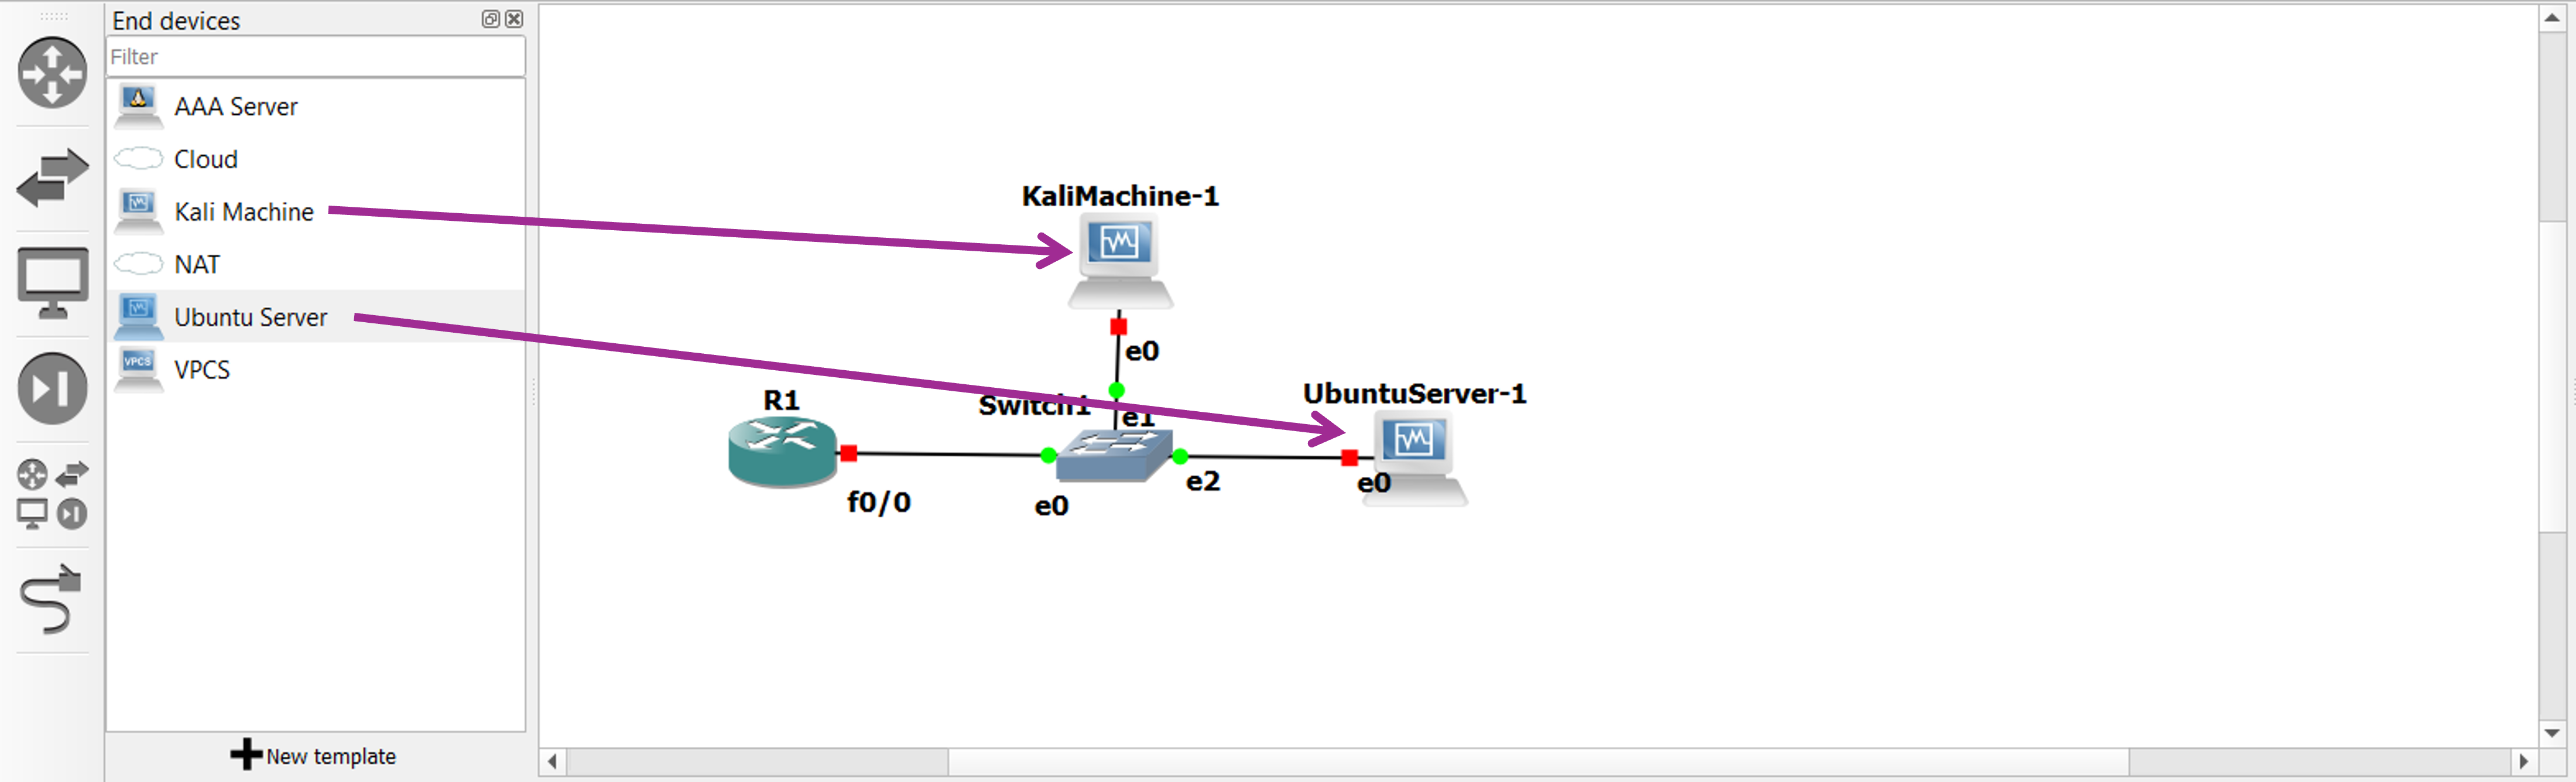
Now you should be able to see the VMs names in the appliances list on the left of GNS3 GUI. Drag them into the topology and connect them as we did before for the router and switch.
We can finally start all the nodes in our lab.
Configuring the router
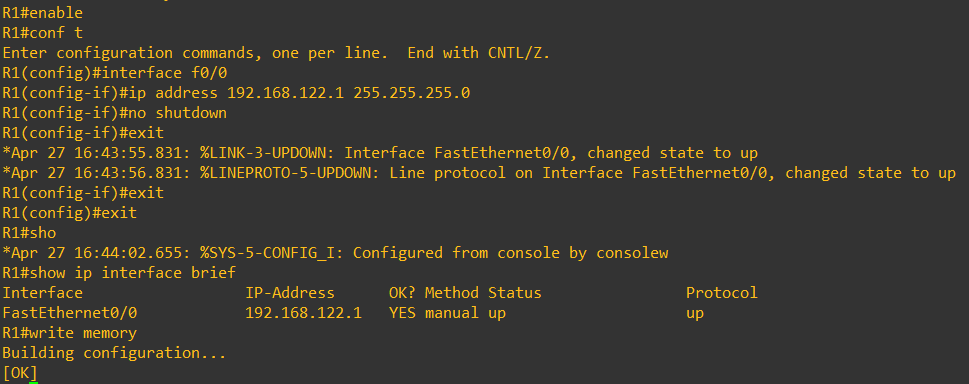
To configure the router, we open its console (right click on the router’s icon in GNS3 GUI) and run the following commands.
                        enable

                        conf t

                        interface [NAME_OF_INTERFACE]

                        ip address 192.168.122.1 255.255.255.0

                        no shutdown

                        exit

                        exit

                        write memory
With enable we achieve administrative privileges for the device, entering EXEC mode. Then we specify the interface for which we want to define some settings. In our example, that’s f0/0. Here we specify the IP address and the subnet mask for the interface. Then we bring the interface up with no shutdown, allowing it to receive and send traffic. Finally, we exit the interface configuration and we exit the EXEC mode. We write the changes so that they can be maintained after reboot using write memory. If you wanna check if the configurations were saved successfully, type show interface brief.
The following figure shows how it's done for our Cisco 7200.
Configuring the VMs
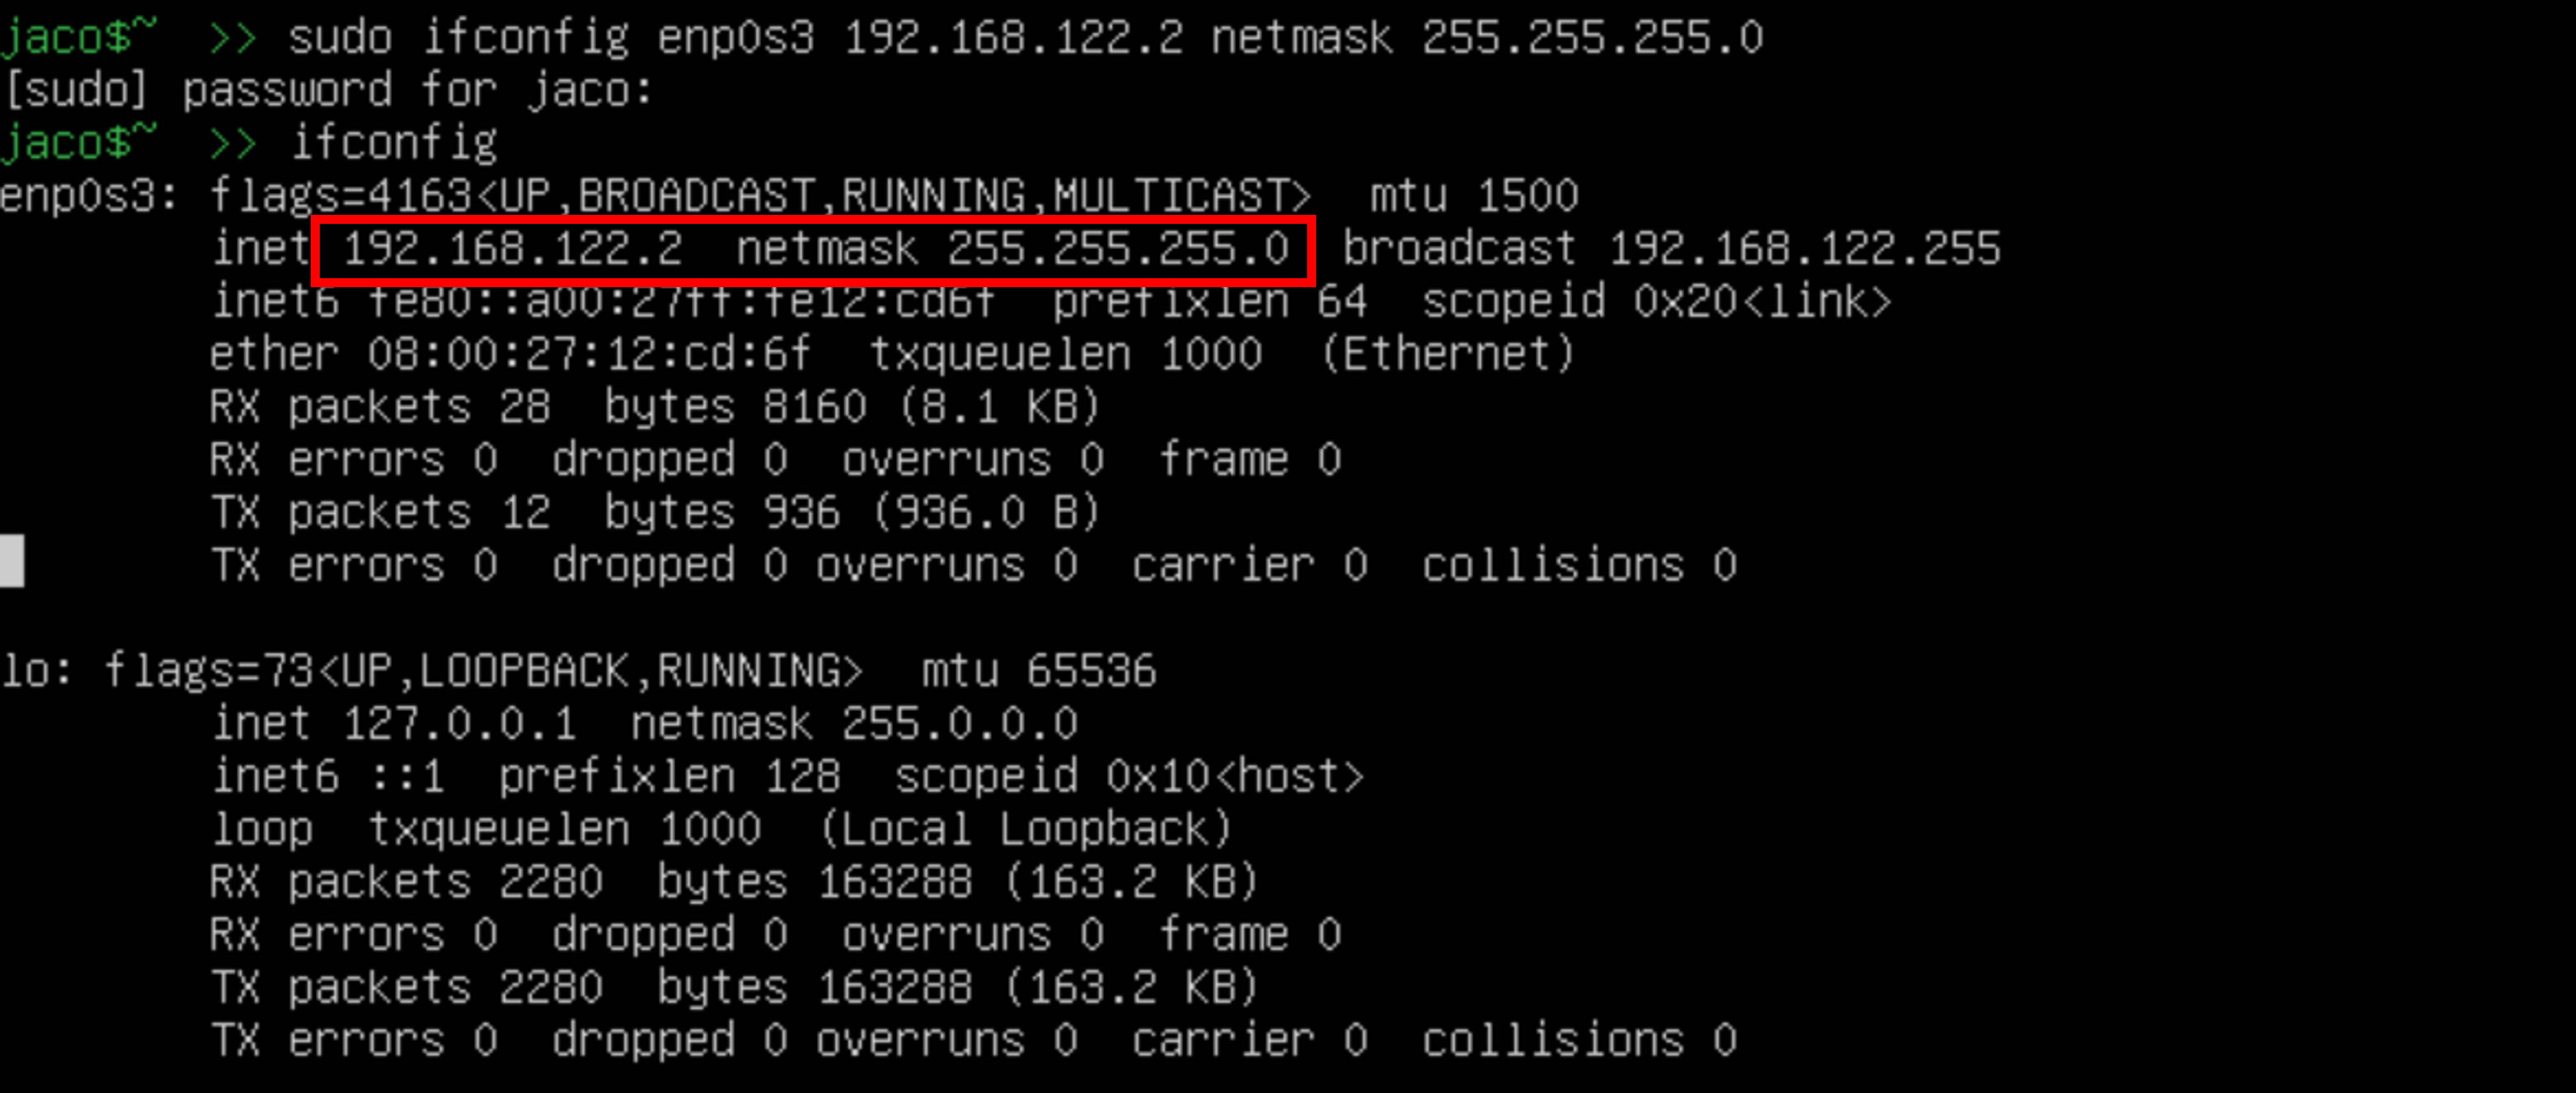
Let's start from booting the Ubuntu Server. Once inside, we need to configure the interface's static IP address by running the following:
sudo ifconfig [INTERFACE_NAME] 192.168.122.2 netmask 255.255.255.0
Use ifconfig command to find the name of the interface and to check whether the changes are in place or not.
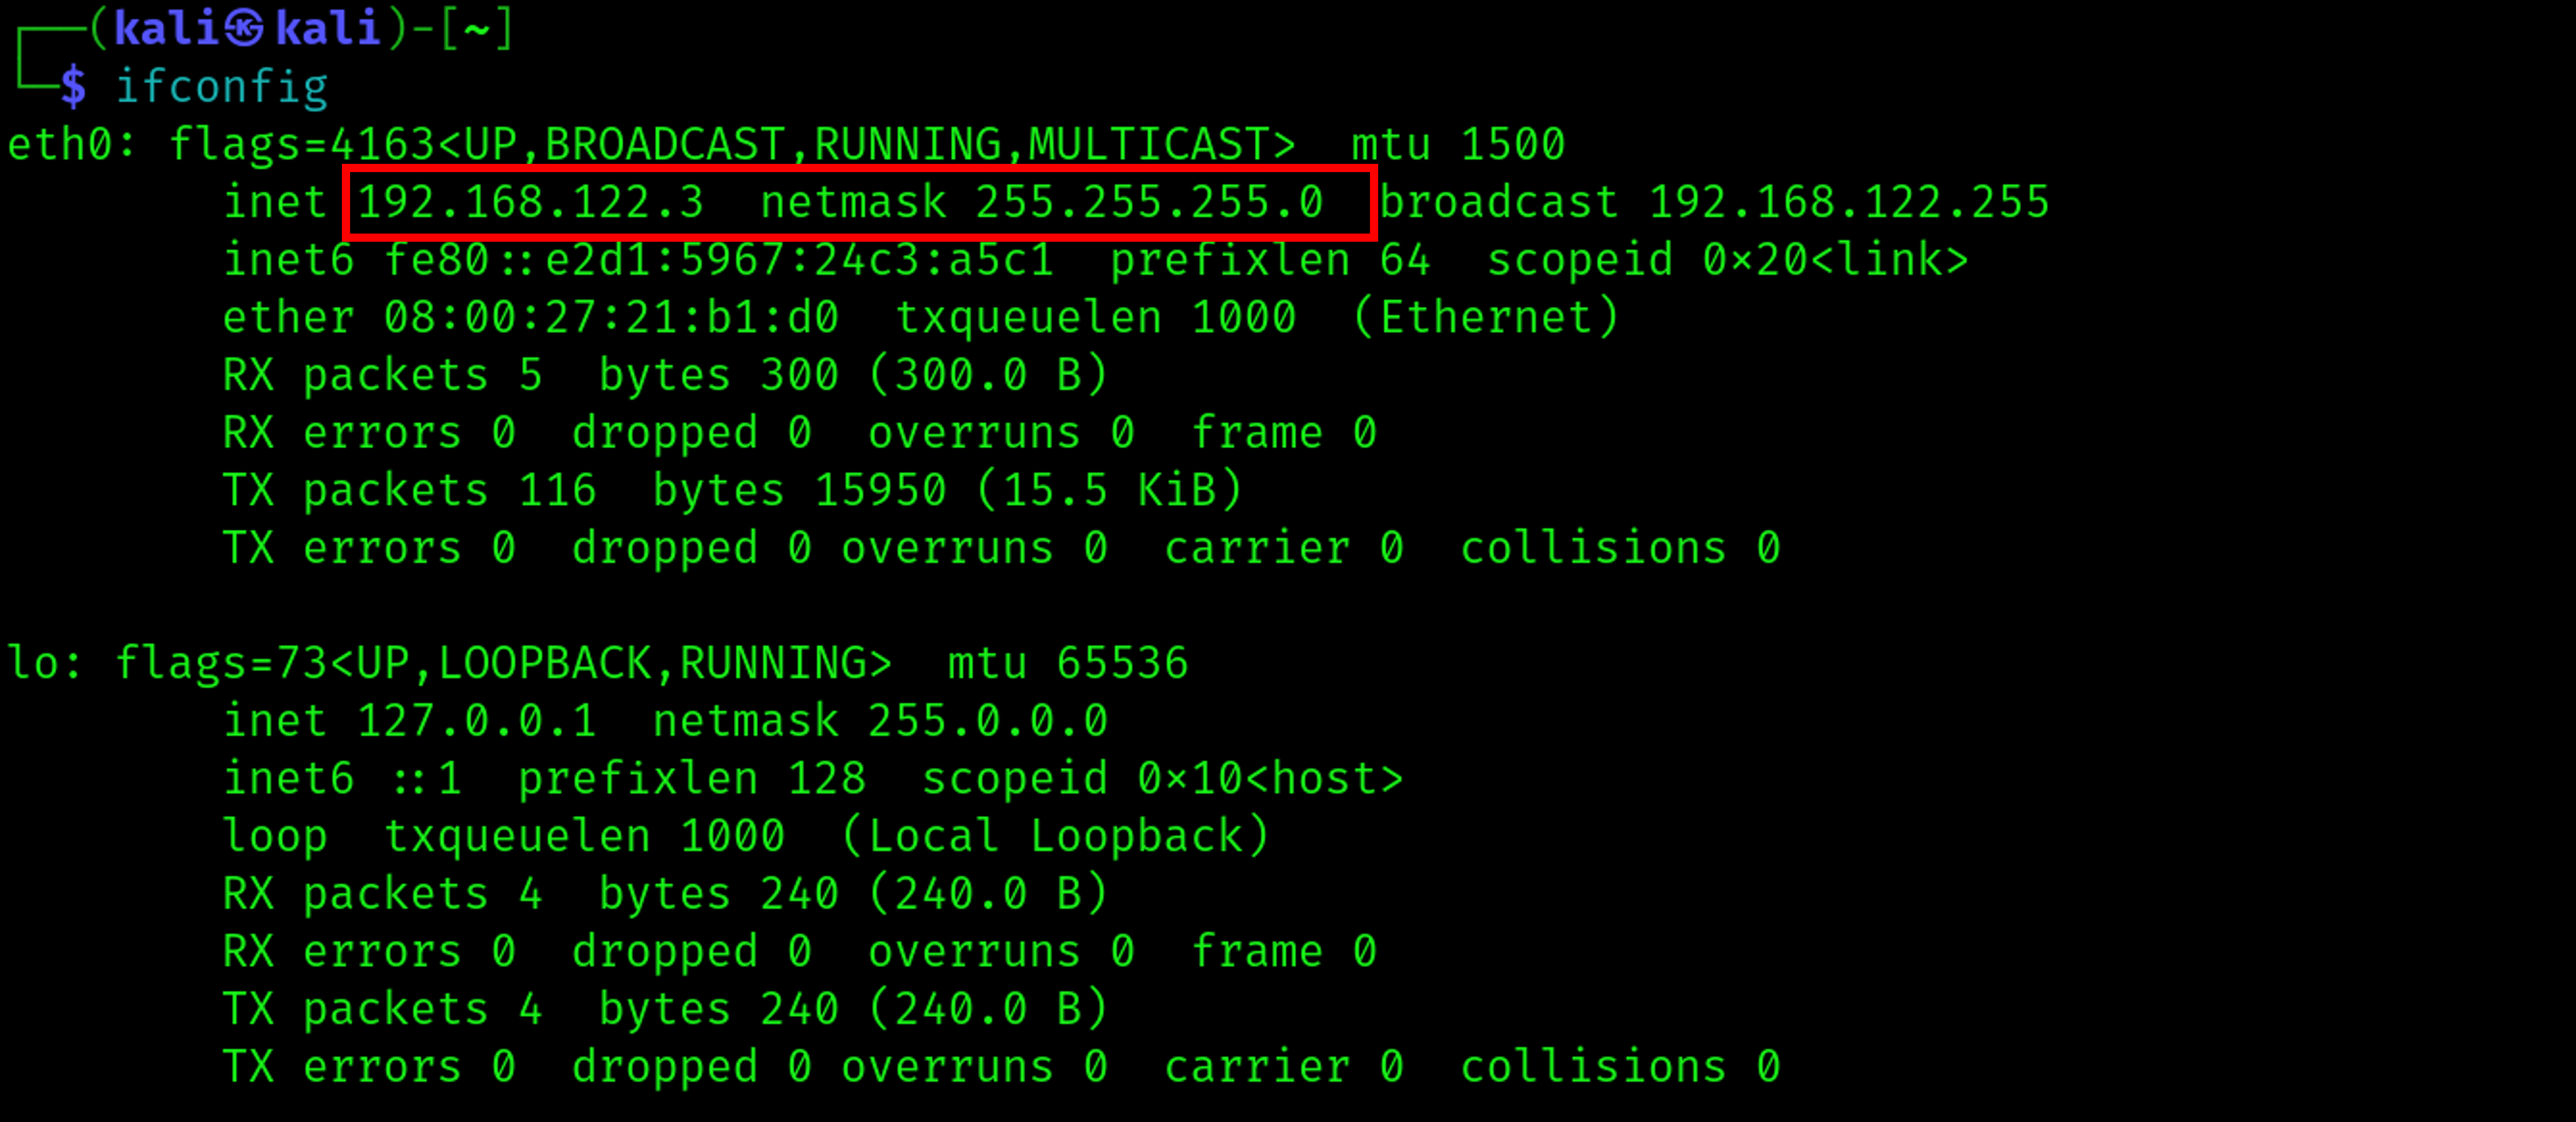
Now we do the exact same thing with Kali Linux. Here I used the GUI. You can go to Advanced Network Configuration, select Wired Connection 1 > IPv4 Settings and add the static address.
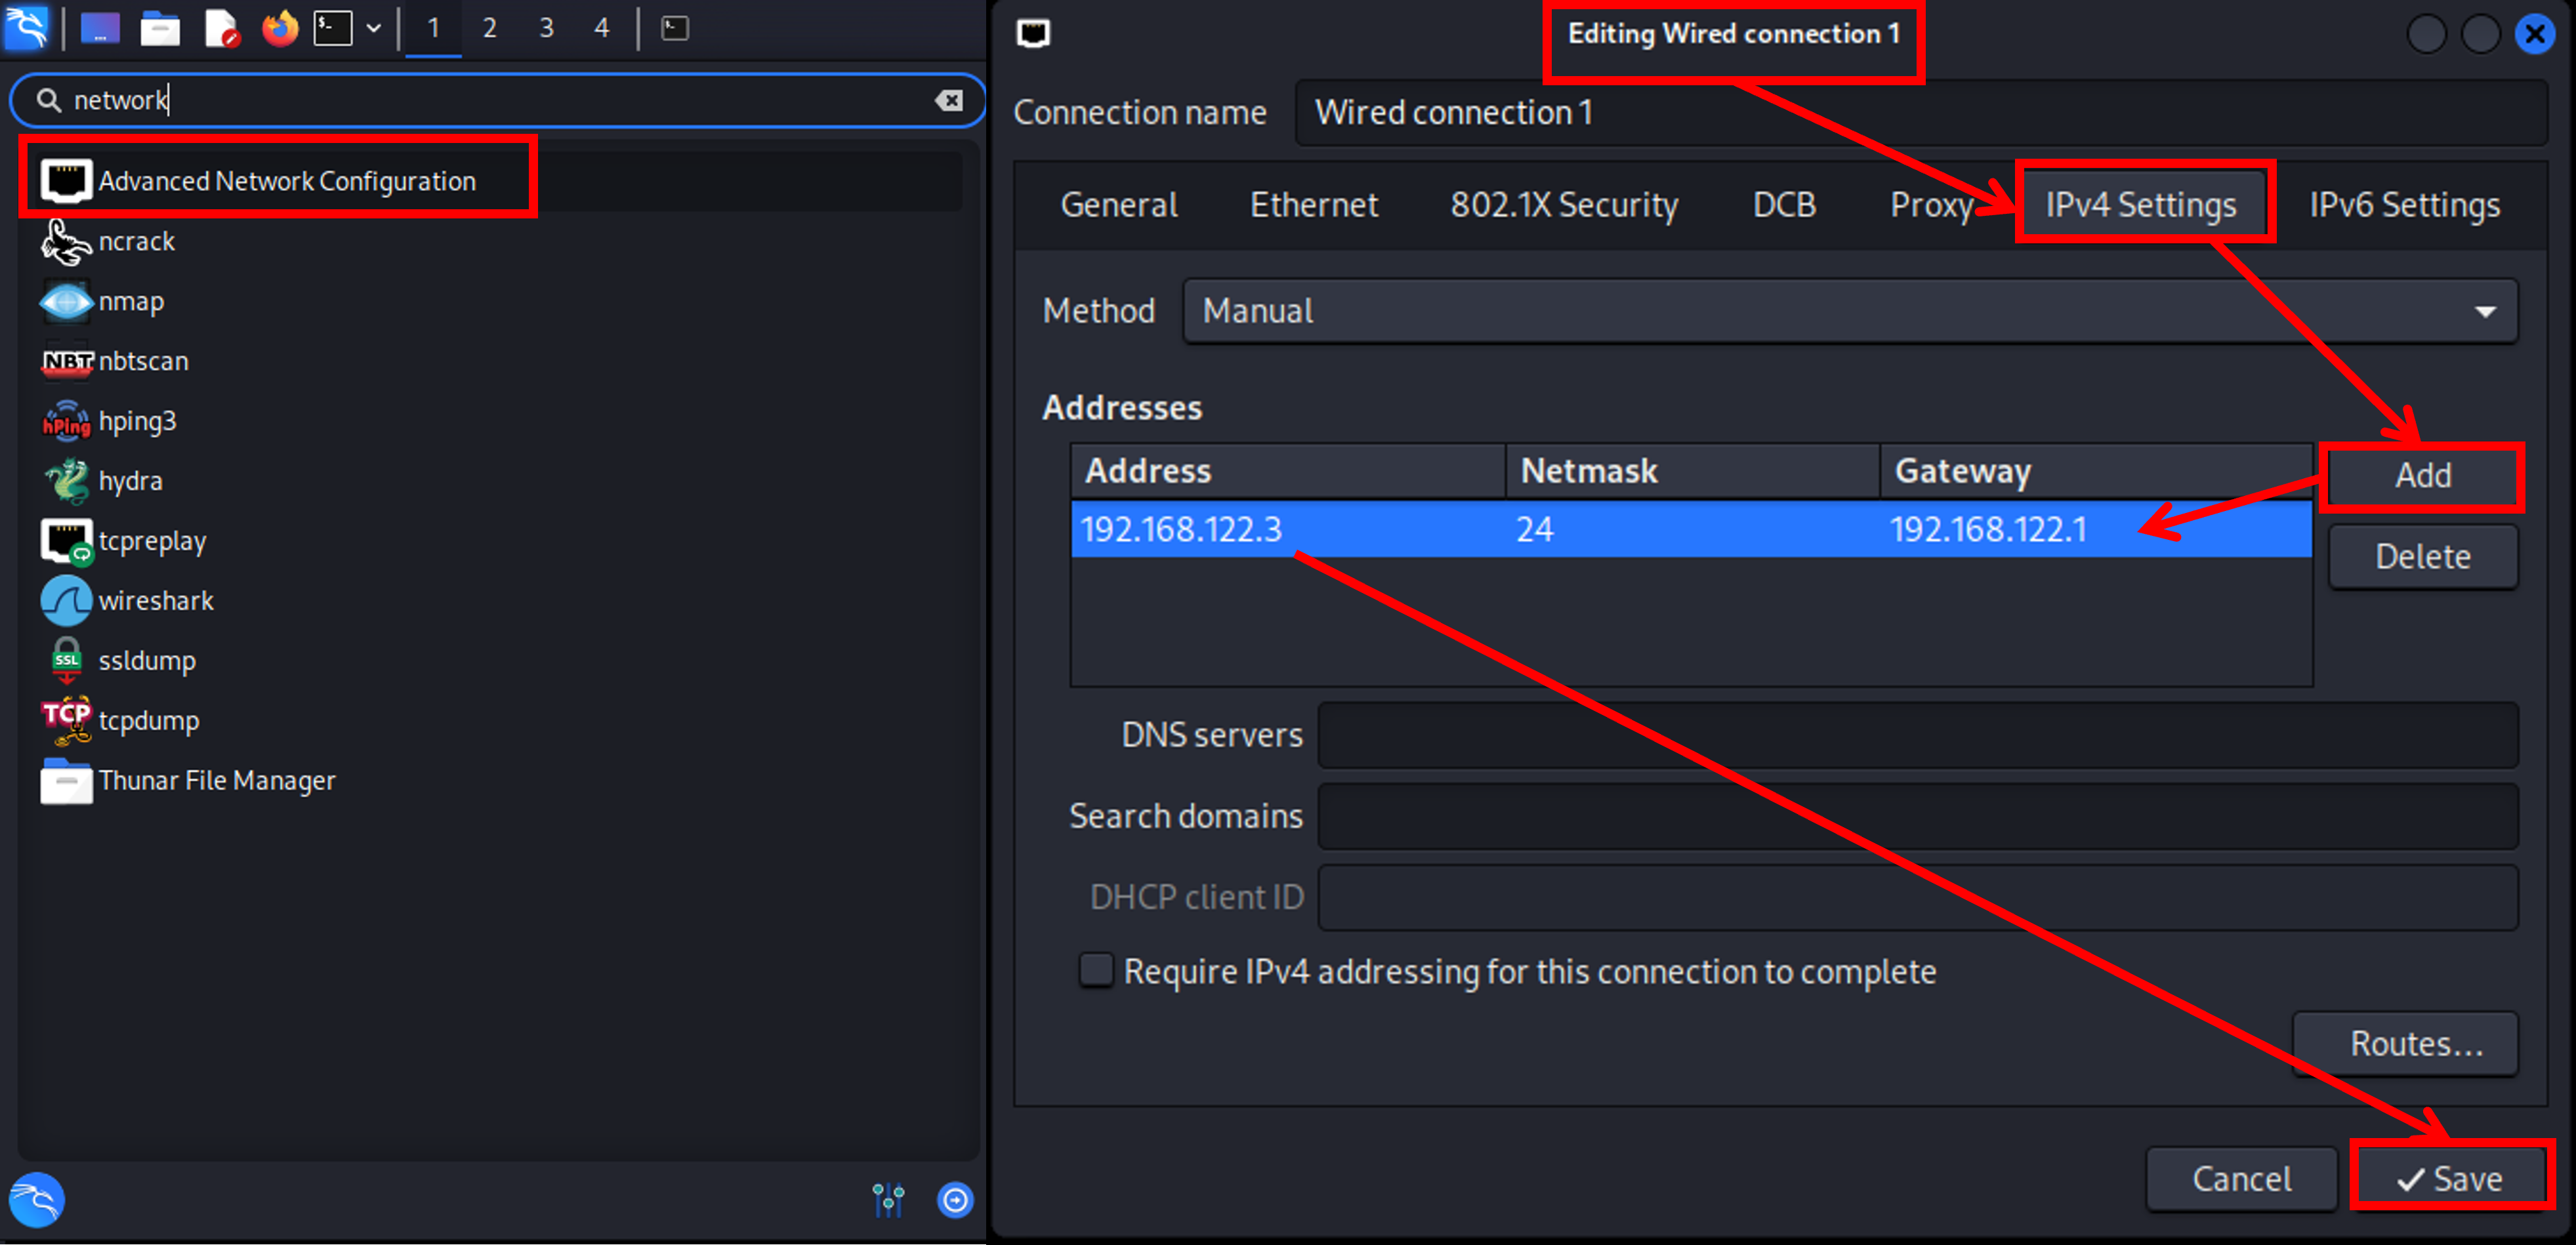
To enforce the changes, you might need to disconnect and reconnect the device. Use the icon on top right of the desktop. Run ifconfig again, to check if everything is working correctly.
Testing connections
We are ready to test the connections in our lab using the ping utility. For example... Let's ping the router and the Kali VM from our Ubuntu Server machine.
Let's ping the Kali VM and Ubuntu Server from our router.


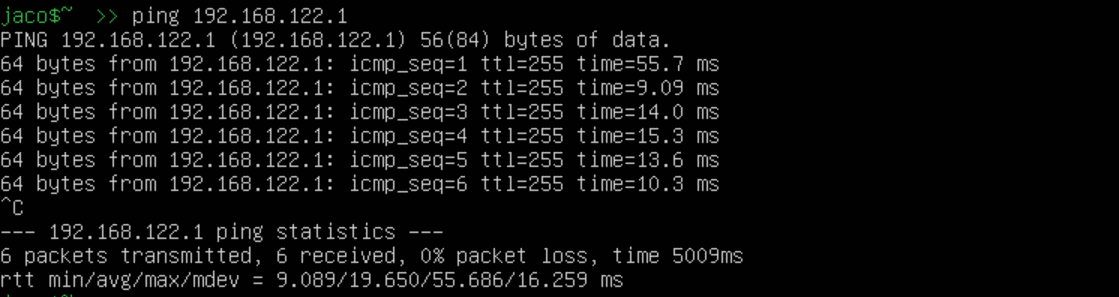
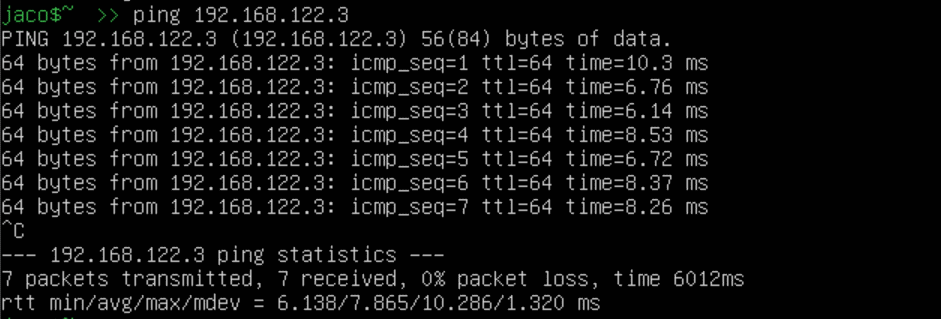
Finally, let's ping from the Kali VM.

Everything seems to work fine in terms of connections.
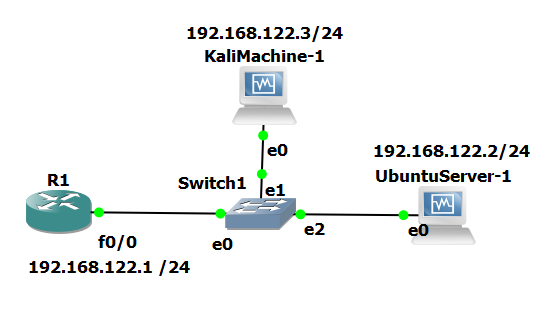
Home lab topology
Capturing traffic
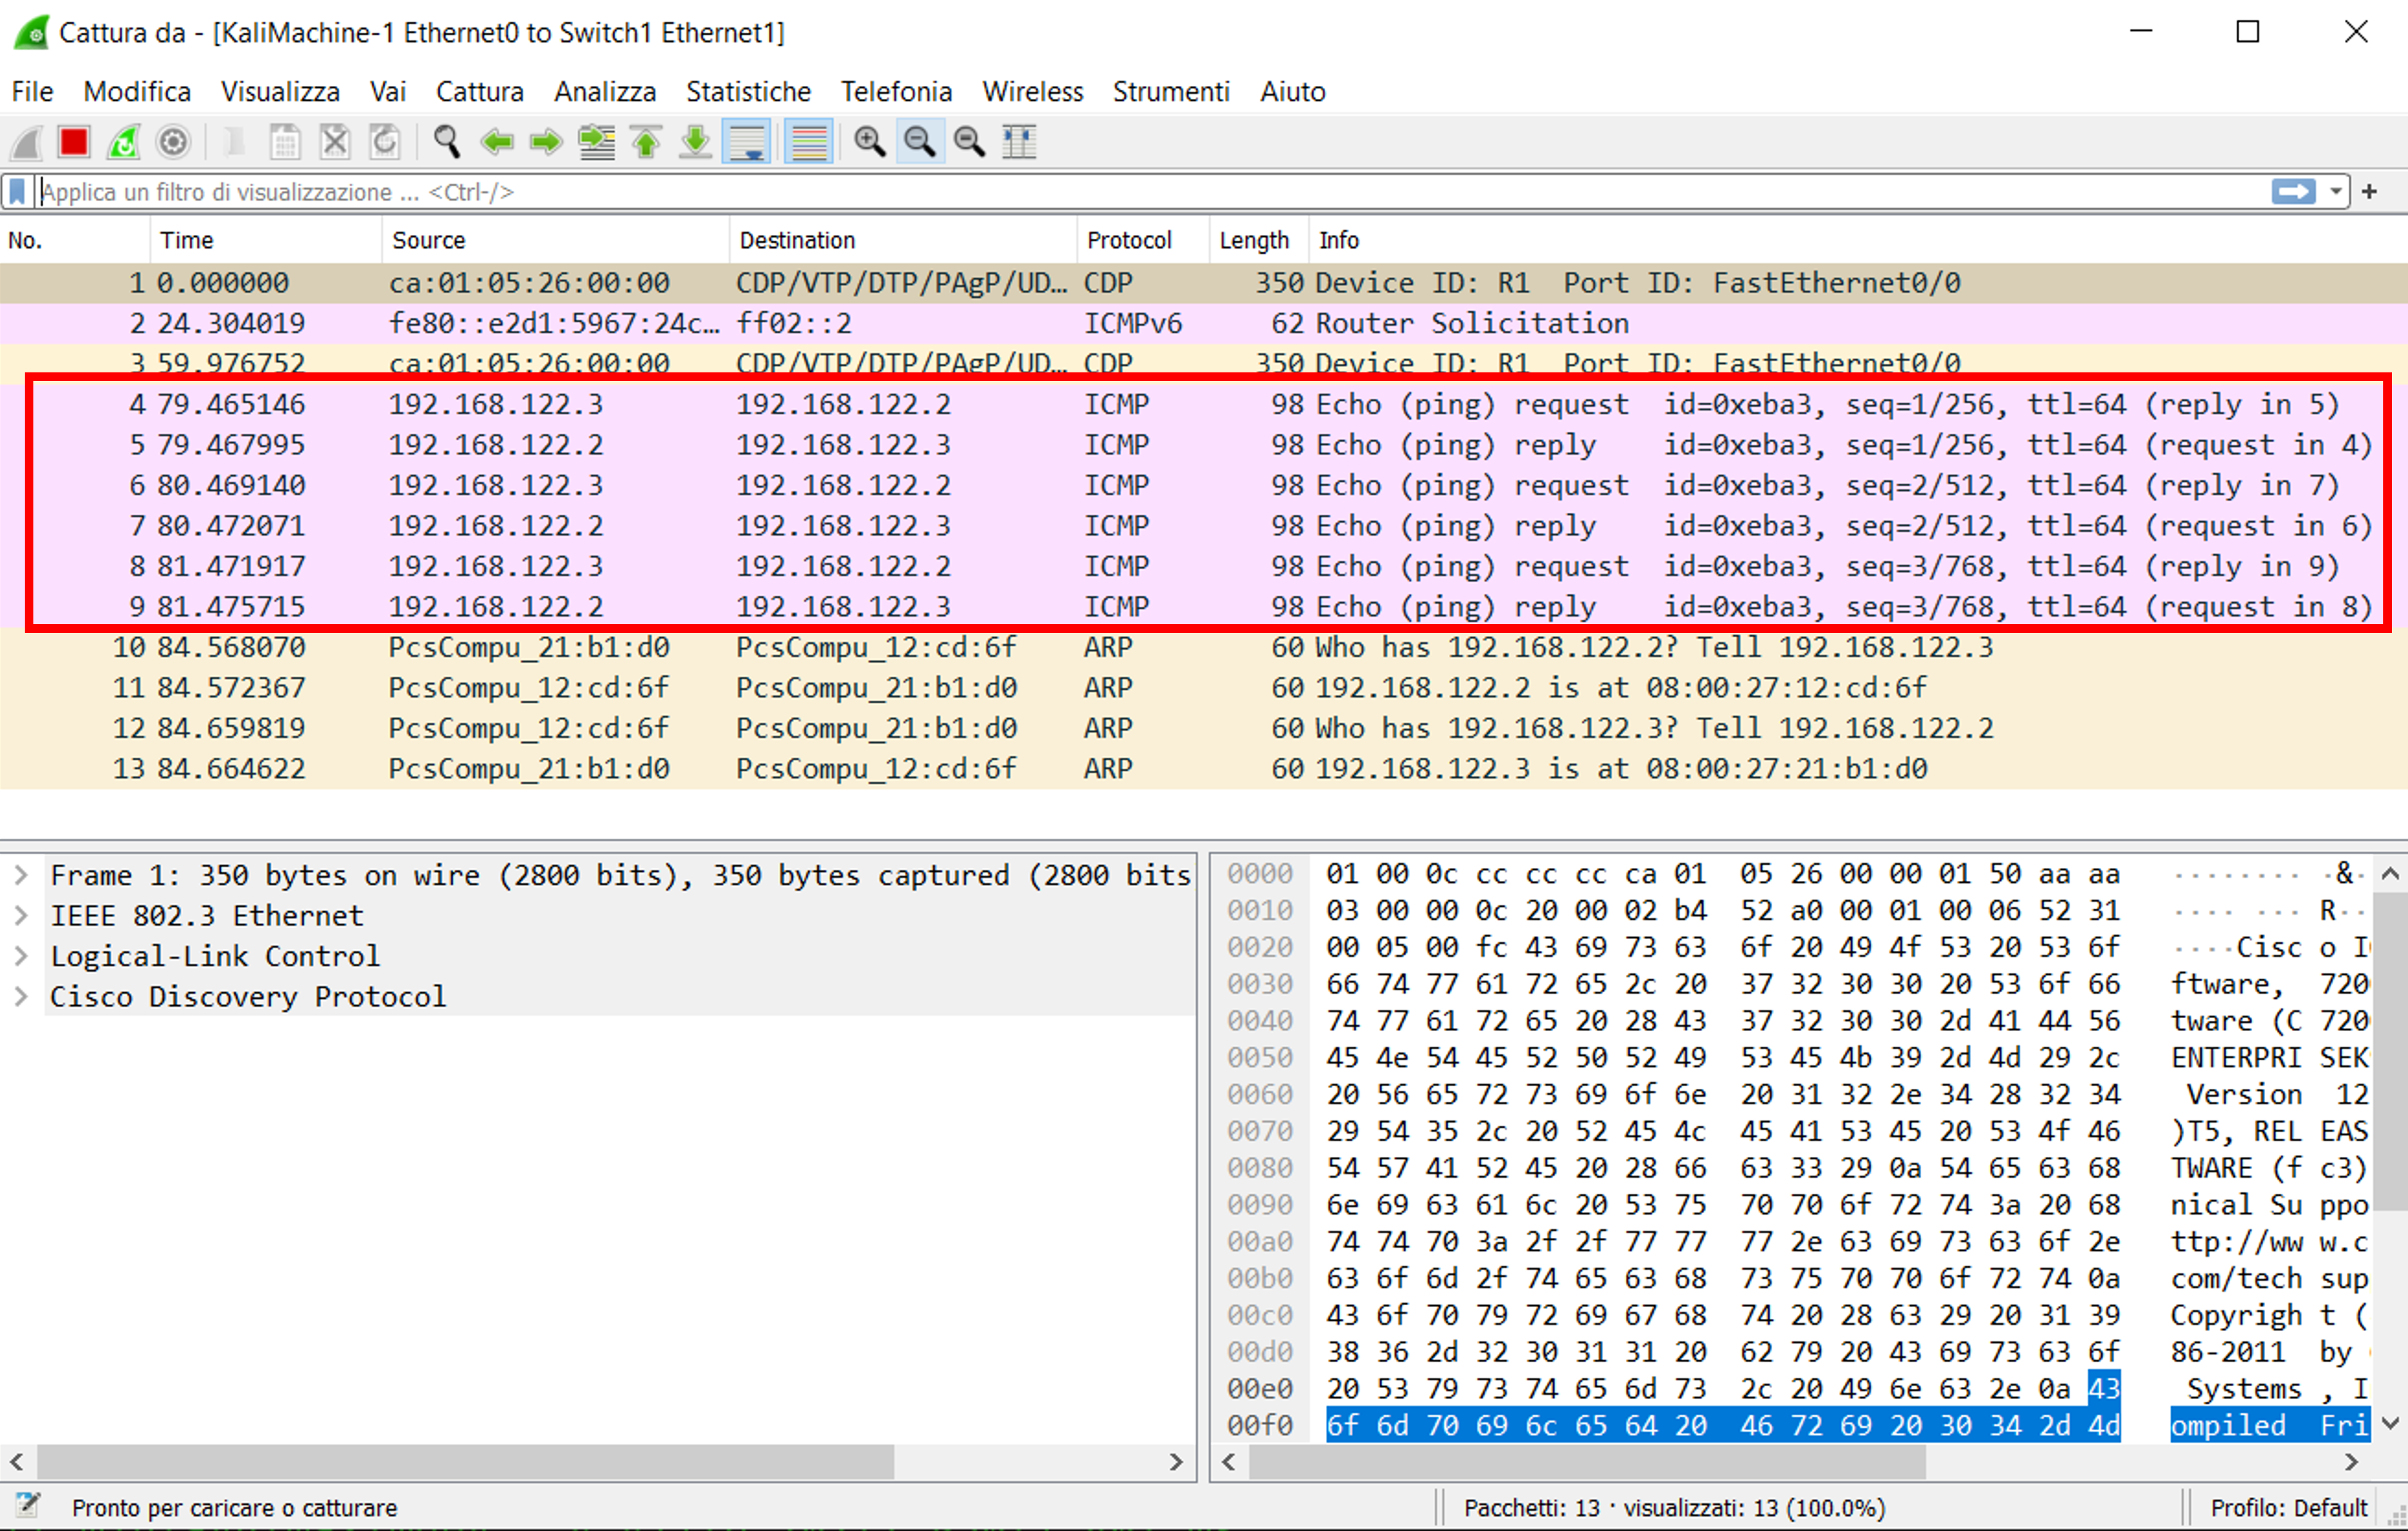
To capture traffic with Wireshark, we can just right click on the link between nodes in the GNS3 GUI and select Start Capture. The figure below shows an example of the captured ICMP echo requests and replies exchanged when pinging the Ubuntu Server from the Kali VM.
Note that this doesn't stop us from running Wireshark also within the Kali VM, along with any other interesting tool we might want to test.
Where's my internet?!
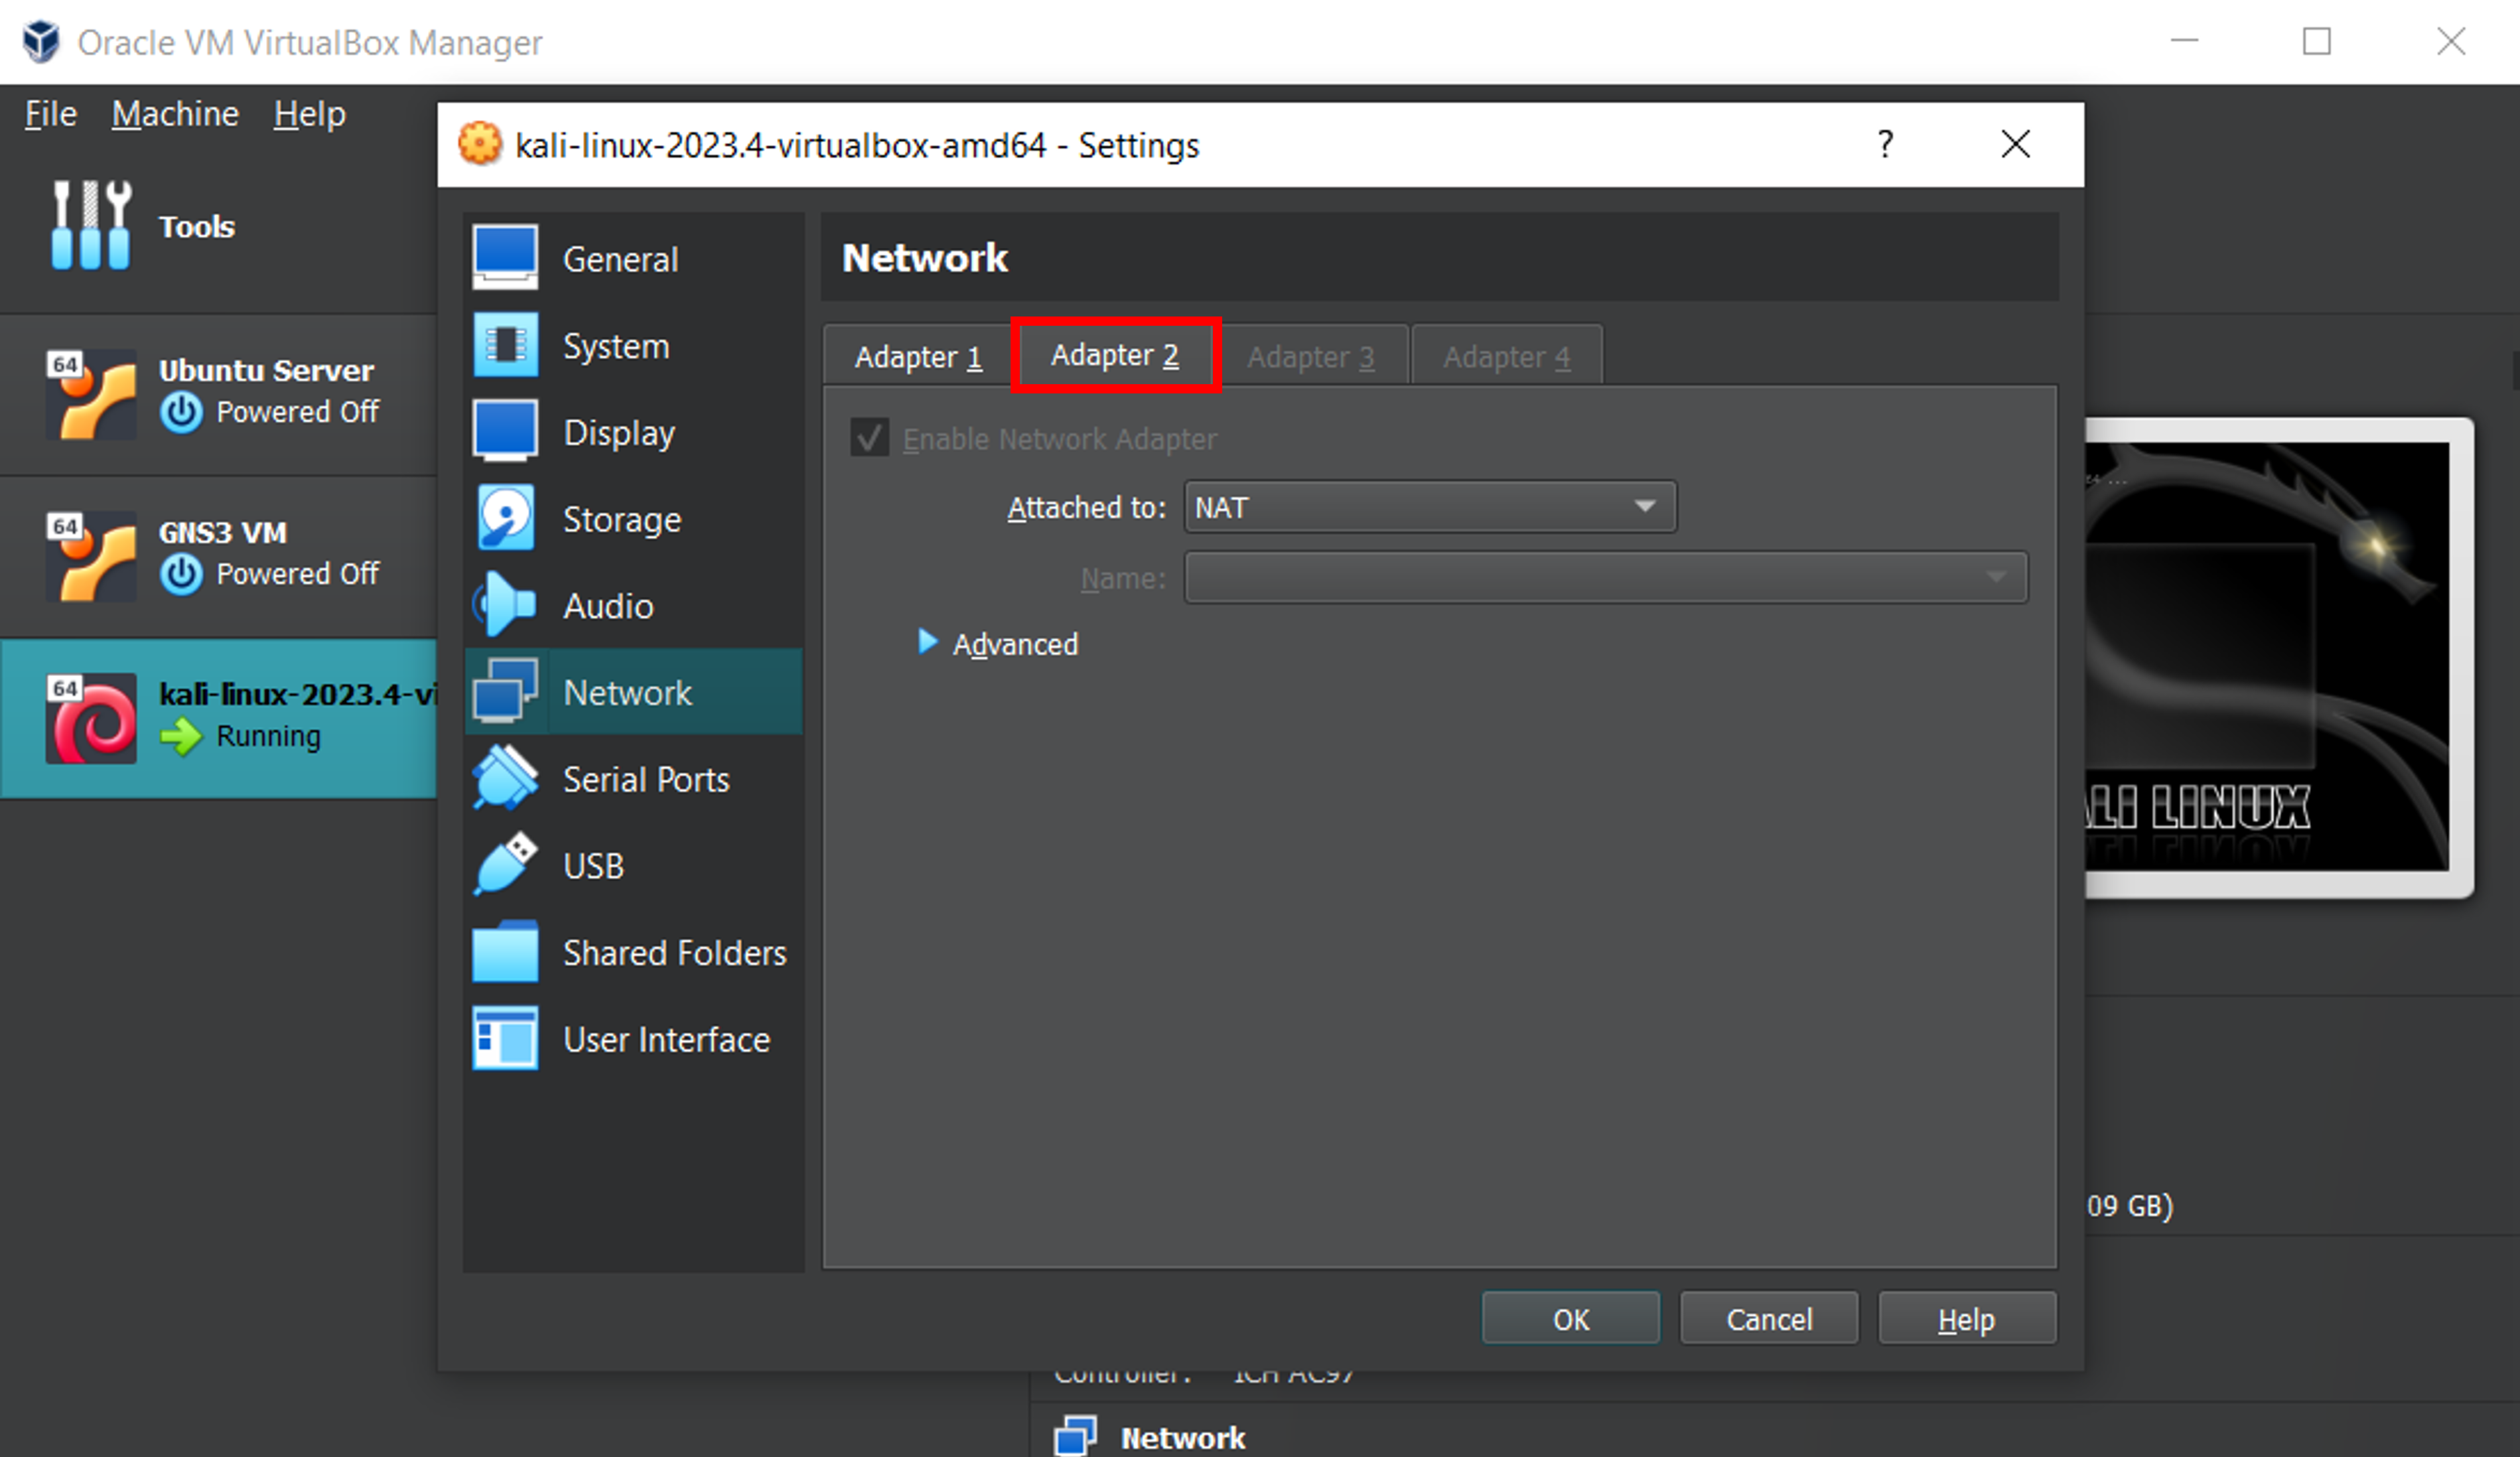
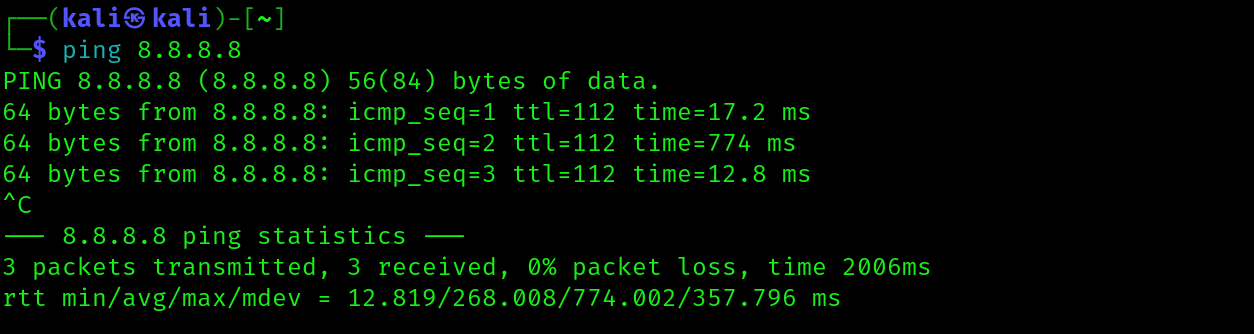
As we pointed out at the beginning of this post, having a lab that is isolated from the internet might be a good choice in terms of security but also brings a disadvantage: you can’t download additional stuff onto your analysis station. This issue can be easily circumvented by temporarily changing the network settings for the VM from which we want to reach the internet, enabling Network Address Translation on the used adapter. An alternative that also appears to work is to enable a second adapter with NAT, like shown below.
That's it. I am tired of writing. Hopefully this will be helpful to someone in the future (me included).
👽 Related links 👽
If you wanna know more about this stuff, these may be useful resources to begin with.
GNS3 Documentation
The official guide and reference for GNS3
GNS3 Community
Useful threads here
Virtual Box Documentation
Some tutorials here